 Office Solutions Pro
Create SharePoint list views with [Me], [Today], filters, and grouping
Build My Requests, Open Requests, Overdue Requests, and Unassigned Requests views, then group by status and sort by due date.
On this page
- Overview
- Before you begin
- 1. Use All Items as a baseline and save My Requests
- 2. Filter My Requests with [Me]
- 3. Create Open Requests
- 4. Create Overdue Requests using [Today] and AND
- 5. Find Unassigned Requests with an empty value
- 6. Group Open Requests by Status
- 7. Sort My Requests by Need By Date
- Reuse the patterns carefully
A useful list view helps you focus on the work you need to see. This tutorial starts from All Items in an existing list called Office Support Request and creates four reusable views. You will then group the open items by Status and sort My Requests by Need By Date.
Views organize the same list; this procedure does not create four new lists or duplicate the underlying requests. The sample’s formatting and Days Until Need By automation already exist and are not rebuilt here.
Before you begin
Use a SharePoint Online list with these fields or their equivalents:
- Created By, the built-in person field.
- Status, with a choice named Completed in this example.
- Need By Date, a date field.
- Assigned To, a single-value person field.
You need access to the list and permission to create and edit the chosen views. All four examples are saved as public views, making their definitions available to list users. To save public views you need the Manage Lists permission, which the default Members group has through the Edit level. Contribute can create personal views only, and Read can’t create views. You can’t change a personal view to public or a public view to personal later, so decide before you save. Microsoft: permission levels.
Menu placement varies as the interface changes. If view commands are missing, clear any selected items and ask the list owner to check access. Microsoft: create and change views.
1. Use All Items as a baseline and save My Requests
Open All Items. Set up the columns and their order before making copies, so you have less work to repeat. Keep this baseline unfiltered. This example doesn’t change its column layout.
Open the dropdown beside the current view name and select Save view as…. Enter My Requests, leave Make this a public view selected, and select Save.
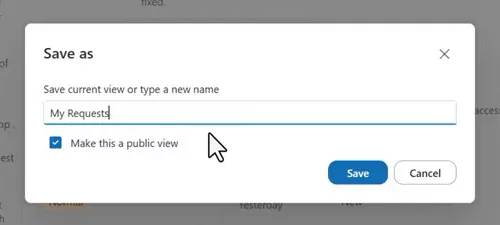
Save the view definition with a new name.
A public view can still show different results for each user when it contains a dynamic [Me] filter. Clearing the public checkbox makes the new view personal instead; this example keeps it selected.
Now open My Requests and select Edit current view from its dropdown. This opens the classic-style view editor used for the filter examples below.
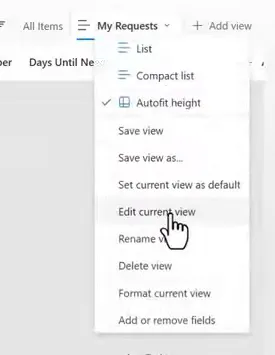
Open the editor for the intended view.
2. Filter My Requests with [Me]
Scroll to Filter and select Show items only when the following is true:. Set the first condition as follows:
| Column | Operator | Value |
|---|---|---|
| Created By | is equal to | [Me] |
Leave the second column as None. Type the square brackets; do not enter the word “me” as a person’s name.
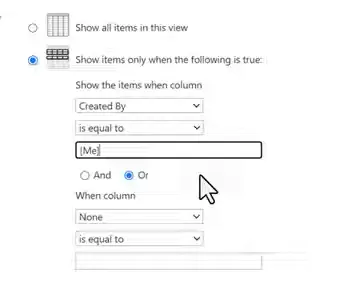
The stored value is [Me], evaluated for the viewer.
Select OK at the top or bottom of the editor to save. If the old results remain visible, refresh the page.
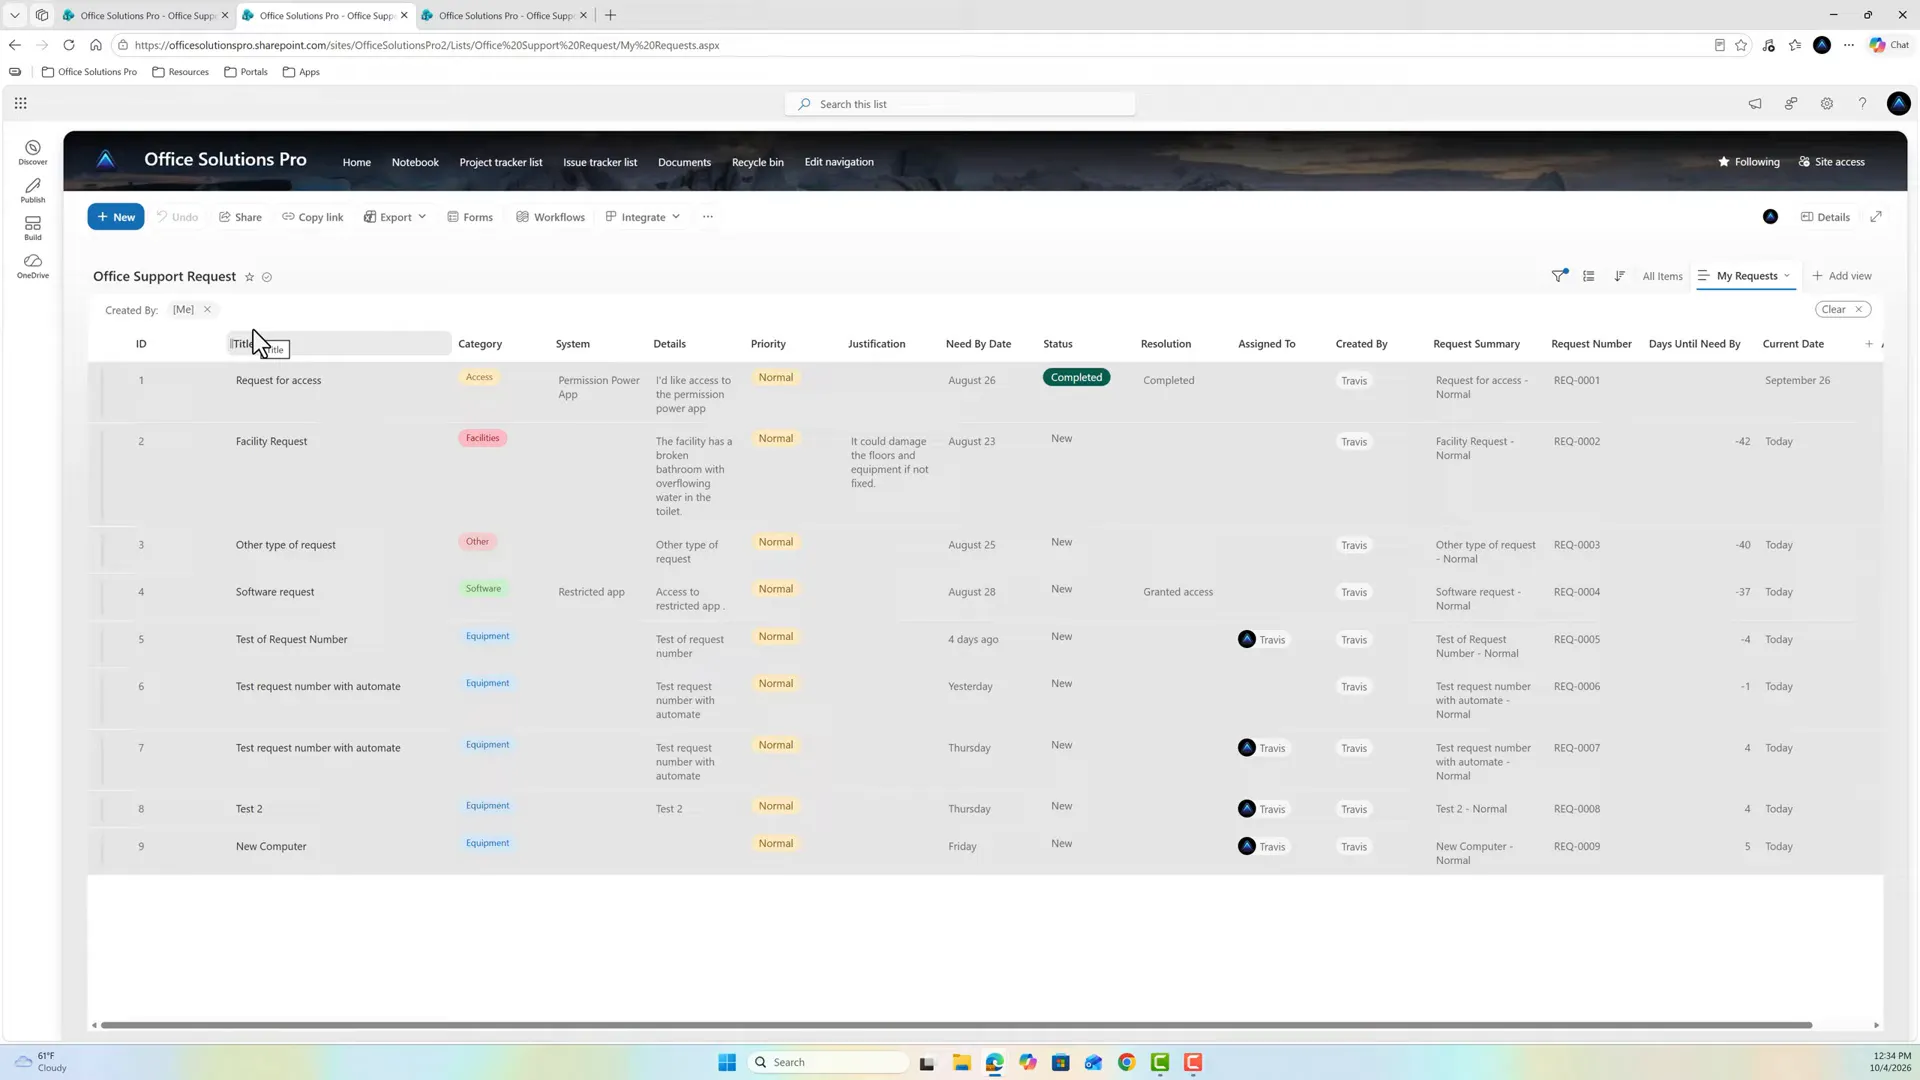
All sample items remain because this account created all of them.
Every sample item has the same creator, so check the view with a second account if you need to confirm what other people see. This definition is created by me, which differs from assigned to me. For other definitions, use an appropriate person column such as Assigned To or Requester.
[Me] is dynamic and applies to person-based fields; [Today] applies to dates. Use the classic view editor for these keyword filters rather than typing them into column-header filters. Microsoft: filter on dynamic dates or the current user.
A view filter does not restrict permissions
A [Me] filter only changes what the view displays. It isn’t item security. A user with permission to see other items may be able to see them through another view or by removing a display filter. A public My Requests view is a convenience, not a rule that users can only access their own requests. If people must not see each other’s requests, restrict access with list or item permissions and test it with a second account.
Microsoft’s permissions model controls access at site, list, and item scopes; existing access controls continue to apply when views change. Microsoft: permission levels, Microsoft: views and existing access controls.
3. Create Open Requests
Switch back to All Items, then use Save view as… to create Open Requests, keeping it public. Using All Items prevents the [Me] condition from being inherited.
Open Edit current view, select the filtered-items option, and set:
| Column | Operator | Value |
|---|---|---|
| Status | is not equal to | Completed |
Leave the second column as None, then select OK and refresh if needed.
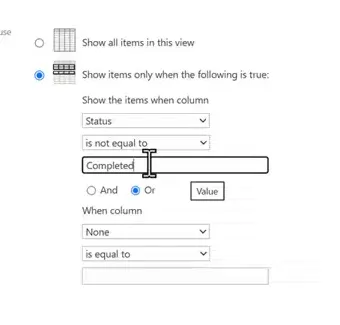
Use the exact status choice from your list.
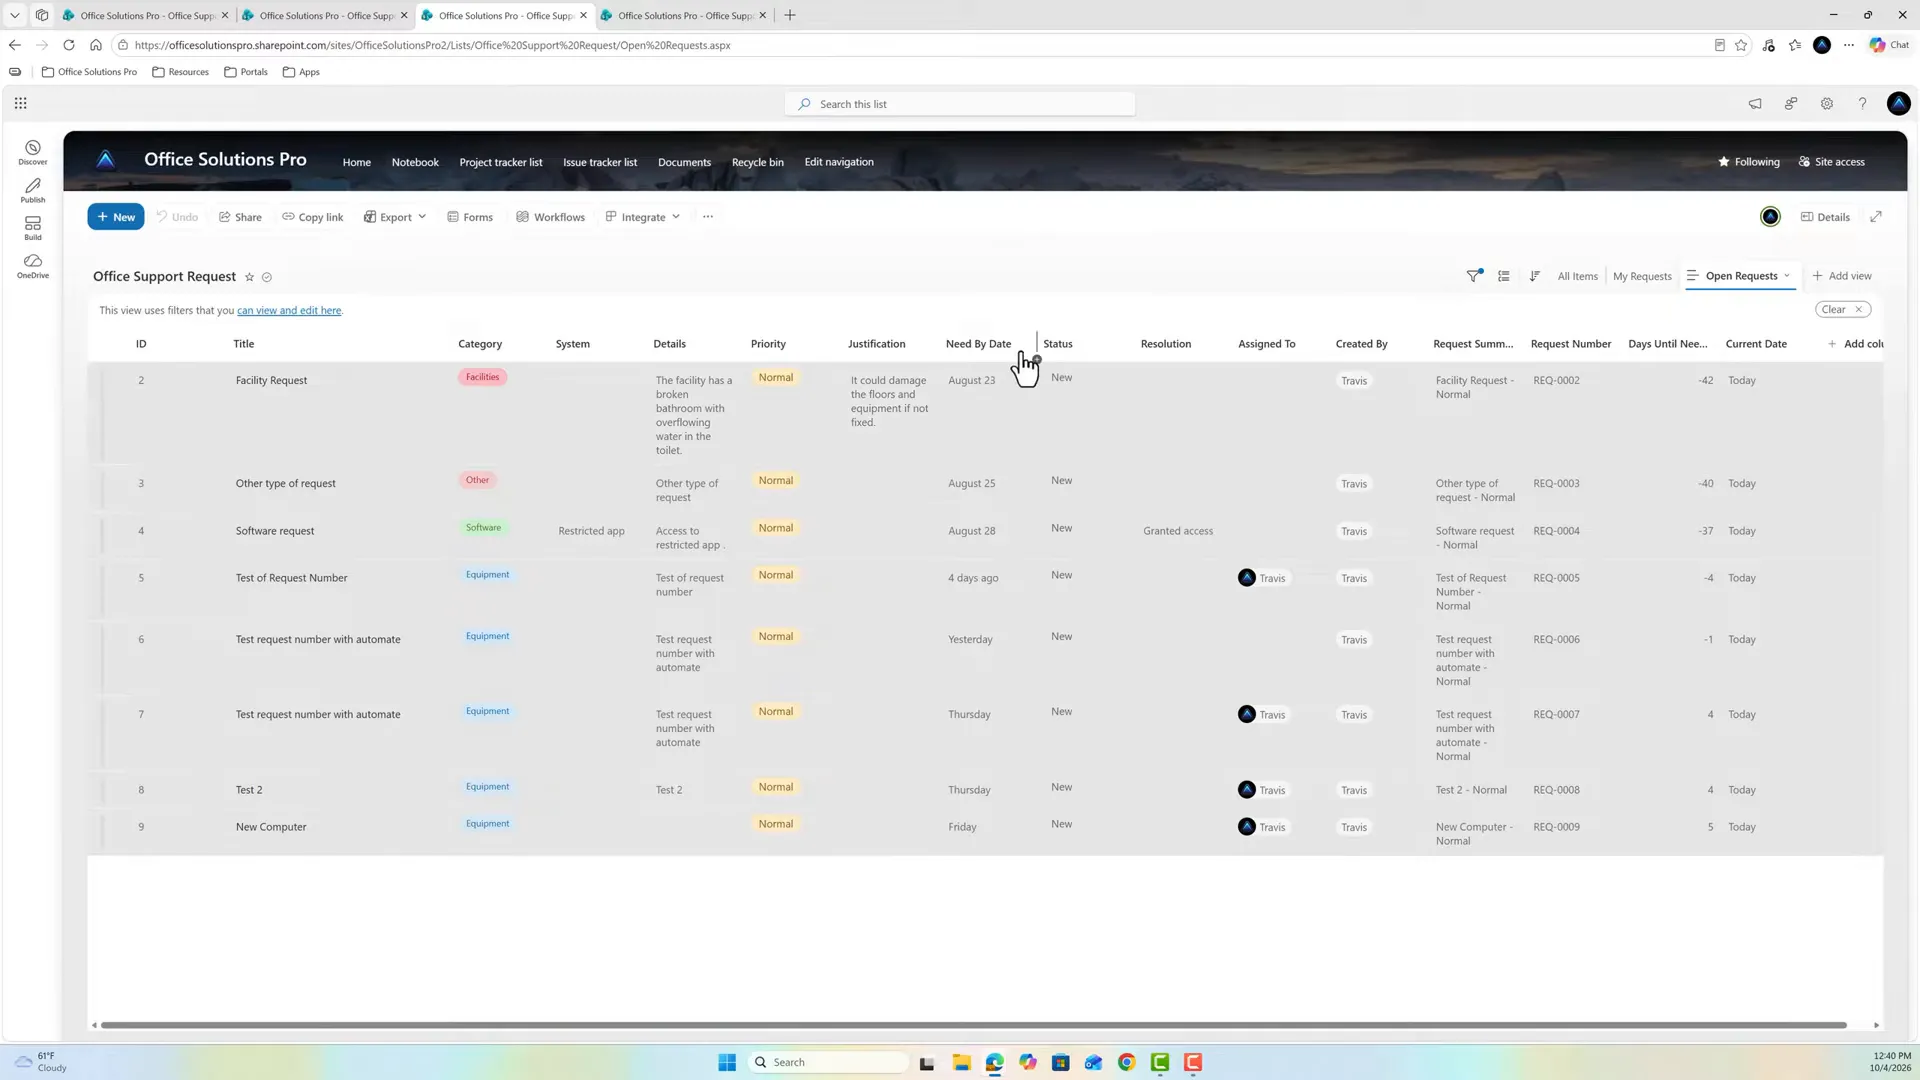
The completed request has disappeared; eight sample items remain.
Here, “open” means an item whose status is not Completed. If Status can be empty in your list, find out how these views handle that once you’ve built them in steps 4 and 5: add a test item with no Status, no Assigned To, and a past Need By Date, check whether it appears in Open Requests, Overdue Requests, and Unassigned Requests, then delete the test item. If your business process has additional closed states, adapt that definition deliberately rather than assuming this one condition identifies every closed item.
4. Create Overdue Requests using [Today] and AND
Start from Open Requests so the existing status filter is carried forward. Save it as Overdue Requests, keeping it public, then select Edit current view.
Keep the first condition, select And, and add the second. The editor can show Or selected, so check this before you save:
| Position | Column | Operator | Value |
|---|---|---|---|
| First | Status | is not equal to | Completed |
| And | Need By Date | is less than | [Today] |
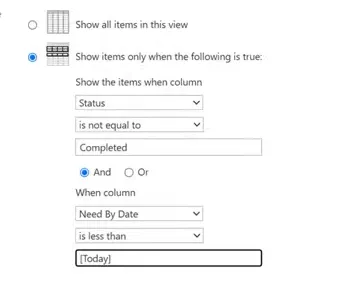
Both conditions must be true.
Select OK and refresh if needed. The sample now shows five open items with earlier need-by dates, including dates displayed as Yesterday or 4 days ago.
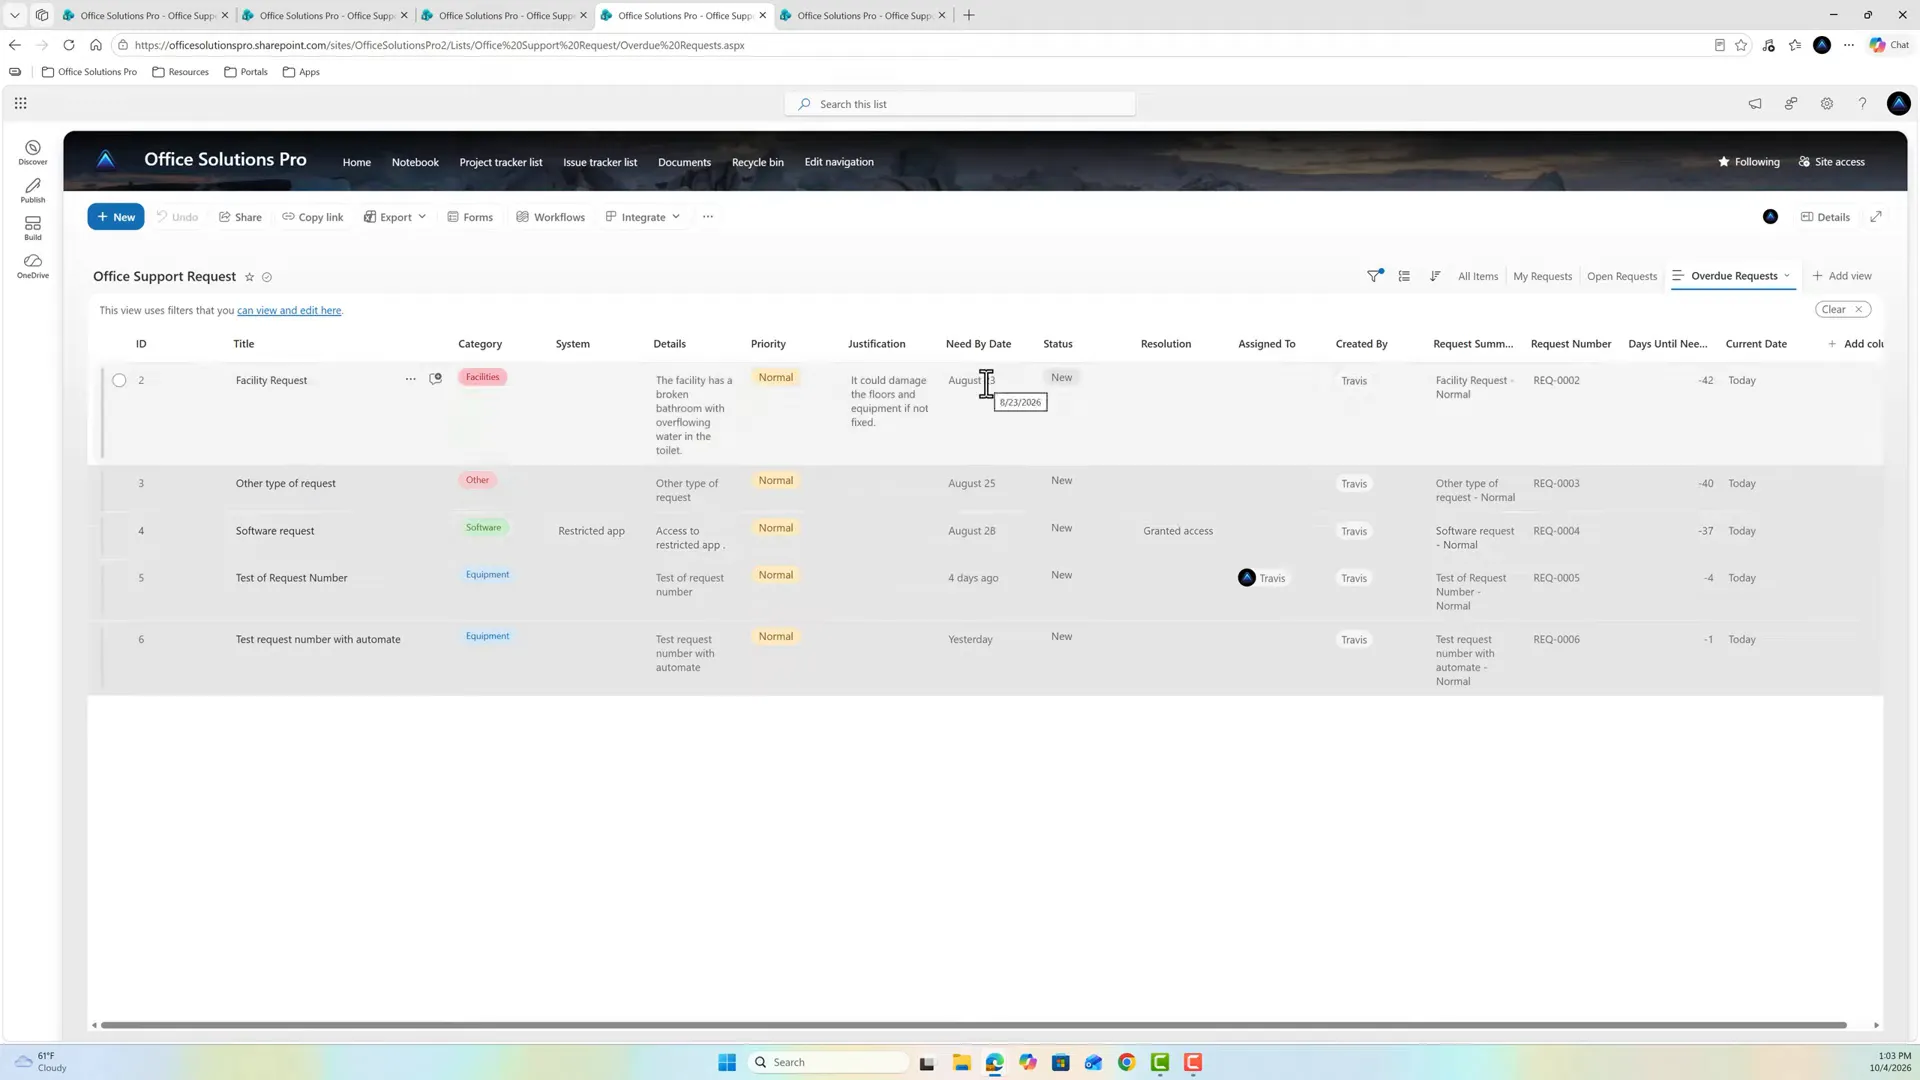
Future-dated requests and the completed item are excluded.
For this calendar-date definition, items due today are not overdue: less than excludes today. An item with no Need By Date has no date to compare, so don’t rely on this view to catch it. Step 5 covers looking for empty values. Use the actual Need By Date field for this filter; the custom Days Until Need By column is only supporting context and is not required to build the view. Validate time-zone and time-of-day behavior separately if your field stores times.
Why And matters: And requires both an open status and an earlier date. Or would also admit open future-dated items, or completed items with earlier dates. It would answer a different question.
5. Find Unassigned Requests with an empty value
Return to Open Requests, not Overdue Requests. Save a public copy as Unassigned Requests, then select Edit current view.
Use these two conditions and select And between them:
| Position | Column | Operator | Value |
|---|---|---|---|
| First | Status | is not equal to | Completed |
| And | Assigned To | is equal to | Leave the input completely empty |
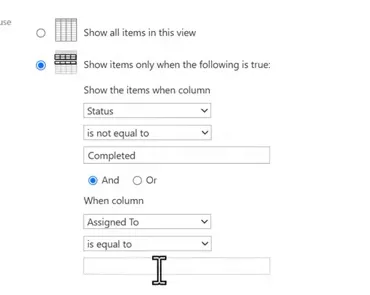
Do not type “blank,” quotes, a space, or [Me] into the last box.
Select OK and refresh if needed. In the sample result, IDs 2, 3, 4, and 6 remain and their Assigned To cells are empty.
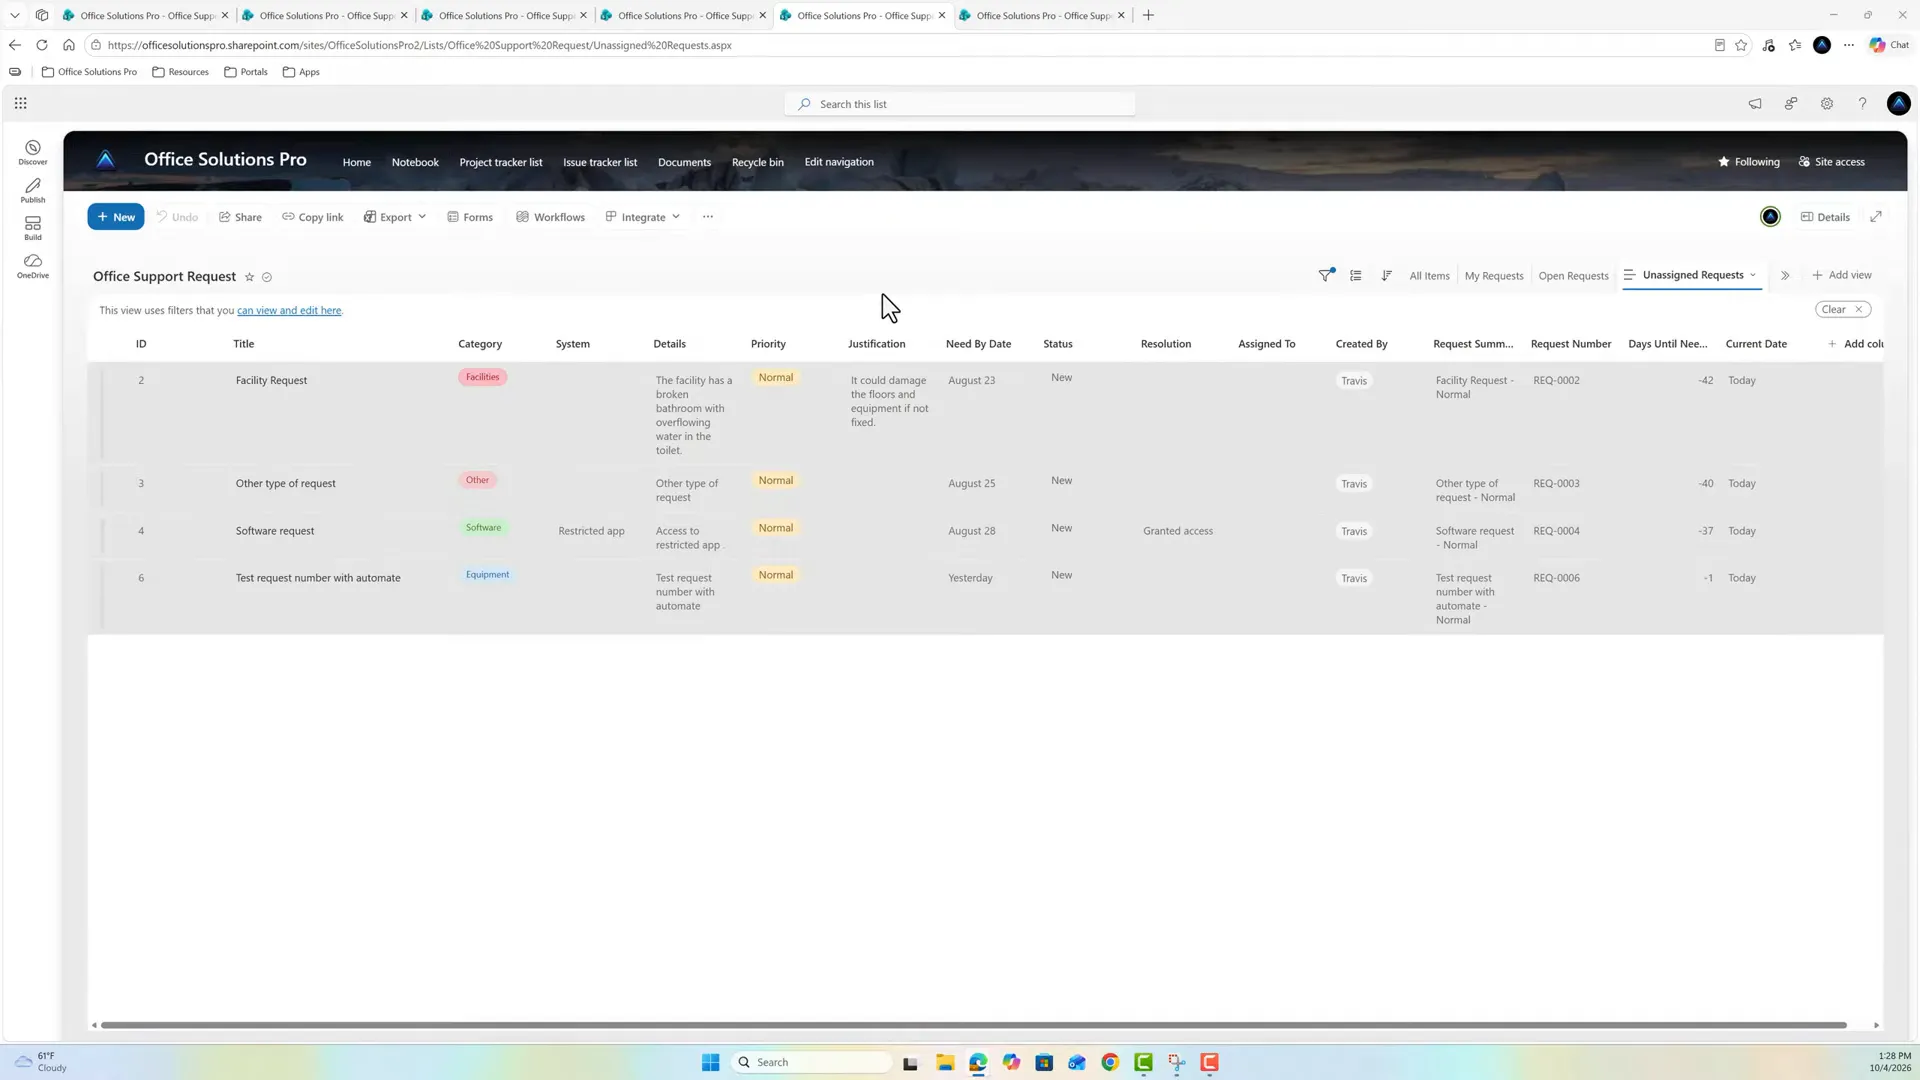
The view shows only open requests with an empty Assigned To value.
Multi-value person columns are unsupported for indexing and filtering, so this pattern calls for a single-value person field. Microsoft: supported and unsupported columns. You could try the same idea to find missing due dates or categories. Check sample items when adapting the pattern to another column type.
6. Group Open Requests by Status
Select Open Requests and open Edit current view. Keep its status filter. Expand Group By and set:
- First group by the column: Status.
- Show groups in ascending order.
- Then group by the column: None.
- By default, show groupings: Collapsed in this example.
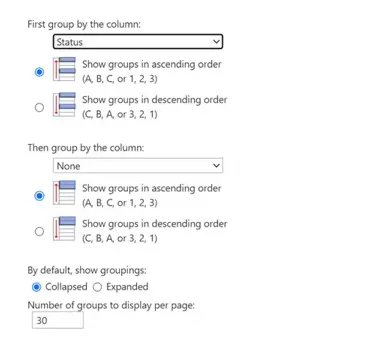
Grouping is saved on Open Requests.
Select OK, refresh if needed, and expand the group headers to inspect the items. The sample shows In Progress, New, and Waiting.
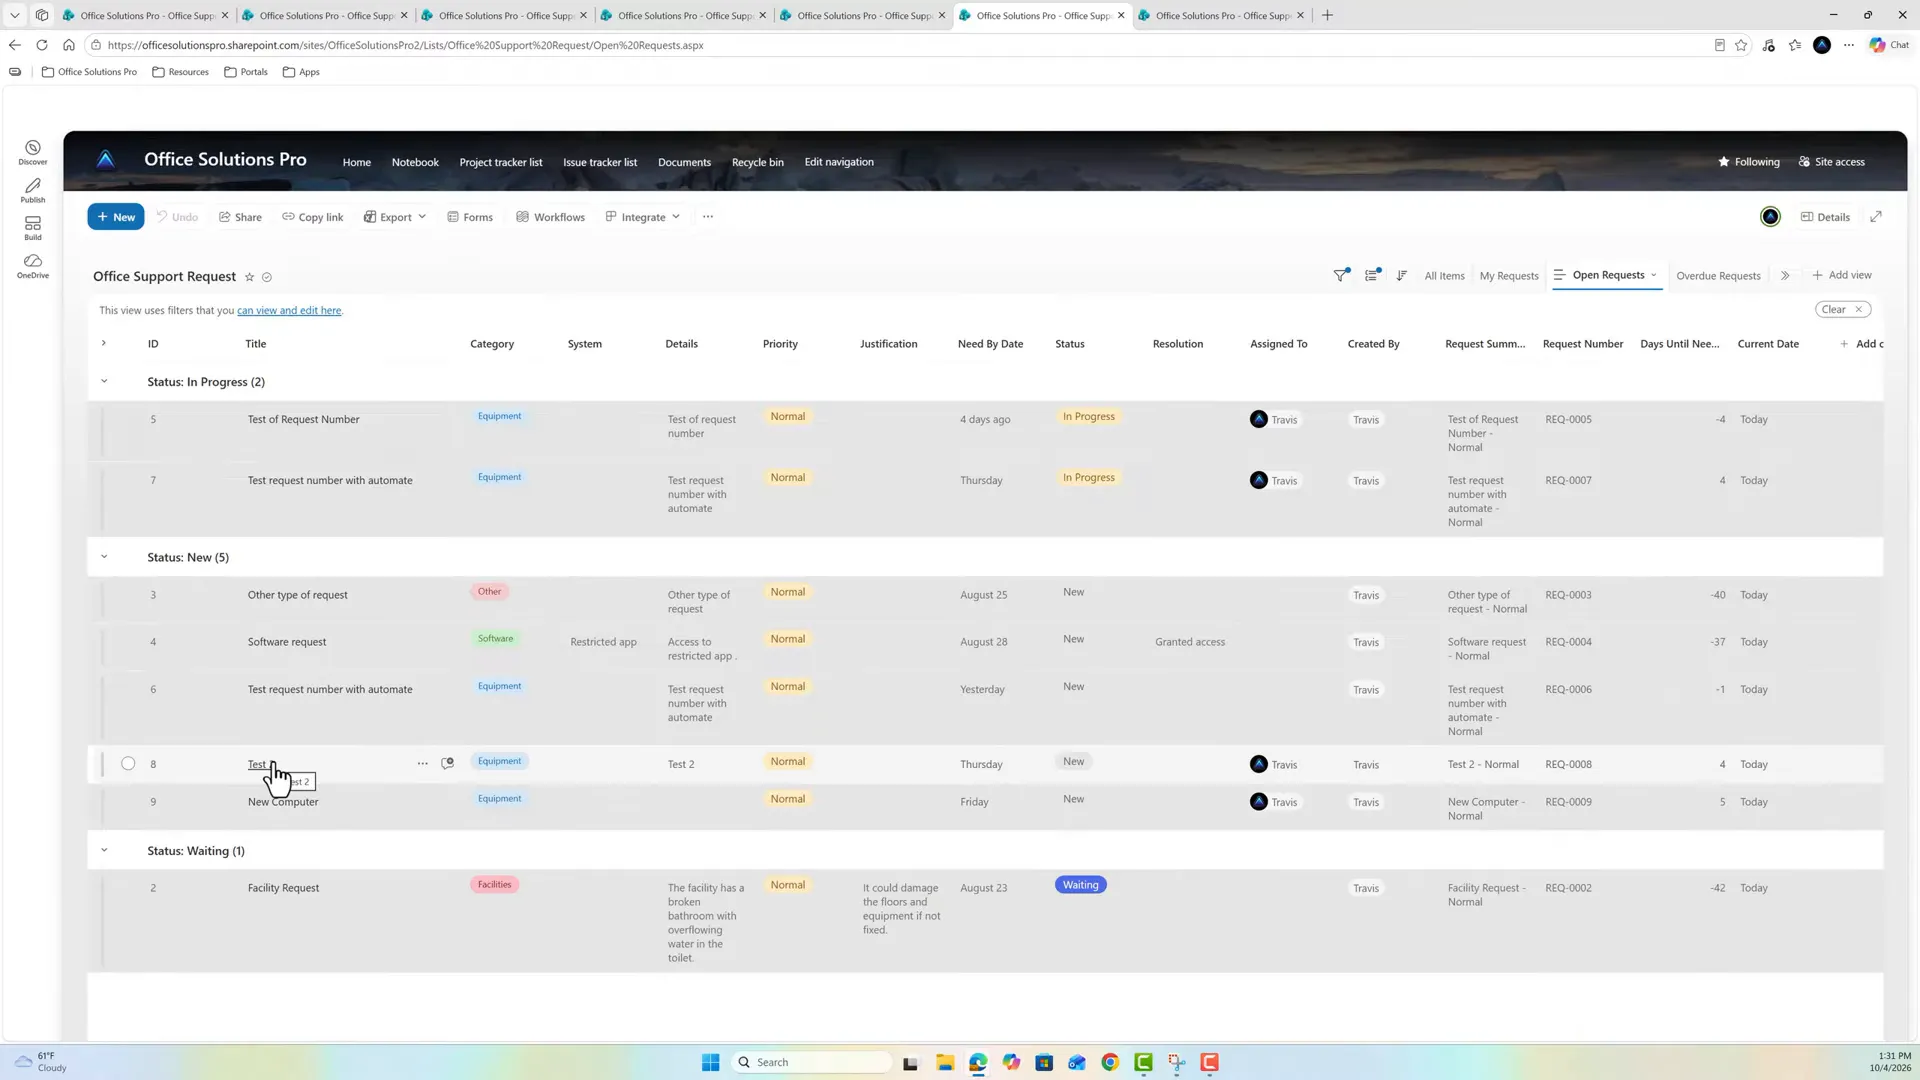
Expanded groups reveal their matching requests.
Grouping changes presentation and can be combined with filters and sorting. It does not itself select a different set of items. Microsoft: use grouping to modify a view.
Switching to My Requests does not apply this grouping to that view. Each saved view keeps its own settings.
7. Sort My Requests by Need By Date
Select My Requests and open Edit current view. In Sort, set First sort by the column to Need By Date and select Show items in ascending order. Leave the second sort column as None.
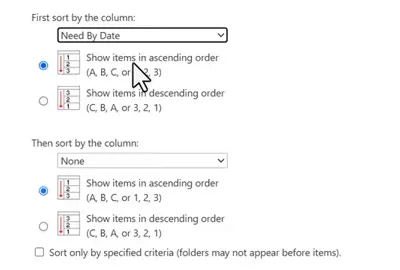
The existing Created By filter remains on My Requests.
Select OK and refresh if needed. The sample now begins with August 23, August 25, and August 26.
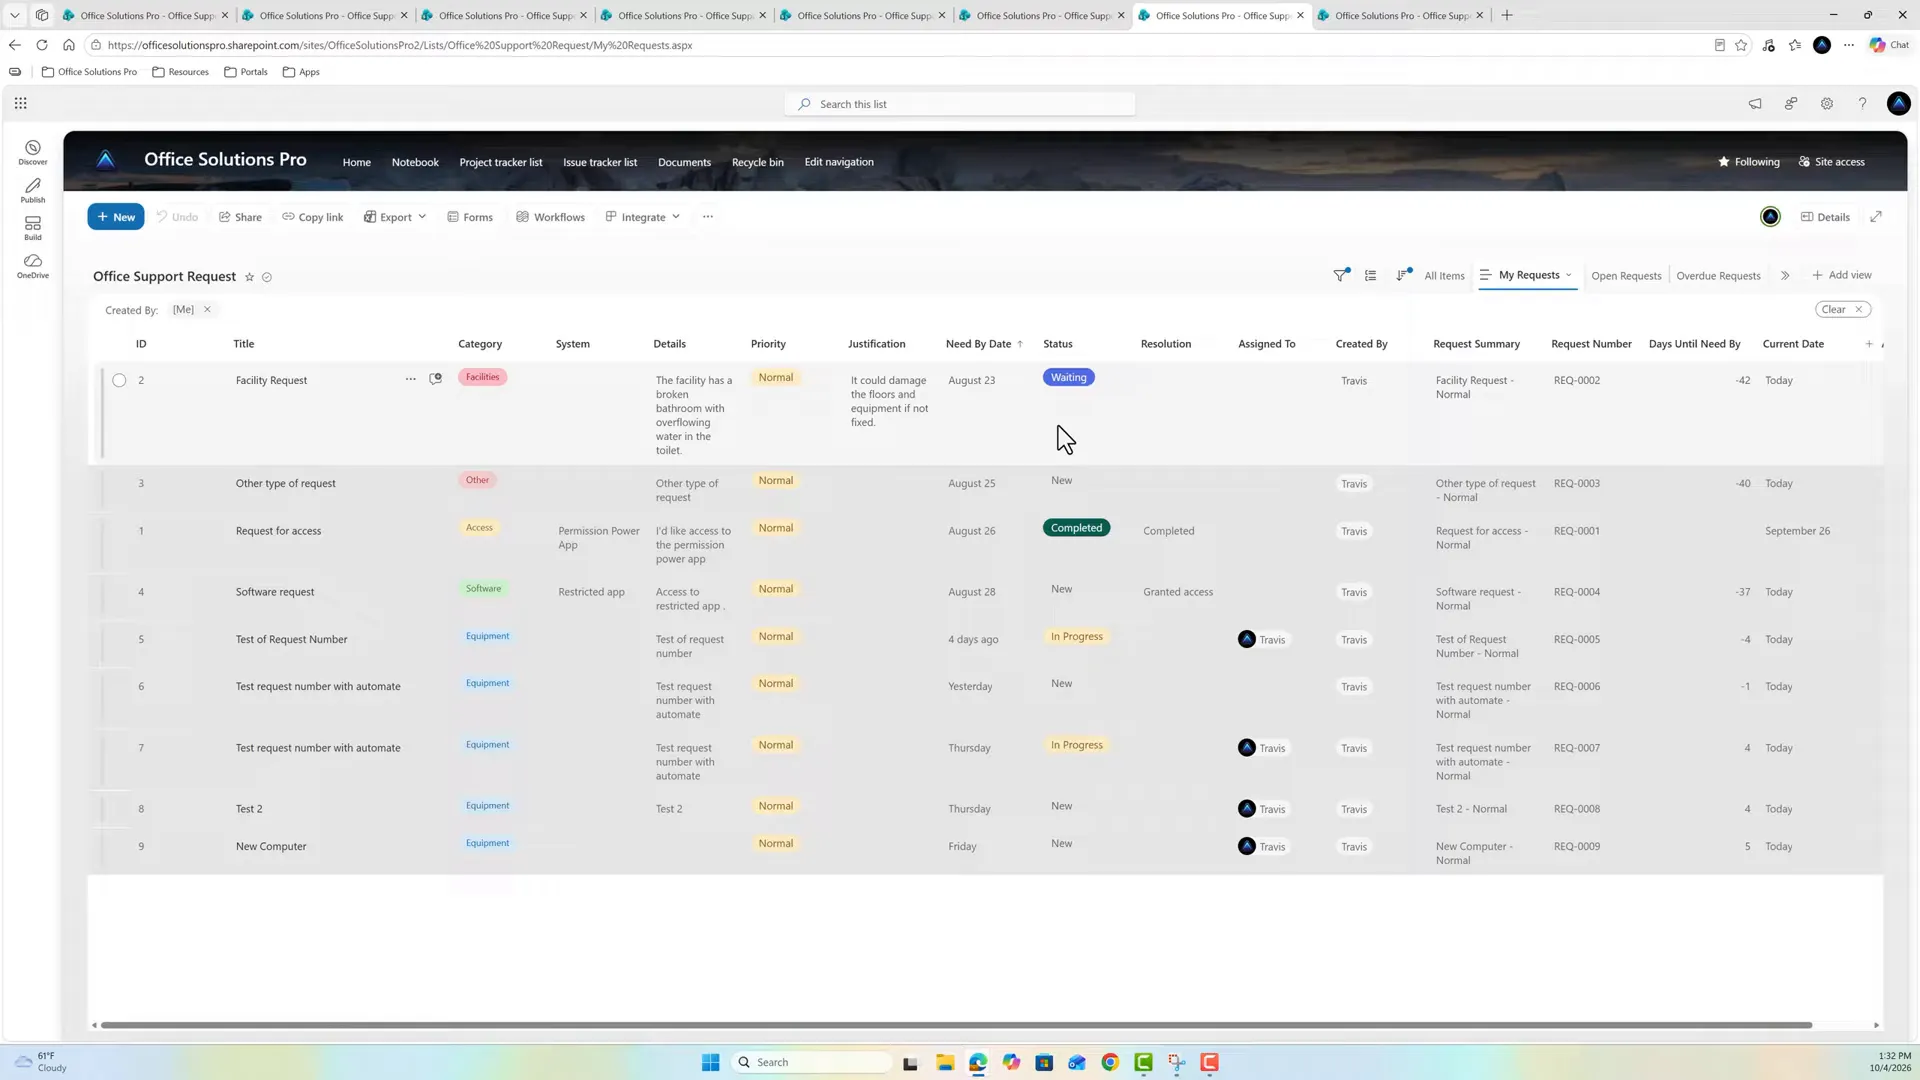
This orders due dates, not request creation dates.
This sort puts the earliest Need By Date first, which isn’t the same as the oldest requests. Sorting by creation age would require Created instead. Microsoft: use sorting to modify a view.
Reuse the patterns carefully
You can combine these ideas for high-priority open items, requests assigned to the viewer, and recent requests. This tutorial doesn’t build those variants.
For a recent-date filter, [Today]-7 is only the value; the selected date column and comparison operator still determine the result. For example:
Created is greater than [Today]-7Microsoft: typical filtered views.
For a third condition, select Show more columns at the lower right of the filter section. You can use up to 10 conditions. If you mix them, put Or conditions first and And conditions after. Microsoft: use filtering to modify a view.
After saving any variation, check representative matching and nonmatching items. Confirm that the intended view is selected and that copied filters were retained or removed intentionally.
SharePoint blocks operations that exceed the List View Threshold of about 5,000 items, and that limit can’t be changed in Microsoft 365. Before your list gets that large, index the columns your views filter on. The first column in the filter should be indexed and should return fewer items than the threshold. Creating a sort in a view can also be blocked on a list over the limit, so test your views against your real list. Microsoft: large lists and the List View Threshold, Microsoft: add an index, Microsoft: use filtering to modify a view.
Companion video
Video: How to Create Useful SharePoint List Views: Filters, [Me], [Today] & Grouping. Published October 5, 2026.
If the player is blocked on your network, open the video on YouTube.
Need help applying this to your own setup? Read about consulting.