 Office Solutions Pro
SharePoint calculated columns for request numbers and due dates
Combine list fields, format request numbers using an ID helper column, and refresh a due-date calculation with Power Automate.
On this page
- Overview
- Before you begin
- 1. Combine Title and Priority into Request Summary
- 2. Use ID Copy for a formatted Request Number
- 3. Copy the new item’s ID with Power Automate
- 4. Store Current Date for the countdown
- 5. Refresh Current Date daily
- 6. Exclude completed requests and display a blank countdown
- 7. Validate the finished setup
A calculated column can combine or calculate values from the same SharePoint list item. In this tutorial, you will build a request summary, a request number such as REQ-0007, and a Days Until Need By column that uses a date refreshed by a daily flow.
Two approaches look simpler but need workarounds: using a newly created item’s ID directly, and relying on TODAY() in a calculated column. This tutorial shows why, then uses helper columns instead. It also covers stopping update actions from overwriting other fields, and checking retrieval limits on larger lists.
Before you begin
This example uses SharePoint Online in a browser, a modern list, the classic-style calculated-column settings page, and Power Automate’s new designer. Exact menus can vary. The sample list is Office Support Request; select your own site and list in every action.
You need access to create list columns and flows, plus a SharePoint connection that can read and update the target items. The SharePoint connector is classified as Standard. Microsoft 365 plans can use standard connectors, so these flows don’t need a Premium license. In a US government cloud, sign in at the address for your cloud, such as make.gov.powerautomate.us for GCC. Microsoft lists exceptions to feature parity in those clouds, so some menus or features may differ. Microsoft: SharePoint connector, Microsoft: Power Automate licensing FAQ, Microsoft: Power Automate US Government.
Start with these existing fields:
| Field | Purpose |
|---|---|
| Title | Request name; required by the sample update action |
| Priority | A single-choice value such as Low, Normal, or High |
| Need By Date | Due date; use populated calendar dates for the countdown example |
| Status | A single-choice value including Completed |
| ID | SharePoint’s existing item identifier; show it temporarily for comparison |
Calculated formulas work within the current row. They cannot pull another row or list into the calculation, and lookup columns are unsupported in these formulas. Use the actual display names of your columns in the formulas. Microsoft: introduction to SharePoint formulas, Microsoft: calculated-field limitations.
1. Combine Title and Priority into Request Summary
In the list, select + Add column, then See all column types. Select Next, which Microsoft’s current guide describes as More, to open Settings → Create Column. Select Calculated (calculation based on other columns) and name it Request Summary. Microsoft: calculated-column setup.
Enter this formula:
=[Title]&" - "&[Priority]Select Single line of text as the returned data type, then select OK. Return to the list and refresh if the column is not yet visible.
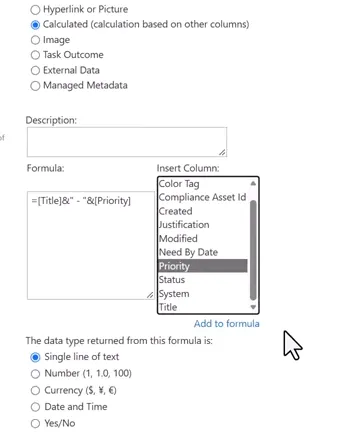
The Insert Column list helps insert the correct field references.
The ampersand (&) joins the values. A title of Facility Request and priority of High produces Facility Request - High. Microsoft: text formula examples.
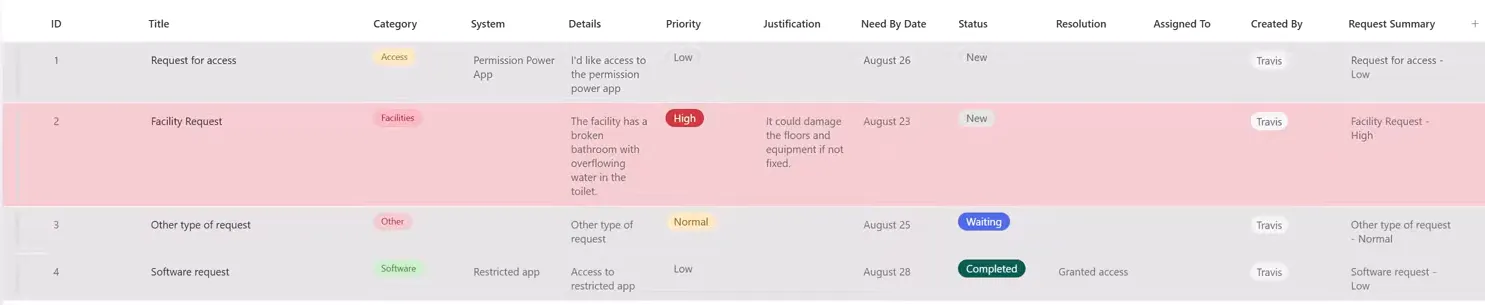
When Priority changes and the item is updated, the summary follows that value.
2. Use ID Copy for a formatted Request Number
To see why a helper column is needed, you can first create Request Number, returning text, with this diagnostic formula:
="REQ-"&TEXT([ID],"0000")Existing rows look correct at first. A new item then shows the problem: in this example it receives ID 5, but its calculated value is REQ-0000. Refreshing the page does not repair it.
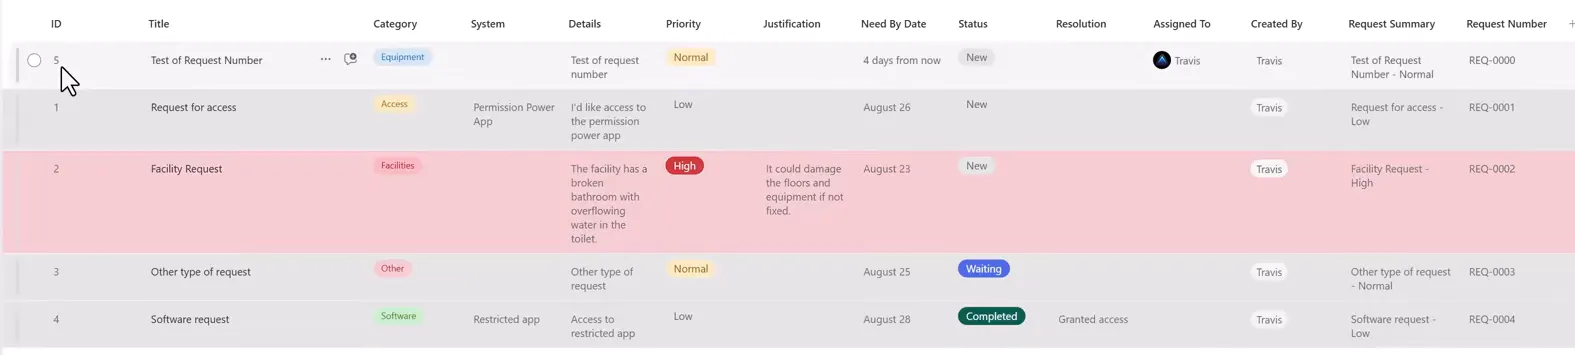
This failure is the reason to use a helper column.
The ID of a newly inserted row does not exist when its calculated formula is processed. A result on existing items does not establish that this direct-ID formula will work on creation. Microsoft: calculated-field limitations.
Create the helper and change the formula:
- Select + Add column and choose Number.
- Name the column ID Copy, set Number of decimal places to 0, and leave the default value empty. Select Save.
- Open the gear menu’s List settings and select Request Number. If you skipped the failed experiment, create Request Number as a calculated column now.
- Use the following helper-based formula, with Single line of text as the returned type, and select OK.
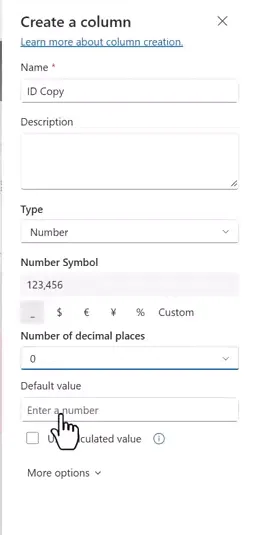
ID Copy configuration.
="REQ-"&TEXT([ID Copy],"0000")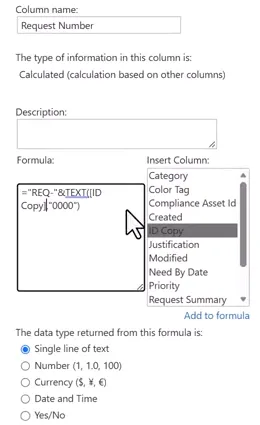
Updated formula. The line break in the small editor is visual wrapping.
TEXT produces formatted text. The four zeros pad small IDs: 7 becomes 0007. They do not turn the result into a new SharePoint ID or guarantee a gap-free sequence. Microsoft: TEXT function.
3. Copy the new item’s ID with Power Automate
Open Workflows → Build from scratch → Power Automate. In the designer, name the flow Update ID Copy SharePoint Column.
- Add the SharePoint trigger When an item is created. Select the target Site Address and List Name.
- Add SharePoint Update item, using the same site and list.
- Set its Id to the trigger’s ID dynamic content.
- Set Title to the trigger’s Title, and preserve any other required fields using their corresponding source values.
- Expose ID Copy under Advanced parameters and set it to the trigger’s ID. Add only the parameters you need. Show all can display Priority Value and Status Value already filled in, in this example with Normal and New.
- Apply the field-preservation steps immediately below, then select Save.
| Update item input | Value/source |
|---|---|
| Id | ID from When an item is created |
| Title | Title from When an item is created |
| ID Copy | ID from When an item is created |
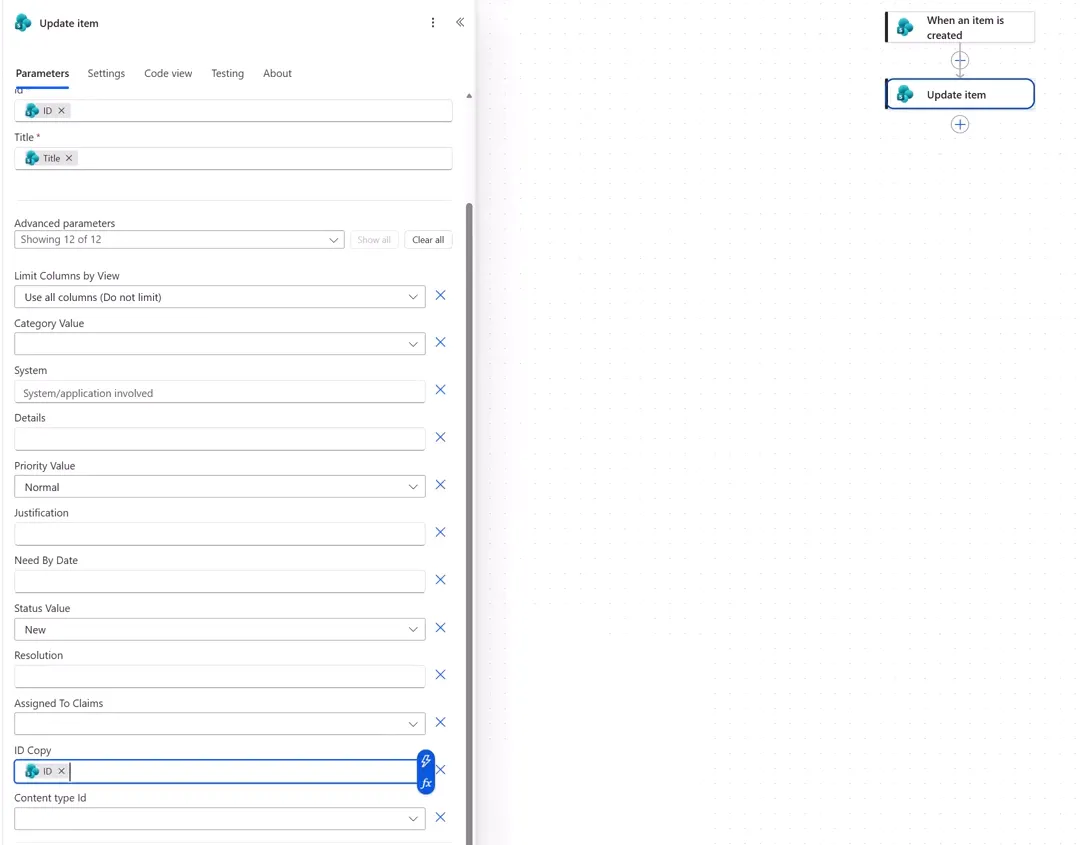
The Normal/New defaults visible here must be changed as described below; this screenshot does not show a corrected configuration.
Preserve fields outside the helper update
Both Update item actions in this example’s screenshots expose Priority Value = Normal and Status Value = New. This matters: before the daily flow, ID 2 is High, ID 3 is Waiting, and ID 4 is Completed. After that flow runs, the visible values are Normal/New. That change is consistent with the update action’s fixed inputs.
Configure each update action to change its helper field while preserving the other item data:
- Remove optional business-field parameters that are not being changed, using the × beside each parameter. In particular, remove the fixed Normal/New inputs. Do not replace them with empty strings.
- For any field the action requires, provide its existing dynamic value. If Priority or Status must remain in your action, replace the fixed choice with the matching Priority Value or Status Value from the source item. Use the trigger for this creation flow and the current Get items loop item for the scheduled flow.
- Check the action’s Code view, then a test run’s inputs, to confirm that unrelated fields are not sent as fixed defaults or empty replacements. Check the resulting item to confirm its other values remain intact.
Microsoft’s connector describes Update item as accepting changed properties, and its flow guidance requires values for all required columns. The exact optional-field controls can vary by designer. Microsoft: SharePoint Update item, Microsoft: required-column guidance.
Test with a new request whose priority is High, rather than only a Normal/New example. Leave ID Copy empty, save the request, and wait for the flow to finish. In flow run history, confirm the update succeeded. Refresh the list and compare ID, ID Copy, and Request Number; also confirm Priority and Status were preserved.
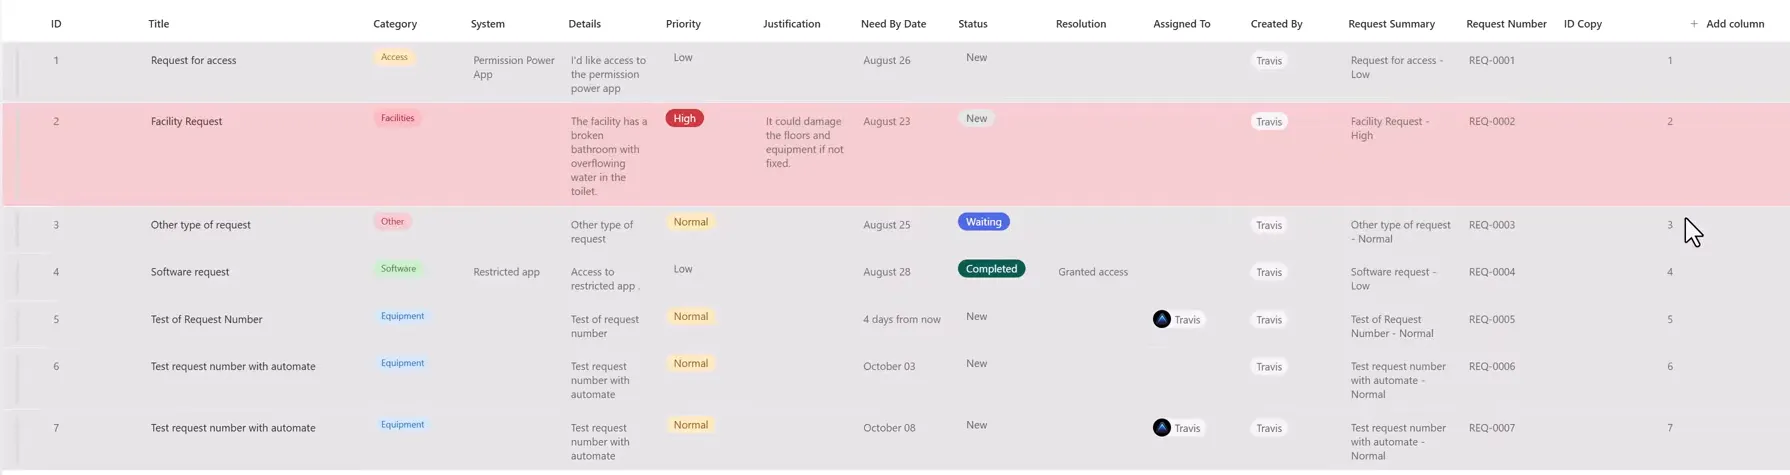
Older helper values in this example were updated separately. The creation trigger handles future items, not an automatic historical backfill.
For existing items, populate ID Copy with each item’s actual ID through a separate, deliberate backfill before relying on Request Number. For a few items, this can be a manual list edit. Do not assume the creation flow has already processed them. The update is asynchronous, so a new item’s Request Number isn’t correct until its run finishes, and stays wrong if the run fails.
Optionally hide ID Copy from the view using its column menu’s Hide this column. In the new-item form, open Edit columns, clear ID Copy, and select Save. Both are display changes: neither deletes the helper column or its data, and Request Number still depends on ID Copy. If ID Copy is changed, Request Number changes with it. Microsoft: show or hide columns.
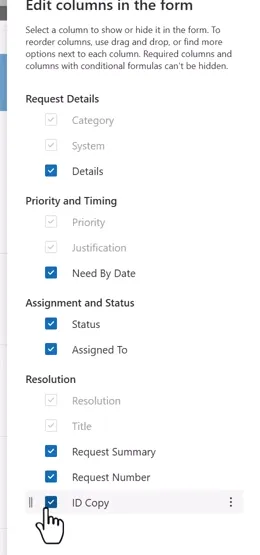
Clear this checkbox and save to remove the helper from the form.
4. Store Current Date for the countdown
You might try this calculation first:
=[Need By Date]-TODAY()It can display a value, but this is an experiment, not the final setup. TODAY and ME are unsupported in calculated columns, and NOW is also unsupported. Use the stored date below instead. Microsoft: function limitations.
- Create a Date and time column named Current Date.
- Set Include Time to No. This example enables Friendly format and leaves Default value as None. Select Save.
- Create or edit the calculated column Days Until Need By through List settings.
- Enter the helper-based formula below. Select a Number return type and 0 decimal places, then select OK.
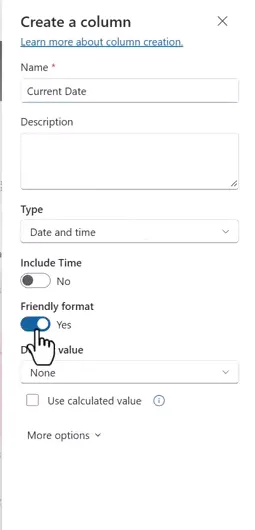
Friendly format changes the display; it does not refresh the stored value.
=INT([Need By Date]-[Current Date])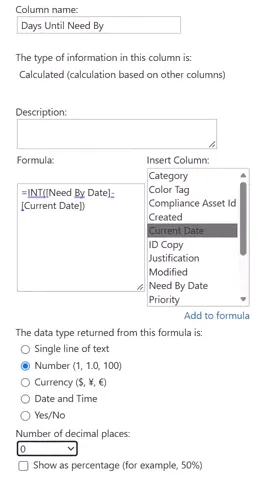
Final helper-based settings.
INT rounds down to an integer; it is not simply truncation toward zero. This example uses calendar-date fields. If your fields contain times or use different date/time interpretations, verify the result near midnight before calling it a calendar-day count. Microsoft: INT function.
Populate Need By Date and Current Date before trusting this result. If Current Date is empty, the column shows a large serial-like number. This formula has no missing-date guard.
5. Refresh Current Date daily
Create another flow named Update Current Date SharePoint List, starting again through Workflows → Build from scratch → Power Automate.
Set the daily schedule
Add the Recurrence trigger and configure:
| Setting | Value |
|---|---|
| Interval | 1 |
| Frequency | Day |
| Time zone | (UTC-05:00) Eastern Time (US & Canada) |
| Start time | A date at least 24 hours ahead, at 04:00, as YYYY-MM-DDT04:00:00 with no Z at the end |
| At these hours | 4 |
| At these minutes | 0 |
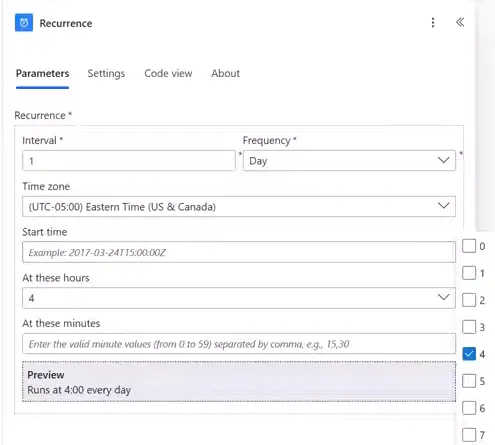
This screenshot shows Start time and At these minutes still empty. Enter both as listed in the table above.
Microsoft documents the separate time-zone, hour, and minute controls, and says the time zone applies when you specify a start time. Its advice for a dependable schedule is to set a time zone, a start date and time, and specific hours and minutes. If At these minutes is empty, the minutes are calculated from when the recurrence starts.
Leave the Z off the end of Start time, even though the field’s example and Microsoft’s scheduled-flow page show one. A trailing Z means UTC, and the time zone is then ignored. With a start time set, the flow doesn’t run when you save it, so use the manual test in step 7 to fill Current Date the first time.
Microsoft’s detailed Recurrence pages are written for Azure Logic Apps, and its scheduled-flow page links to one of them for advanced options. They say that selecting a time zone moves the schedule with the seasonal clock change, so the run keeps its local time. One page’s troubleshooting list also suggests adjusting a recurrence by hand when daylight saving takes effect, without saying whether that applies once a time zone is selected, so step 7 has you check the first run and the first run after a clock change. If a run did move by an hour, it would still fall hours after midnight, and the expression below works out the date when the flow runs, so Current Date would still be right.
Choose the business time zone appropriate to your list and use that same zone in the expression below. Microsoft: scheduled-flow configuration, Microsoft: Recurrence settings, Microsoft: recurrence troubleshooting.
Produce the local date
Add Compose, rename it Compose - Current Eastern Date, and enter this in its expression editor:
formatDateTime(convertTimeZone(utcNow(), 'UTC', 'Eastern Standard Time'), 'yyyy-MM-dd')Commit the expression with Add. It converts the current UTC timestamp to Eastern Time before formatting the date as year-month-day. Use the Windows time-zone identifier shown, rather than replacing it with a fixed numeric UTC offset. Microsoft: time-zone conversion, Microsoft: date formatting.
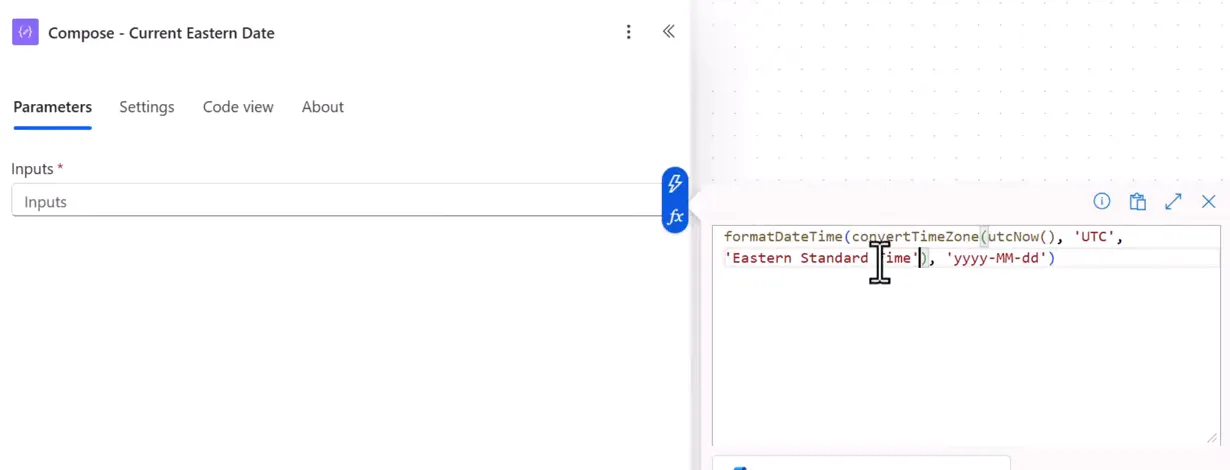
Completed expression.
Retrieve and update the items
- Add SharePoint Get items. Set Site Address and List Name to the target list.
- Add SharePoint Update item for the same list. Use ID from Get items for Id. The designer wraps the action in a For each loop because Get items returns an array. If you add the loop yourself, use the returned value array as its input.
- Use the current loop item’s Title for the required Title input, plus the existing values for any other required fields.
- Under advanced parameters, set Current Date to Outputs from Compose - Current Eastern Date. This output is the same business date for the run.
- Apply the earlier field-preservation steps: remove unrelated optional parameters and replace any required fixed choices with the current item’s values. Do not map this flow to the creation trigger or to the entire Get items array.
- Add the active-item filter in step 6, check retrieval limits below, then select Save.
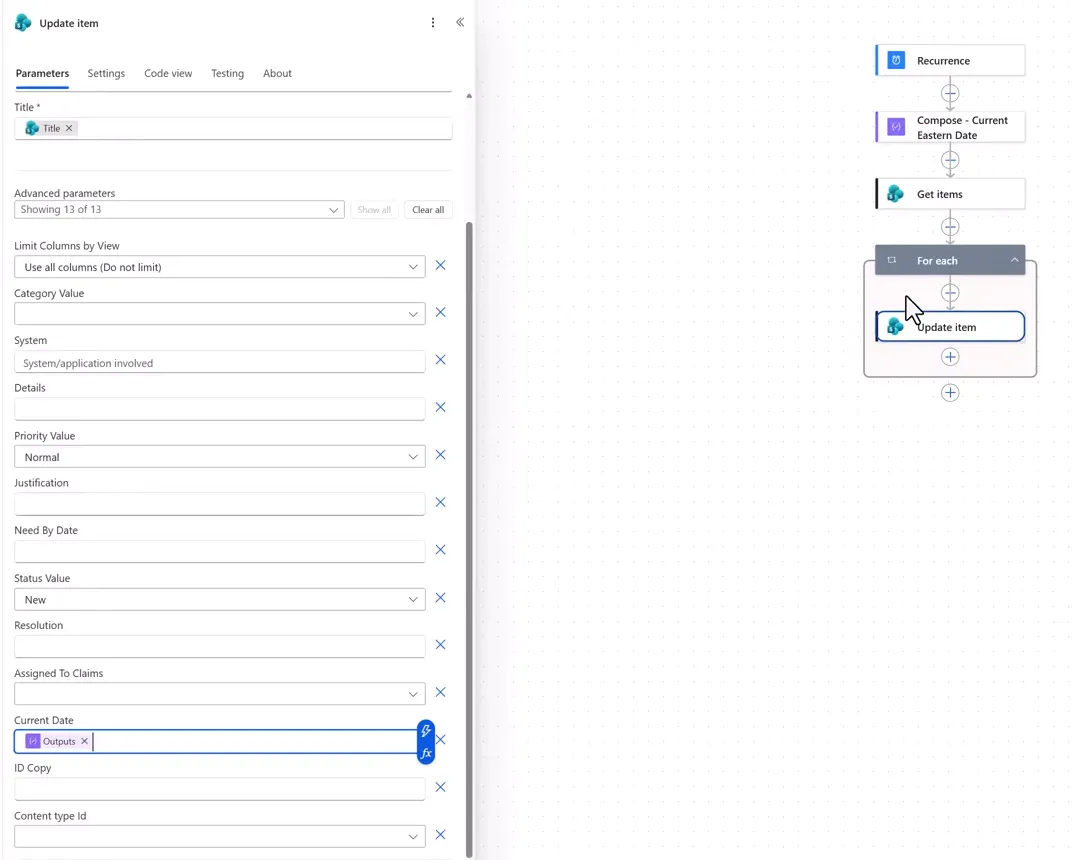
The visible Normal/New inputs are the defaults to remove or replace, not the recommended final configuration.
Check what the daily update changes
Each run, including a manual test, updates every item that Get items returns. Once you add the filter in step 6, that means every active request, every day. Before the first run, including the manual test in step 7, check the list’s version settings and any flows or rules on the list, and decide whether these effects are acceptable:
- Versions: Changing an item’s properties creates a version, and versioning is on by default for new lists in Microsoft 365. With versioning on, each run adds a version to each updated item, so changes made by people sit among the daily updates in version history. Earlier versions are deleted when the version limit is reached, so daily versions can eventually push out older changes.
- Modified and Modified By: These show the flow’s latest update and the account behind its SharePoint connection, not the last person who changed the request. If that’s a personal account, the list shows that person as the last editor of every active request. Views, filters, and sorts that use these columns are affected in the same way.
- Other flows: A flow on this list that uses When an item is created or modified or When an item or a file is modified also triggers on these updates.
- Content approval: If the list requires content approval, each update becomes a draft in Pending status. People who can’t see drafts keep seeing the most recent approved version until someone approves the update.
Microsoft: how versioning works, Microsoft: SharePoint triggers.
Check retrieval limits before scaling up
Don’t assume an unfiltered Get items action retrieves every item. Microsoft’s guidance states that default site/list-only settings return 100. Filtering reduces the work, but does not by itself prove every active item was retrieved.
For a larger list, configure retrieval deliberately. Review Top Count: its field hint says the default is all items, but Microsoft’s guidance gives 100, so treat 100 as the limit. If the list could ever hold more than 100 active items, open Get items → Settings, enable Pagination, and set a threshold above the largest active-item count you expect. Microsoft specifically documents pagination for its filtered-query limitation on lists over 5,000 items. Check the number retrieved and processed; do not assume a small sample proves large-list coverage. Microsoft: Get items limits and pagination.
6. Exclude completed requests and display a blank countdown
In Get items, expose Filter Query and enter this OData filter as text:
Status ne 'Completed'Select Save. Use the actual internal field name if your Status column has a different internal name, and your actual completed-choice label. ne means not equal. The filter selects active requests before the loop. Microsoft: Get items filter queries.
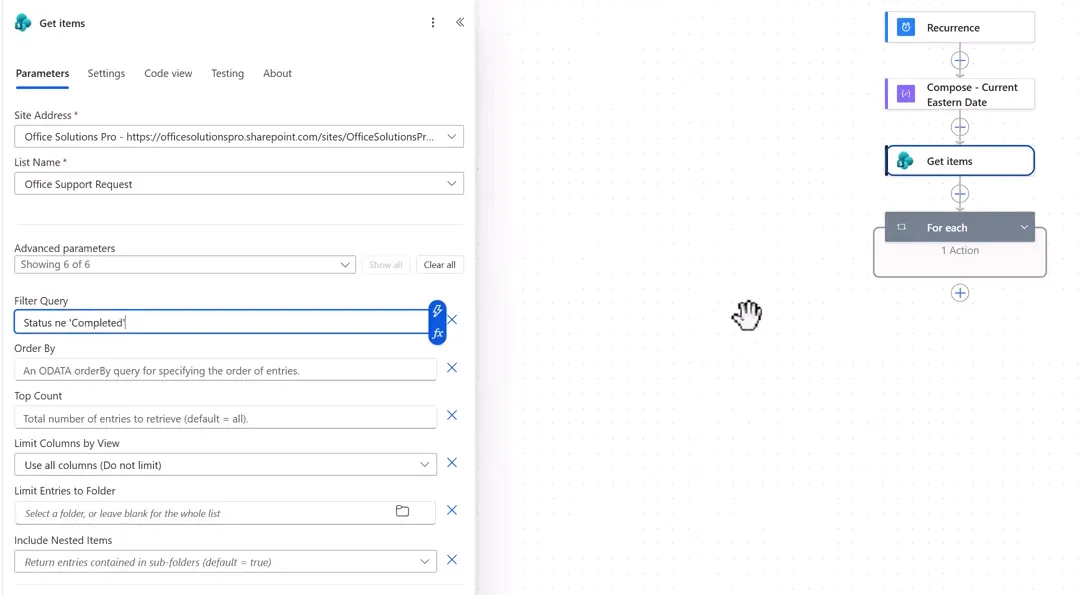
This screenshot does not show pagination being configured.
Next, open List settings → Days Until Need By and replace its formula with the final version:
=IF([Status] = "Completed","",INT([Need By Date]-[Current Date]))Keep Number and 0 decimal places, then select OK and refresh the list.
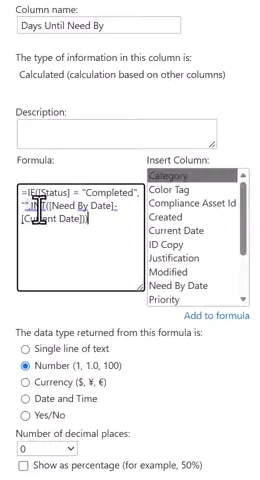
Final formula and return settings. The final condition is Completed.
The two changes serve different purposes: the filter skips completed rows in the scheduled flow, while IF displays empty text for their countdown. This does not store a completion date or freeze the number of days at completion. Microsoft: IF function.
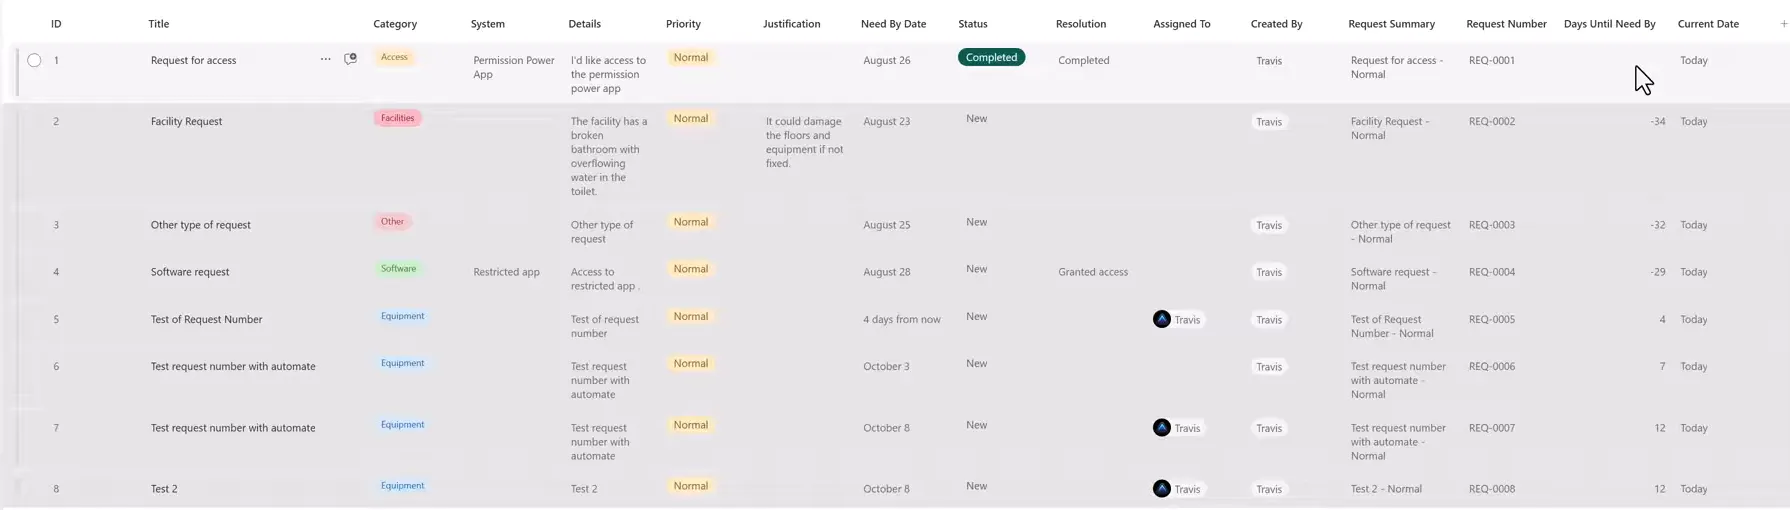
Other fields show the changed Priority and Status values described in step 3; use this image for the countdown display, not as an example of preserved values.
The example only excludes the exact Completed status. If your process also closes requests as Canceled or another value, adapt both the filter and the formula consistently.
7. Validate the finished setup
After saving the scheduled flow, use Test → Manually → Test → Run flow. Inspect the run, refresh the list, and verify the stored Current Date matches the intended business date. Run this test with the Completed filter in place, because a blank countdown alone doesn’t show that the filter excluded those items.
A manual test doesn’t use the schedule. After the first scheduled run, open the flow’s run history, check the time of the run, and confirm Current Date holds the date you intended. Check again after the next daylight saving change. If a run succeeded but Current Date is a day behind, it probably started before midnight in your time zone, so recheck Time zone and Start time.
Use representative test requests:
| Check | Expected result |
|---|---|
| New request after the creation flow succeeds | ID Copy equals ID; Request Number uses that number |
| High-priority request, or an existing Waiting request | Priority and Status survive a helper update unchanged |
| Open request due three calendar days after Current Date | 3 for matching date-only interpretations |
| Open request due on Current Date | 0 |
| Open request due two days before Current Date | -2 for matching date-only interpretations |
| Completed request | Blank countdown; excluded from the scheduled retrieval |
| Larger active set | Retrieved and processed counts cover the intended set |
The daily schedule does not update the value continuously or at midnight. Until the next successful run, Current Date remains the last value written. Check run history from time to time. Microsoft turns off a cloud flow that fails continuously for 14 days, and a flow that isn’t triggered for 90 days might also be turned off. Microsoft: flow limits.
Newly created items have no helper date while Default value is None, so they show a large false countdown until the scheduled flow reaches them. Reopened items likewise wait for the next eligible run.
Optional addition: If the countdown must initialize immediately, set Current Date in the creation flow as well, using the same local-date expression from step 5. Test it with the same date-boundary and field-preservation checks. A default date on creation would still not replace the daily refresh.
Validate the optional-parameter configuration, pagination, concurrent item edits, and date storage in your list before operational use.
Companion video
Video: SharePoint Calculated Columns: Formulas, ID Limitations & Power Automate Fixes. Published September 28, 2026.
If the player is blocked on your network, open the video on YouTube.
Need help applying this to your own setup? Read about consulting.