 Office Solutions Pro
Send yourself a failed flow run link in Power Automate
Build an email alert that names your flow and links to the exact run that failed.
On this page
- Overview
- What this example does
- Before you begin
- 1. Create the manual switch and Condition
- 2. Give the False branch a successful exit
- 3. Build the current run’s URL
- 4. Send the flow name and link to yourself
- 5. End the alert path with Failed
- 6. Save and test both paths
- 7. Make the email link clickable
- 8. Connect the alert to a real failure path
- Keep the message useful
What this example does
This example builds Flow Failure Admin Email Demo in the new Power Automate designer in your browser. A Yes/No input selects one of two paths:
| Input | Actions | Overall result |
|---|---|---|
| No / off | Terminate with Succeeded | Successful run; email actions skipped |
| Yes / on | Compose run link → Send an email (V2) → Terminate with Failed | Alert email followed by a failed run |
This is a controlled test: choosing Yes does not make an earlier business action throw an error. The final Terminate action deliberately sets the run to Failed. Step 8 explains how to connect the alert to a real failure with a Try and Catch pair of scopes.
Power Automate also sends its own notifications: a weekly digest and per-run alerts for certain recognized, actionable failures, with a 28-day cooldown after a per-run alert for the same flow. Custom alerts let you choose the message and recipient for your configured error path. Microsoft: Understand flow failure notifications.
Before you begin
Use a Power Automate account that can create and edit a cloud flow in your chosen environment, plus a working Office 365 Outlook connection and mailbox. That connector is classified as Standard, and this example doesn’t add a premium connector. Microsoft says a flow without a premium connector doesn’t need a Premium license and can use a Microsoft 365 license, so this example doesn’t need a Premium license. Microsoft: Outlook connector, who needs a Premium license.
If you later add a premium connector, the license you need depends on how the flow runs and how it’s licensed. The main factors are:
- Flow type. Microsoft says instant flows run in the context of the person who starts them, and automated and scheduled flows normally run in the owner’s context. So under user licenses, an instant flow with a premium connector generally needs a license for each person who runs it. An automated or scheduled flow with one, such as a flow you adapt in step 8, generally needs one for its owner.
- Who gets something from the flow. Microsoft says that a person who gets something back from a premium flow, such as an email, can need a Premium license too, even if they only started it indirectly. Microsoft: licensing FAQ, multiplexing.
- Process license. A Process license assigned to a flow in a solution gives that flow access to premium connectors, whoever runs it.
- App context and other arrangements. Flows in the context of a Power Apps or Dynamics 365 app, flows triggered from Dataverse, and child flows can follow different rules.
Before you add a premium connector, check your case in Microsoft’s licensing FAQ, or ask your Power Platform admin. Microsoft: licensing FAQ, flow runs, who needs a Premium license.
This example sends to an explicitly selected recipient in To. It does not automatically discover the flow owner’s email address. Choose your own address for the first test. If you later alert another maintainer, confirm they can open the run history; flow owners can view it, and an emailed URL does not itself grant permission. Run-only users can’t view it. A co-owner can also edit the flow, delete it, and add or remove other owners, so add only trusted people as co-owners. Microsoft: Add an owner to a cloud flow, sharing and permissions.
Your designer controls can differ from these screenshots. Look for expressions under fx, dynamic content under the lightning bolt, and Run after under the action’s Settings. Microsoft: Explore the cloud flows designer.
1. Create the manual switch and Condition
- In Power Automate, select Create → Instant cloud flow.
- Name the flow Flow Failure Admin Email Demo, choose Manually trigger a flow, and select Create.
- Open the trigger, select Add an input → Yes/No, and keep the input name Yes/No.
- Use the plus below the trigger to add Control → Condition.
- Set the left value to the trigger’s Yes/No dynamic content, the operator to is equal to, and the right value to Boolean
true. This example typestrueinto the comparison field. If your designer needs an expression, inserttrueusing fx rather than the quoted text'true'.
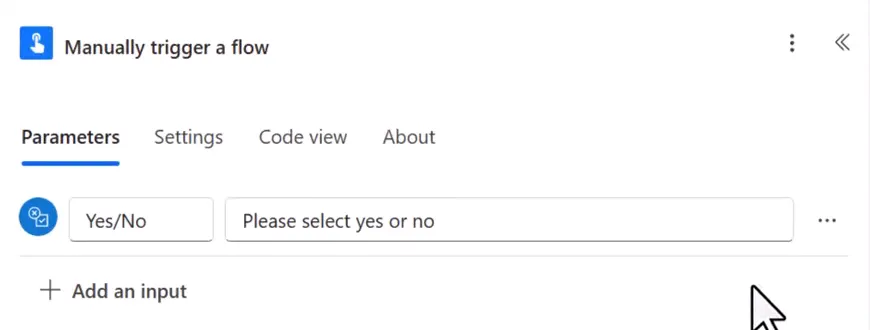
The manual input is the test switch for this example.
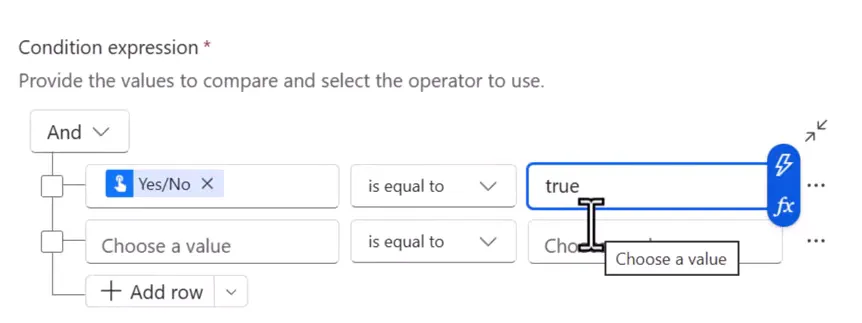
Yes selects the True branch. The empty comparison row is not an instruction to add another test; leave only the intended comparison configured.
A Condition selects tasks using a true/false result. Microsoft: Add a condition.
2. Give the False branch a successful exit
Inside False, add Control → Terminate. Set Status to Succeeded. This example keeps the action name Terminate.
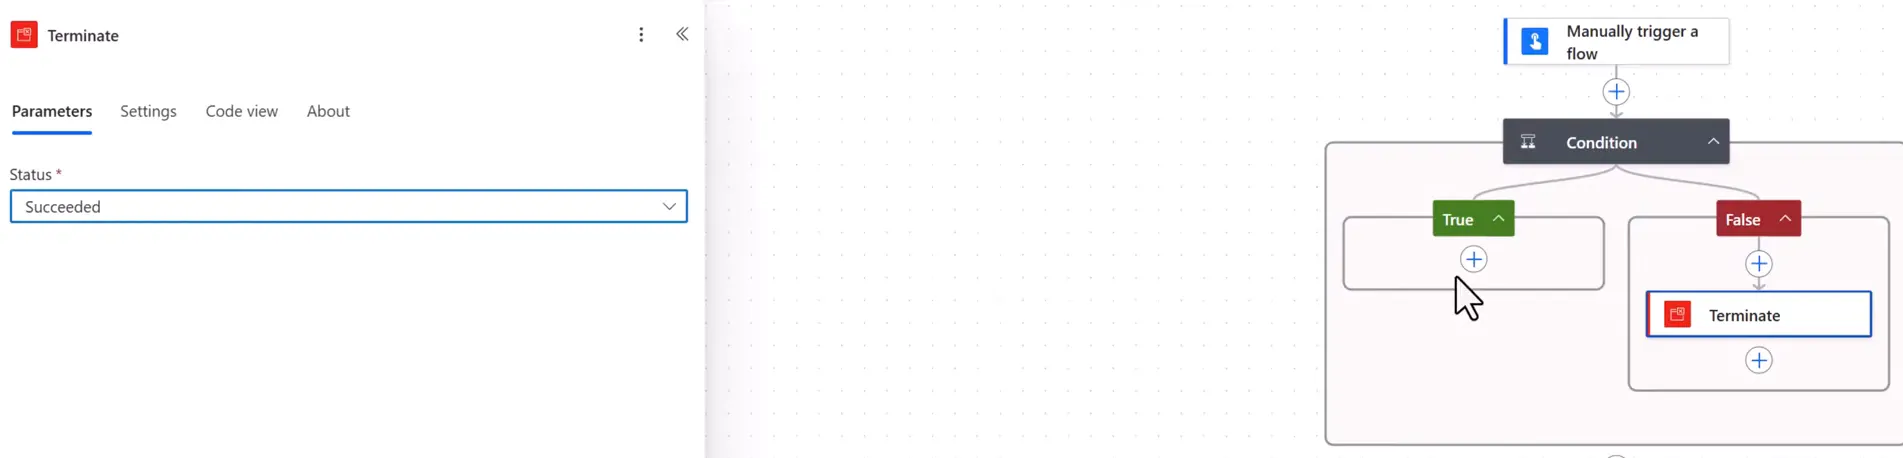
This branch ends the test without running the alert actions.
3. Build the current run’s URL
Inside True, add Data Operation → Compose. Open Inputs → fx, paste the commercial expression below, and select Add. Rename the action Compose - Failed Run Link.
This is the expression for the commercial cloud:
concat( 'https://make.powerautomate.com/environments/', workflow()?['tags']?['environmentName'], '/flows/', workflow()?['tags']?['logicAppName'], '/runs/', workflow()?['run']?['name'])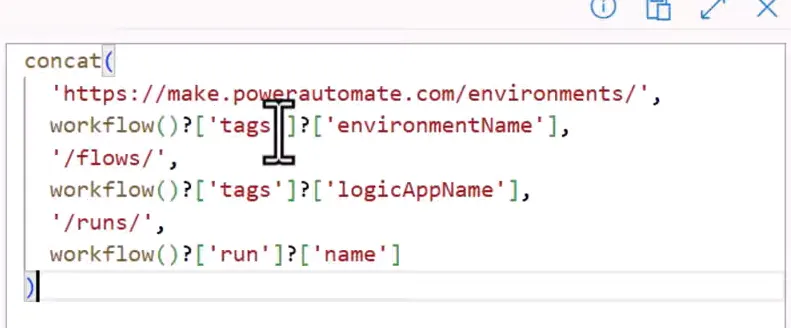
Keep the slashes around /flows/ and /runs/, and use the current run’s name.
workflow() exposes runtime metadata. Here, environmentName identifies the environment, logicAppName supplies the flow identifier, and run.name identifies this execution. You do not need to add Parse JSON to use these direct property expressions. You may also see workflow()['name'] used for the flow identifier. Microsoft documents both properties, so this example keeps logicAppName. Microsoft: Current flow run metadata, Microsoft: expression functions.
For GCC, the first string uses the GCC address:
concat( 'https://make.gov.powerautomate.us/environments/', workflow()?['tags']?['environmentName'], '/flows/', workflow()?['tags']?['logicAppName'], '/runs/', workflow()?['run']?['name'])US government clouds use different portal addresses. Microsoft lists https://make.gov.powerautomate.us (GCC), https://make.high.powerautomate.us (GCC High), and https://make.powerautomate.appsplatform.us (DoD). If you use one of those clouds, put your portal’s address in the expression in place of https://make.powerautomate.com. Microsoft’s list gives the portal addresses only, not the path to a flow run, so confirm that the generated link opens the run. Microsoft: US Government service URLs.
4. Send the flow name and link to yourself
Below Compose, still inside True, add Office 365 Outlook → Send an email (V2). Sign in or select the appropriate connection if prompted.
- Set To to your own address.
- In Subject, type
Power Automate flow failed:, then insert this fx expression and select Add:
workflow()?['tags']?['flowDisplayName']- In Body, type
A Power Automate flow failed:, insert the same flow-name expression, and start a new line. - Insert Outputs from Compose - Failed Run Link using dynamic content. Select that Compose’s output rather than another action’s similarly named token.

The display name makes the alert identifiable without opening Power Automate.
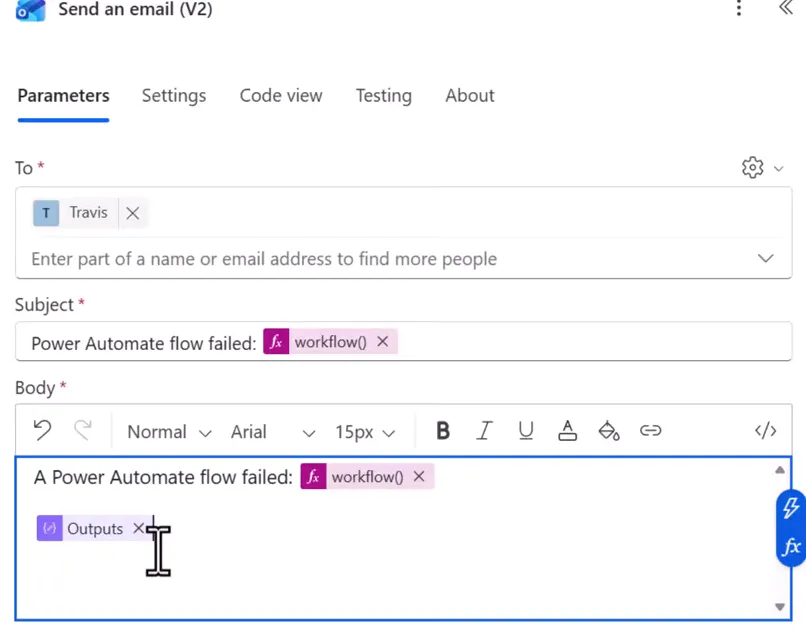
The first version includes the URL as body content; step 7 turns it into a labeled hyperlink.
To, Subject, and Body are required for this action, and Body accepts HTML. The flow-name expression reads runtime metadata. Microsoft: Send an email (V2), Microsoft: workflow function.
5. End the alert path with Failed
Under the email, add another Terminate action. The action here is named Terminate 1. Set Status → Failed; this example leaves Code and Message empty. In a production flow, add a Message that says why the flow failed.
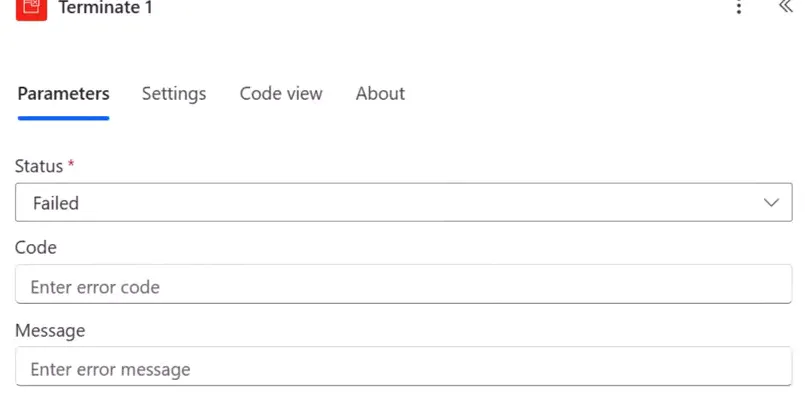
The email is sent before the action that ends the run.
In this example, Compose and email can both succeed. Without the explicit failed termination, merely selecting a branch called “failure” does not make the overall run fail. Terminate stops the flow and sets its final status. Microsoft: Terminate after an error.
6. Save and test both paths
Select Save, then Test → Manually and the displayed test/continue control. In Run flow, use the Yes/No switch, select Run flow, and select Done. If you have unsaved changes, the designer can also offer Save & Test. In a solution-aware flow, the designer has Save draft and Publish. Drafts can’t be tested, so select Publish before you test. Microsoft: Drafts and versioning.
First leave Yes/No off. The False branch should execute Terminate, and the True branch’s three actions should be skipped. The overall run should succeed:
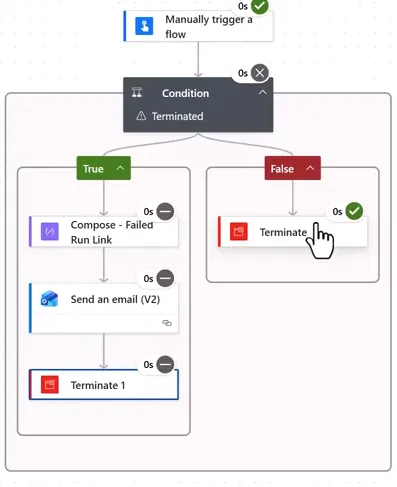
The Condition can display “Terminated” because a child Terminate ended execution. In this example, run history still reports a successful run.
Test again with Yes/No on. Compose should produce the URL, the email action should run, and Terminate 1 should end the run with Failed.
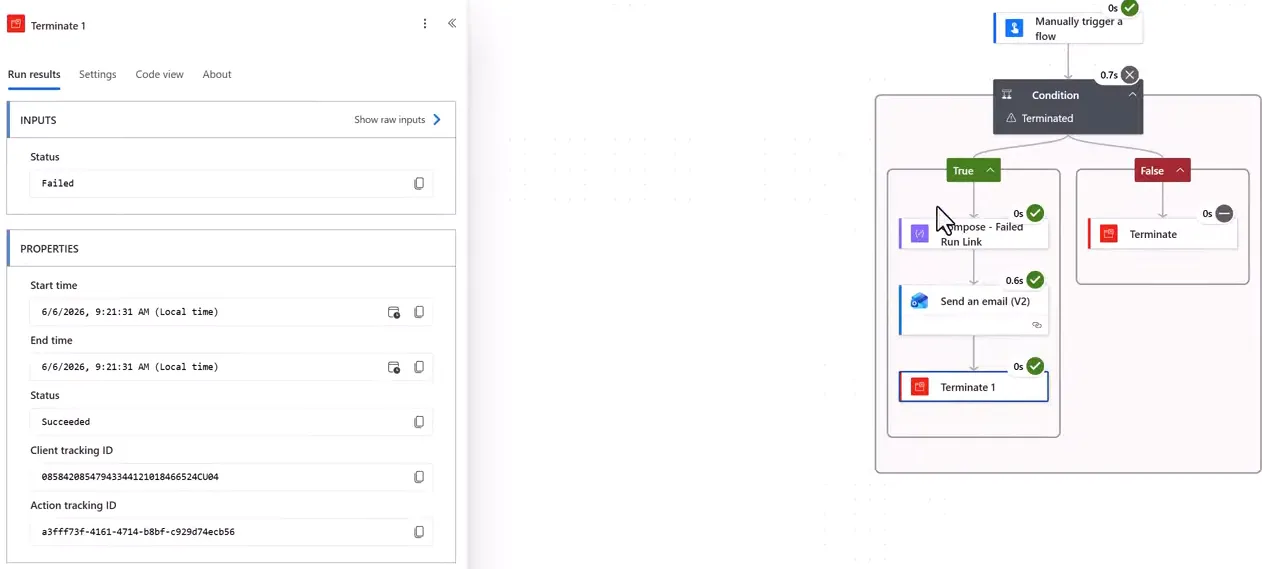
“Inputs → Status: Failed” is the requested overall outcome. “Properties → Status: Succeeded” means the Terminate action successfully carried out that request.
Open the received email. In this first version, copy the URL into a new browser tab. In this example, it opens the exact failed run, where you can expand the Condition. Return to the flow details page and check run history:

Run history distinguishes Test failed from Test succeeded.
Check these results in your own environment, including the inbox and the link to the failed run. Microsoft: Testing flows. Run data is kept for a limited time. Microsoft’s limits page lists run retention as 30 days from the run’s start, while its troubleshooting page says run data is stored for 28 days by default and older runs no longer show on the Run history page. That matches the 28-day run history heading on the flow details page, so plan on 28 days. The link in an older alert may no longer open the run. Microsoft: Duration limits, Missing runs or triggers history.
7. Make the email link clickable
The rich-text hyperlink popup may not offer an obvious way to insert dynamic content. The alternative is the </> button inside the Body editor, where you can enter HTML. Do not confuse it with the action’s separate Code view tab. Microsoft describes this button under its classic designer instructions, and the screenshot below shows it in the new designer, so check that yours has it. If it doesn’t, keep the step 4 body and copy the URL as in step 6. Microsoft: Write HTML directly into the flow.
Open the email action, clear the initial body, and select the Body editor’s </> button.
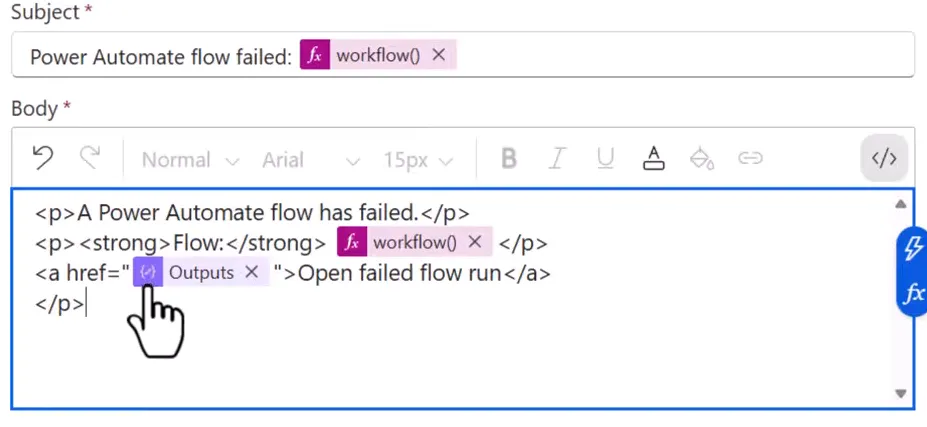
This screenshot shows the flow name and the Compose output inserted as tokens inside the markup. Its last line is a </p> with no opening tag; the example below adds the missing <p> before the link.
Enter this markup in the HTML body, then replace the two bracketed placeholders with tokens from the designer, as the screenshot shows. The placeholders are not literal text, so neither should remain in the body.
<p>A Power Automate flow has failed.</p><p><strong>Flow:</strong> [FLOW NAME TOKEN]</p><p><a href="[COMPOSE OUTPUTS TOKEN]">Open failed flow run</a></p>[FLOW NAME TOKEN]: Delete the placeholder. With the cursor in its place, select fx, enter the flow-name expression from step 4,workflow()?['tags']?['flowDisplayName'], and select Add. The token appears as workflow().[COMPOSE OUTPUTS TOKEN]: Delete the placeholder, but keep the quotes around the URL, one on each side. With the cursor between them, select the lightning bolt and choose Outputs from Compose - Failed Run Link. The token appears as Outputs.
Do not paste the whole HTML body into the fx expression editor.
Save and test with Yes/No on again. Check the new message and select Open failed flow run.
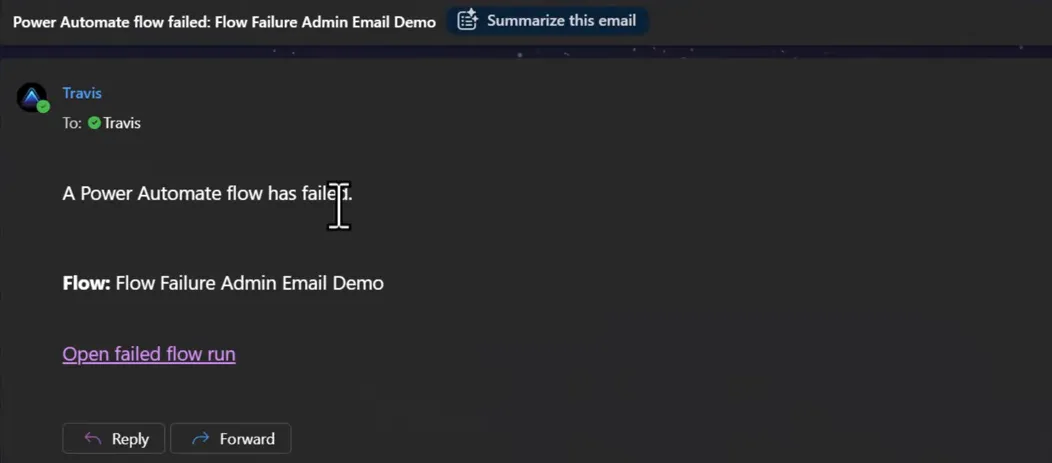
The message has the flow name and a labeled hyperlink that opens the failed-run page. Check both in your own message.
If you see literal tags in the message, confirm you entered them through the Body editor’s HTML mode. If navigation fails, inspect Compose’s evaluated output for the correct cloud host, environment, flow, and run identifiers, then confirm the recipient’s access.
8. Connect the alert to a real failure path
In a production flow, an earlier action or group of actions must determine whether the handler runs. Do not just place this email after normal work and expect it to detect failure automatically.
The email’s own Run after setting isn’t where failure detection belongs. In Send an email (V2) → Settings → Run after, the predecessor is Compose - Failed Run Link, and Is successful remains checked. No failure trigger is configured there.
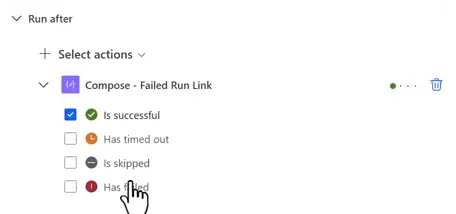
This setting is correct for sending the URL after Compose creates it. It is not the entry point for detecting a business-action failure.
A practical adaptation, consistent with Microsoft’s Try/Catch guidance, is:
- In the business flow you want to monitor, use + → Control → Scope to group its working actions in a scope named Try. Keep the trigger, any Initialize variable actions, and any response action outside. The manual switch and terminating Condition from this example are test scaffolding; do not put them inside Try, because Terminate stops the whole run.
- Add a sibling Scope named Catch after Try and copy or recreate this example’s Compose - Failed Run Link → Send an email (V2) → Terminate (Failed) sequence inside Catch. If you paste the actions, each pasted action’s name is followed by -copy, so re-select the Compose output in the email after you paste. If saving then reports
InvalidTemplate, a reference to an action output that doesn’t exist is a common cause, so check that token first. Microsoft: Copy and paste actions, Microsoft: InvalidTemplate. - Open Catch → Settings → Run after, target Try, and set the following states:
| Try outcome | Run Catch? |
|---|---|
| Is successful | No |
| Has timed out | Yes |
| Is skipped | No |
| Has failed | Yes |
- Keep the email running after a successful Compose so the URL exists when the email is evaluated. Keep the final failed termination after the email for this basic sequence. When it runs, Terminate cancels anything still in progress and skips every remaining action. If you plan to reuse this sequence inside an Apply to each or Do until loop, check that first, because Microsoft’s workflow schema reference for Azure Logic Apps says Terminate can’t appear inside Foreach or Until loops. Microsoft: Terminate action.
- Save and separately test a successful business path and a controlled failed business action. This pattern is designed for two outcomes: if Try succeeds, Catch is skipped, no email is sent, and the run should end as succeeded; if Try fails, Catch runs, the email is sent, and Terminate should end the run as failed. Microsoft: Run after behavior in Azure Logic Apps. Verify the email, URL, and final status in your own run history. Timeout behavior needs its own validation; the manual test does not establish it.
Keep as little as you can outside Try. Variables can be declared only at the global level, not within scopes, and triggers and response actions should remain outside scopes. A failure before Try doesn’t start Catch, because Try is then skipped and Catch isn’t set to run on Is skipped. Microsoft: Initialize a variable, Microsoft: scope limitations.
This changes where failure detection happens: Catch responds to Try, while its internal actions execute in sequence. Microsoft: Error-handling guidance, Microsoft: Add a Scope.
This basic custom alert depends on the handler and Outlook connection executing successfully. It does not cover a trigger that never starts a run, cancellation, or every failure inside the notification path. If Compose or email fails, inspect that failure too; do not treat a missing email as proof that the business work succeeded.
Keep the message useful
This example keeps URL construction in Compose to make its input and output easier to inspect, although it could be embedded directly in the email. Add concise context such as the affected scope, business operation, or troubleshooting notes when that helps you act on the alert.
When its alert path completes, the finished flow gives you a flow name, a link to this run, and a Terminate action that sets the run to Failed. It does not automatically identify every failing action or dynamically find the owner.
Companion video
Video: Send Yourself a Failed Flow Link in Power Automate. Published June 8, 2026.
If the player is blocked on your network, open the video on YouTube.
Need help applying this to your own setup? Read about consulting.