 Office Solutions Pro
Batch generate Word and PDF documents from a SharePoint list
Use a Yes/No column and Power Automate to create a Word document and a PDF for every marked SharePoint list item, then clear the marks when the flow is done.
On this page
- Overview
- Before you begin
- 1. Create the Word template
- 2. Add the Batch column
- 3. Start the flow
- 4. Find the marked rows
- 5. Prepare a run folder and a variable
- 6. Loop through the rows
- 7. Fill in the Word template
- 8. Save the Word document
- 9. Convert it to PDF
- 10. Save the PDF
- 11. Move both files to the final folder
- 12. Clear the Batch mark
- 13. Test the flow
- Troubleshooting
- Next steps
SharePoint has triggers for a selected item and a selected file, but none for several selected items. To process many rows, you can add a Batch column that people use to mark rows. A flow then finds the marked rows, generates the documents, and clears the marks.
This walkthrough creates both a Word document and a PDF for each row. Most people will need only one, so skip the parts you do not need.
Before you begin
You need:
- A SharePoint list with your data. The example is a Requested Projects list.
- A library or folder for templates and working files. The example uses
Template Processing, with a template in aRequest Intake Templatefolder. Keeping templates apart from final documents means users only need access to the output. Each run also makes its own folder in this library. - A destination folder. The example uses
Shared Documents/Project Requests. - Microsoft Word desktop on Windows to create the template. The Developer tab is not available in Word on the web, and creating templates in Word for Mac is not supported.
- It helps to build the single-item flow first, in Create Word and PDF documents from a SharePoint list item. This flow uses the same actions inside a loop.
- Premium licensing. Word Online (Business) is a premium connector. This flow starts from the list, so it runs under the license of whoever starts it. Each of those people needs a Power Automate Premium license, unless the flow itself is assigned a Process license, which covers everyone who runs it. See Licensing.
- No MFA conditional access policy on the Populate action. The Populate action can’t be used if an MFA conditional access policy is enabled. Check with your administrator if your organization has one.
The site, list, library and flow names in the screenshots are examples. Use your own.
As written, this flow supports one run at a time, whoever starts it and however it’s started, up to 50 marked rows in a run, and a list of up to 5,000 items. Nothing in the flow enforces the one run at a time; step 12 explains what happens if two runs overlap. It stops without making anything if more than 50 rows are marked. Step 4 explains why, and what to change for a larger list.
1. Create the Word template
The template is built the same way as for a single item. See Build the Word template for the full steps. In short:
- In Word desktop, lay out the headings and fixed text, then use the Developer tab to add a Plain Text Content Control wherever a value should go.
- In each control’s Properties, set Title to the name of the matching SharePoint column. Every control needs a different Title. The same value in Tag is optional. For a value that can run to several paragraphs, also select Allow carriage returns (multiple paragraphs).
- Use Design Mode to check your spacing, then turn it off.
- Save the file as a
.docxand upload it to your template folder.
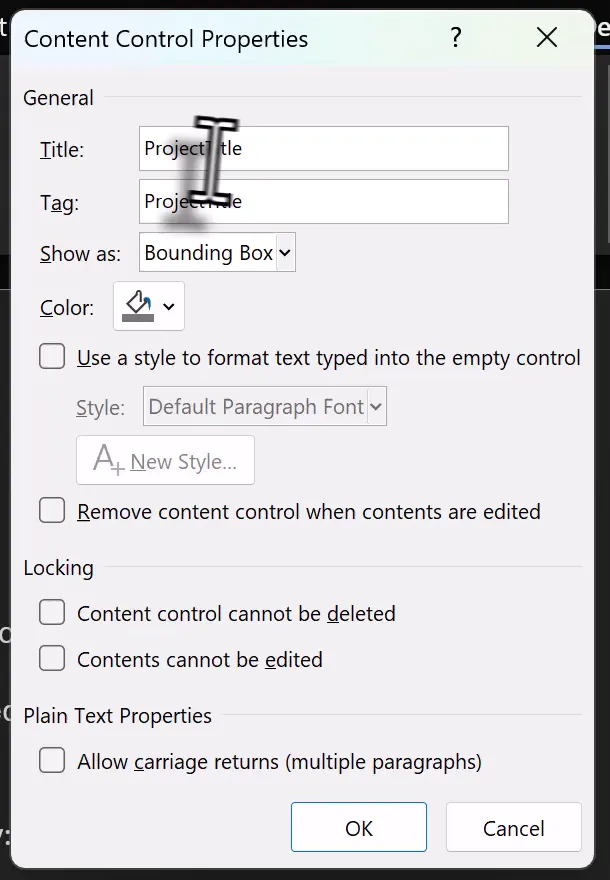
Use plain text controls. The connector doesn’t support rich text, building block gallery, date picker, or check box content controls, or legacy form controls. Input files can be up to 10 MB.
2. Add the Batch column
- In the list, select Add column > Yes/No, then Next.
- Name the column
Batch. - Set Default value to No.
- Select Save.
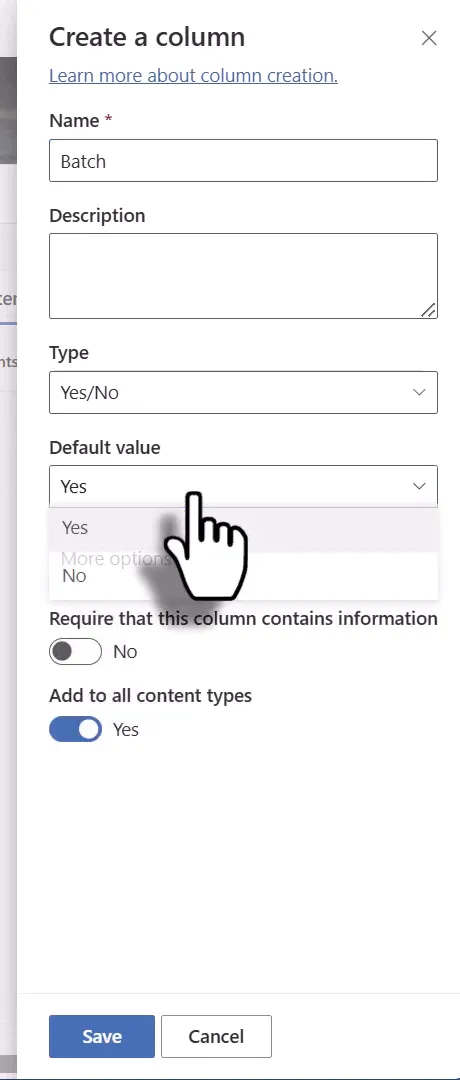
Batch is one shared column, not a private selection. Everyone who can edit the list sees the same marks, and a run processes every marked row, including rows that someone else marked. Before marking rows, check the column for marks you didn’t make. Separate batches for each person need a different design, which this tutorial doesn’t cover.
To use it, people select Edit in grid view, then mark the rows they want.
3. Start the flow
Build the flow in the default environment. The list’s flow menu only lists flows from there for this trigger.
- In Power Automate, select the default environment, and create a new flow.
- Add the SharePoint trigger For a selected item.
- Select your site and list.
- Name the flow, such as
SharePoint Multi-Select to Document, and save it as you go.
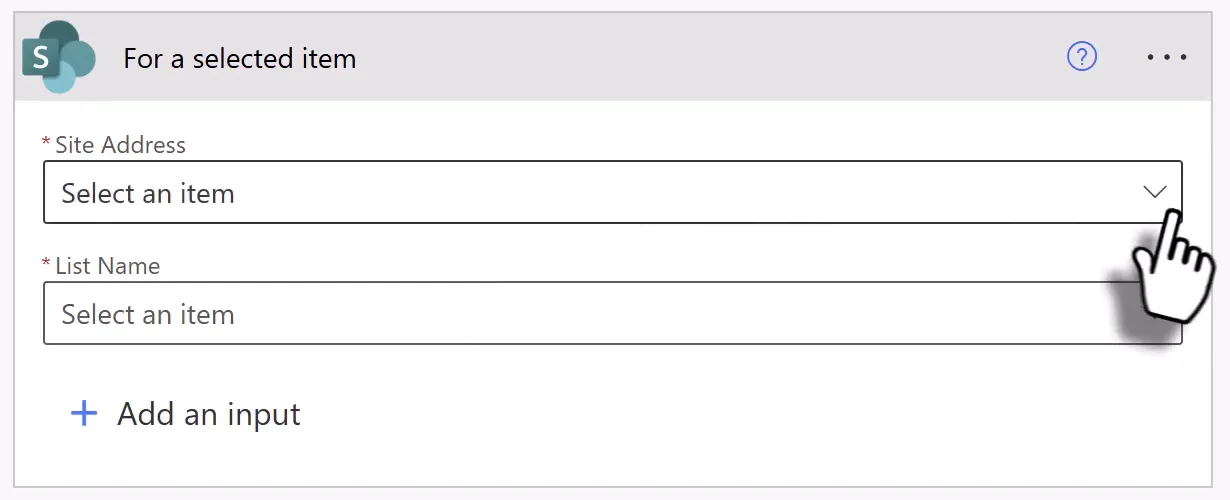
The selected item only starts the flow. The flow works on rows with Batch set to Yes, whichever row you select. You could use a manual or scheduled trigger instead. A separate article covers starting it from a button on a page.
4. Find the marked rows
- Add the SharePoint action Get items, and select your site and list.
- In Filter Query, filter on Batch equal to
1. In OData form, this is:
Batch eq 1Yes/No columns are stored as 1 and 0, so 1 means Yes.
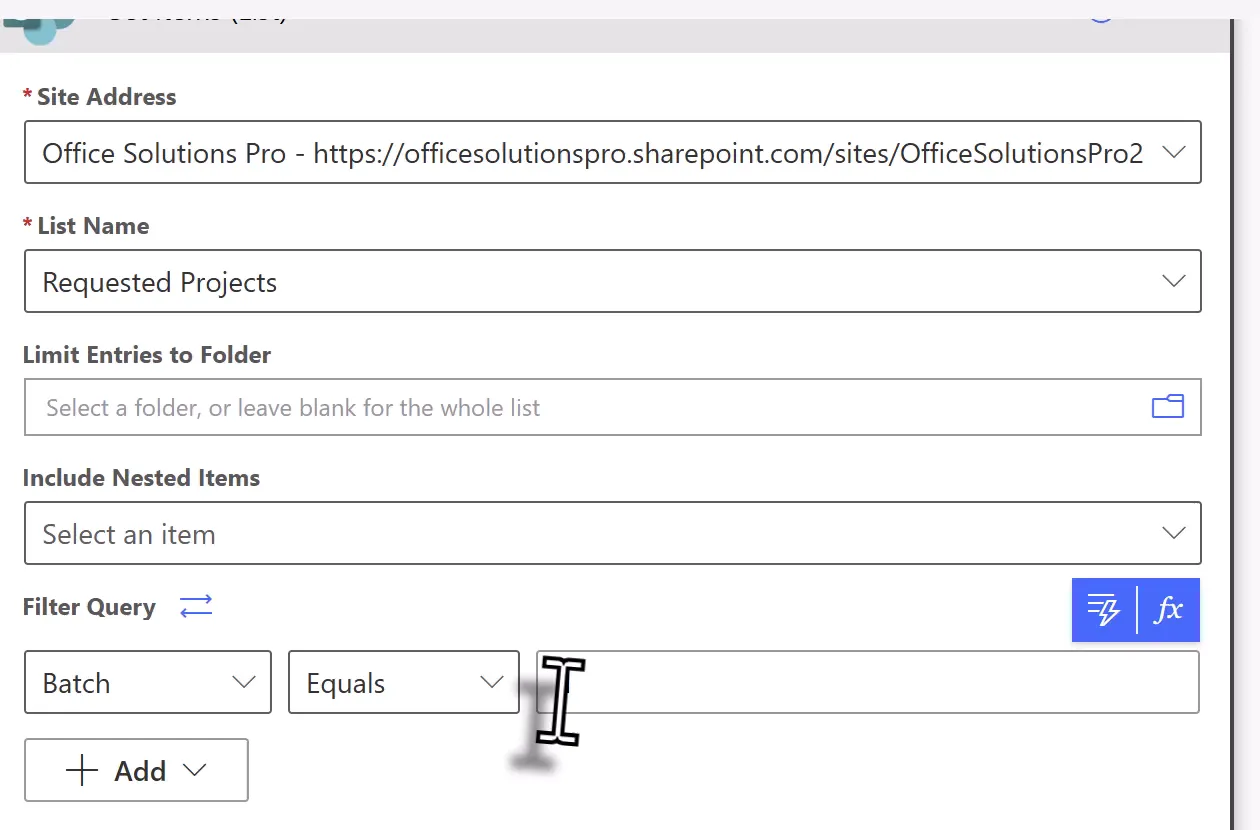
A filter decides which rows match. It doesn’t decide how many come back. If you only set the site and list, Get items returns 100 items, so a larger batch would be cut short. This flow sets its own limit of 50 rows, and checks for more before it makes anything. Each row makes two calls to the Word connector, which allows 100 calls per connection every 60 seconds, so keep batches modest. You can choose another limit, but try a full batch of that size before you rely on it.
-
In the action’s advanced parameters, set Top Count to
51, one more than the limit. Leave Pagination off in the action’s Settings. -
After Get items, add a Condition. In the first box, enter this expression, choose is greater than, and enter
50in the last box:length(body('Get_items')?['value'])The name in
body()is the action’s name with underscores in place of spaces. If you renamed Get items, change it here. -
Under True, add Terminate. Set Status to Failed, Code to
TooManyMarkedRows, and Message toMore than 50 rows are marked. Clear some marks and run the flow again.Leave False empty.
Terminate stops the run and skips the remaining actions. Because the check comes before the loop, a batch that’s too large stops before any document is made, and every mark stays in place. Terminate can’t go inside a loop, which is another reason it sits here.
Asking for 51 rows proves only that no more than 50 came back. It doesn’t prove that every marked row came back, because on a large list Get items can miss rows (see the large-list note below). Step 12 explains what the list shows after a run.
If the list has more than 5,000 items, index the Batch column, and turn on Pagination. Microsoft lists a known limitation: on a list with more than 5,000 items, a filtered Get items may return no records if no items in the first 5,000 match the filter. The fix it gives is to enable Pagination. Set its Threshold to 51. Pagination works in pages, so it can return more than the threshold. As long as more than 50 rows come back, the check still stops the run. Microsoft doesn’t say that indexing or pagination returns every marked row. The view filtered to Batch = Yes depends on the index too: a view that shows more than 5,000 items can reach the list view threshold, and a view that can’t use an index may show only part of the list, or nothing. Try the flow and the view on a full-size copy of your list before you rely on them.
5. Prepare a run folder and a variable
-
Add the SharePoint action Create new folder, after the Condition and outside it. Select your site, set List or Library to your working library, and set Folder Path to
Runs/followed by this expression:workflow()?['run']?['name']workflow()returns details of the current run, including the run’s name, so every run gets its own folder for working files.
Skip the rest of this step if your list has no multi-select columns.
The example’s Impact Areas column can hold several values, so they need to be joined into one piece of text.
- Add Initialize variable.
- Set Name to
varImpactAreasand Type to String.
This action must stay outside the loop you add next, and outside the Condition. Keep concurrency control off on the loop, because each row uses the same variable.
6. Loop through the rows
- Add Apply to each, and set its output to body/value from Get items, the list of rows. Rename it
Apply to each (Item Processing). - Inside it, add Set variable for
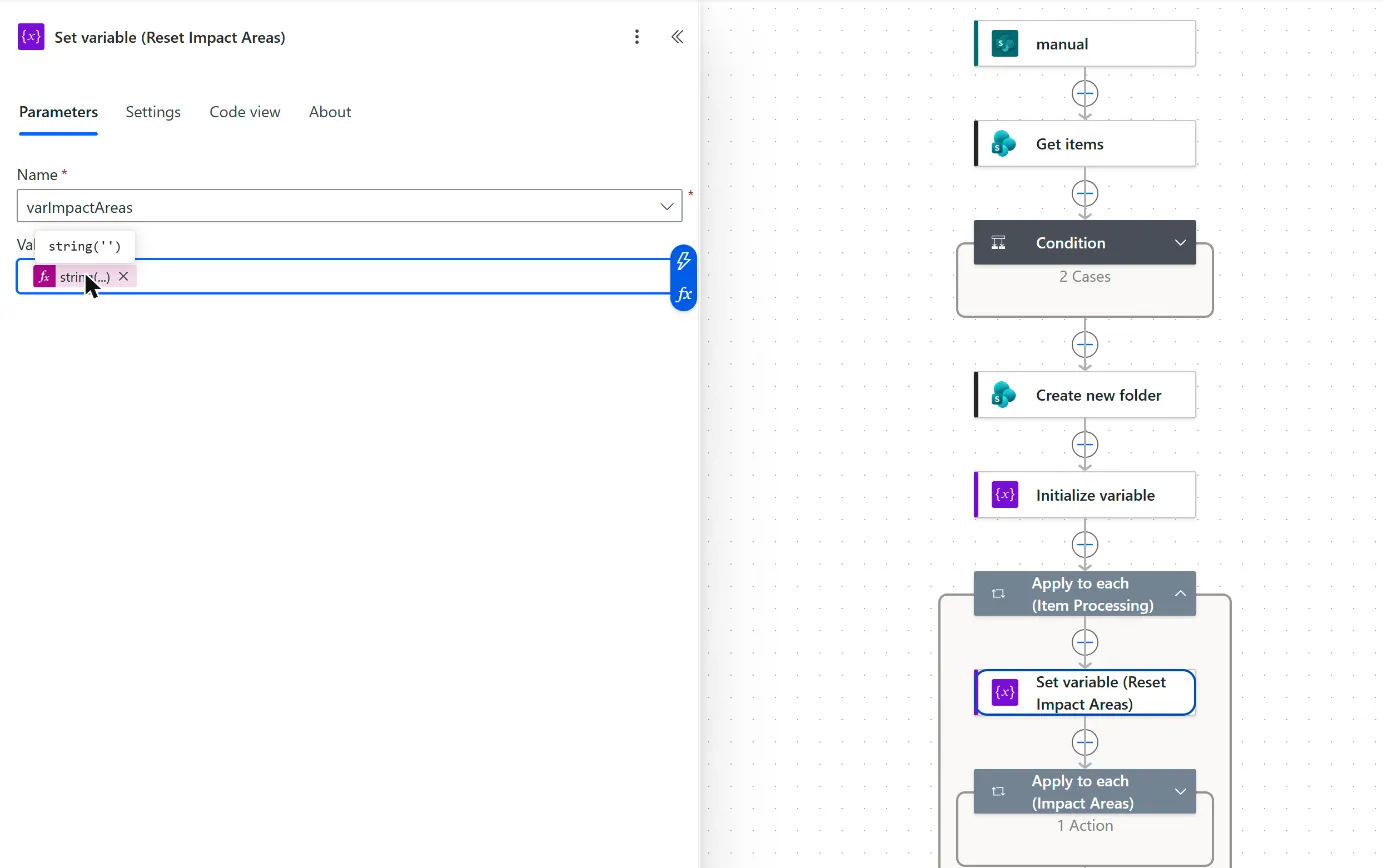
varImpactAreas, and set Value to this expression, which returns empty text. Rename itSet variable (Reset Impact Areas). This clears the value from the previous row.
string('')Two apostrophes on their own also mean empty text, but the designer then shows Value as empty and won’t save the flow again.
- Still inside the outer loop, add another Apply to each. Set its output to Impact Areas from Get items, the list of values, and rename it
Apply to each (Impact Areas). - Inside it, add Append to string variable, and select
varImpactAreas. - In Value, search for your column and select Impact Areas Value, then type a comma and a space.
Add the inner loop first. If you add Append to string variable directly in the outer loop and select Impact Areas Value, the designer can wrap it in two new loops, one of them over every row, which repeats each row’s values once for every marked row.
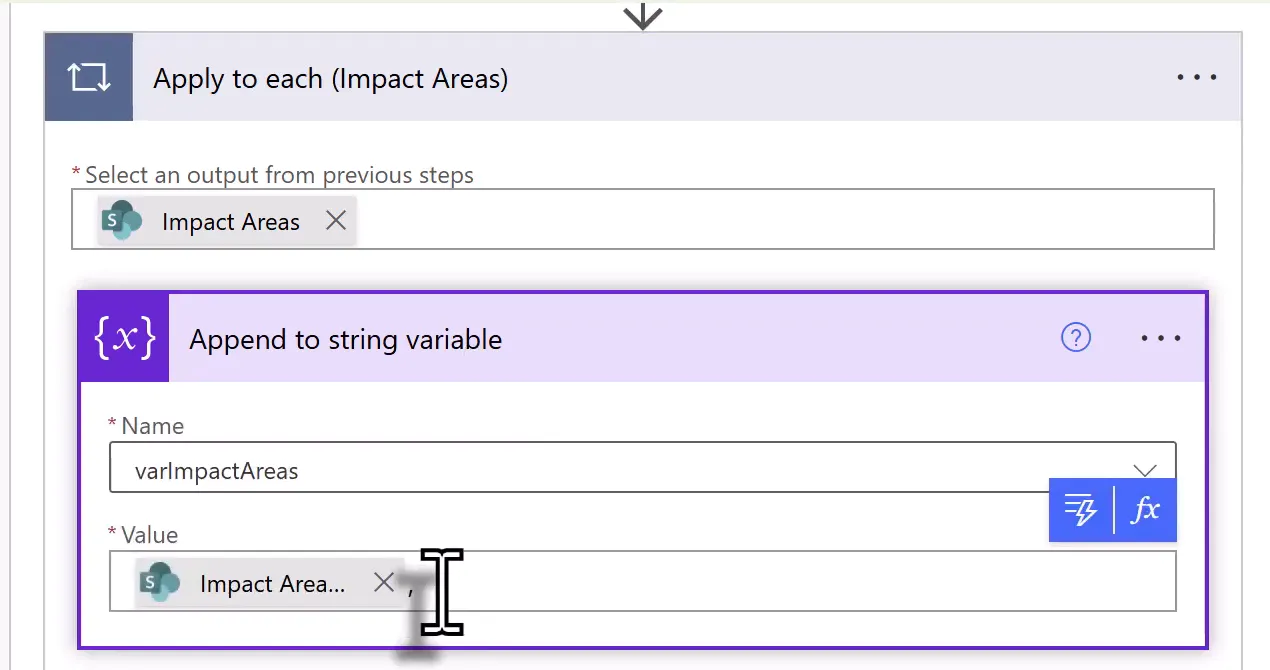
This pattern leaves a comma and space after the last value. Keep that in mind if the text needs to be exact.
The remaining actions go inside the outer loop and after the inner loop.
7. Fill in the Word template
- Add the Word Online (Business) action Populate a Microsoft Word template.
- Select your site, your template library, and the template file. The action then lists your content controls.
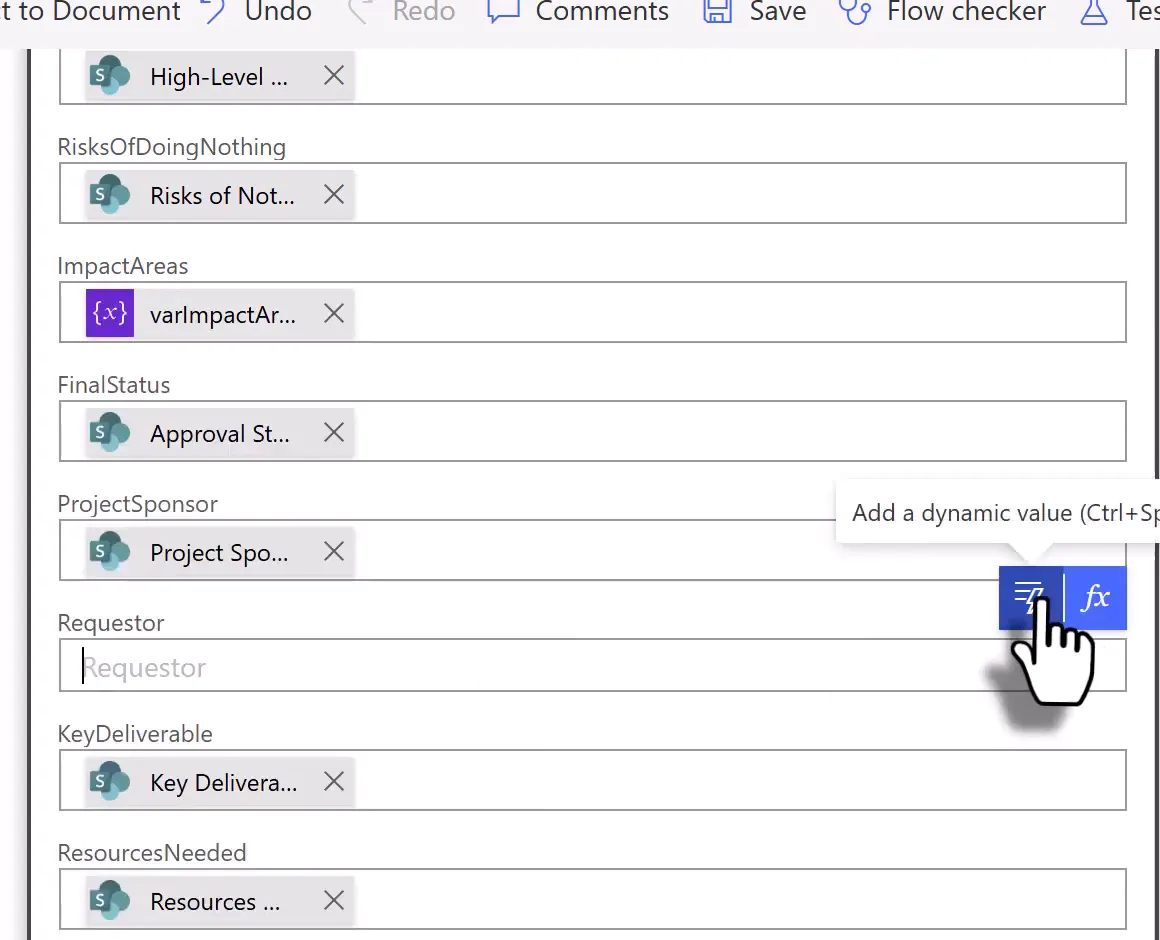
- Fill in each control with the matching column from Get items:
- For Choice columns, select the entry ending in Value.
- For a multi-select column, select
varImpactAreas. - For a Person column, pick the part you want, such as Created By DisplayName.
8. Save the Word document
- Add the SharePoint action Create file, and rename it
Create file (Word Document). - Set Folder Path to the run folder: your working library, then
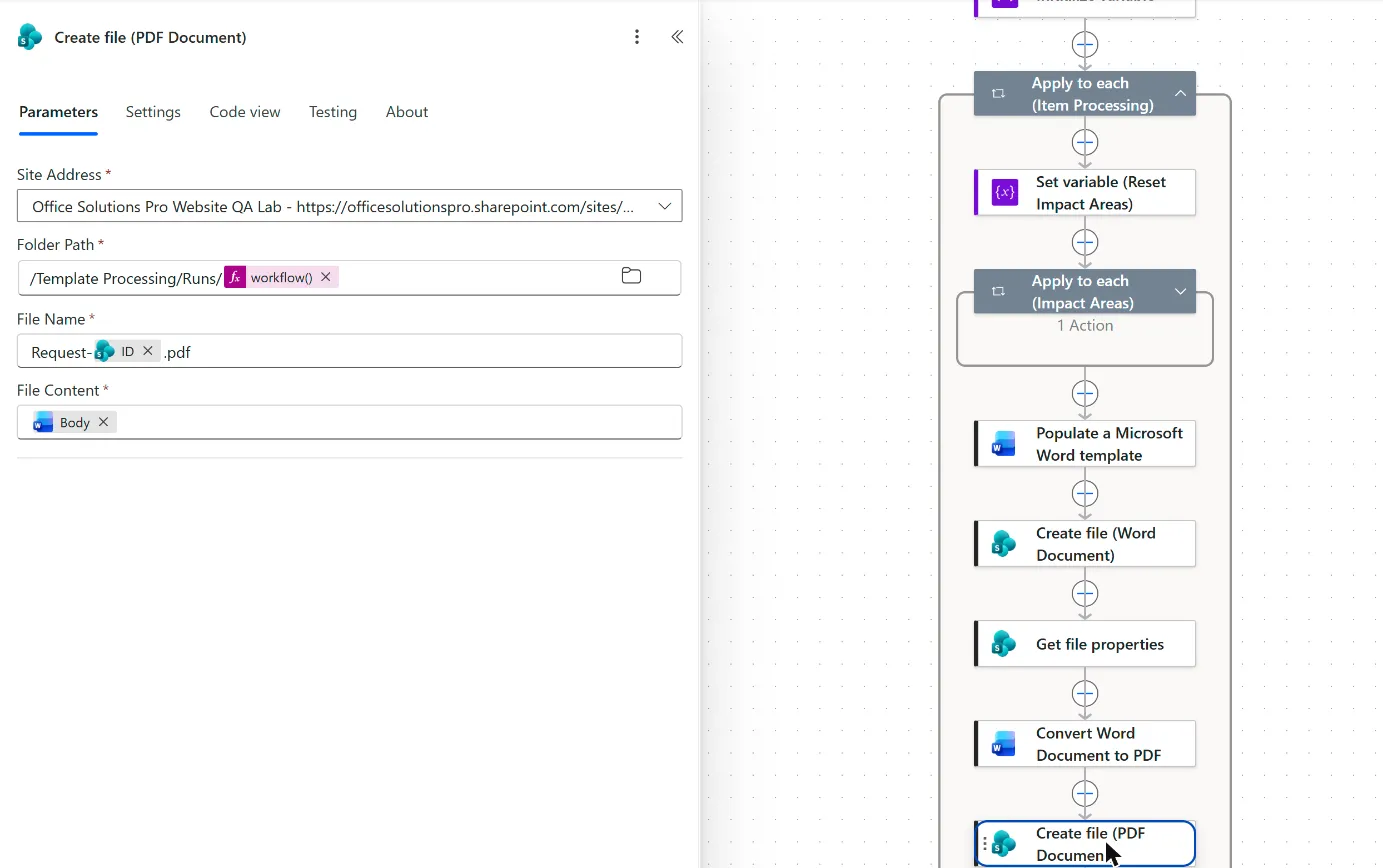
/Runs/, then the run-name expression from step 5. In the example, that is/Template Processing/Runs/followed by the expression. - Set File Name to
Request-, then ID from Get items, then.docx. - Set File Content to Microsoft Word document from the template action.
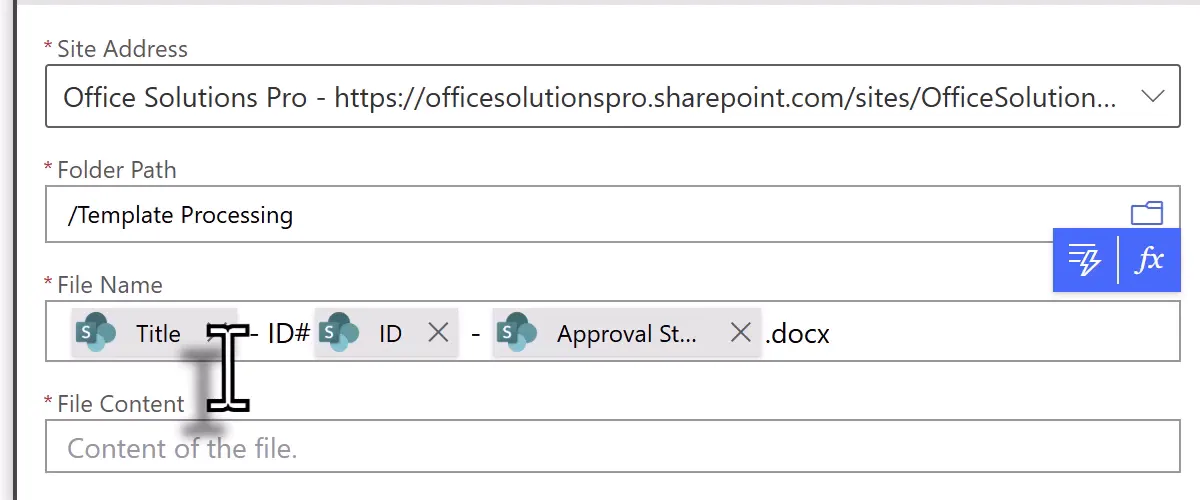
The example in the screenshot builds the name from the title, ID, and status. Use the run folder and the Request- name instead. Named from the ID alone, each item ends at the same Word file and PDF on every run, even after someone edits its title, and the title appears inside the document. If you’d rather keep a history, see File names and repeat runs for what each naming choice keeps.
9. Convert it to PDF
Convert Word Document to PDF doesn’t support files labeled Confidential or Highly Confidential. Handle those files outside this flow.
-
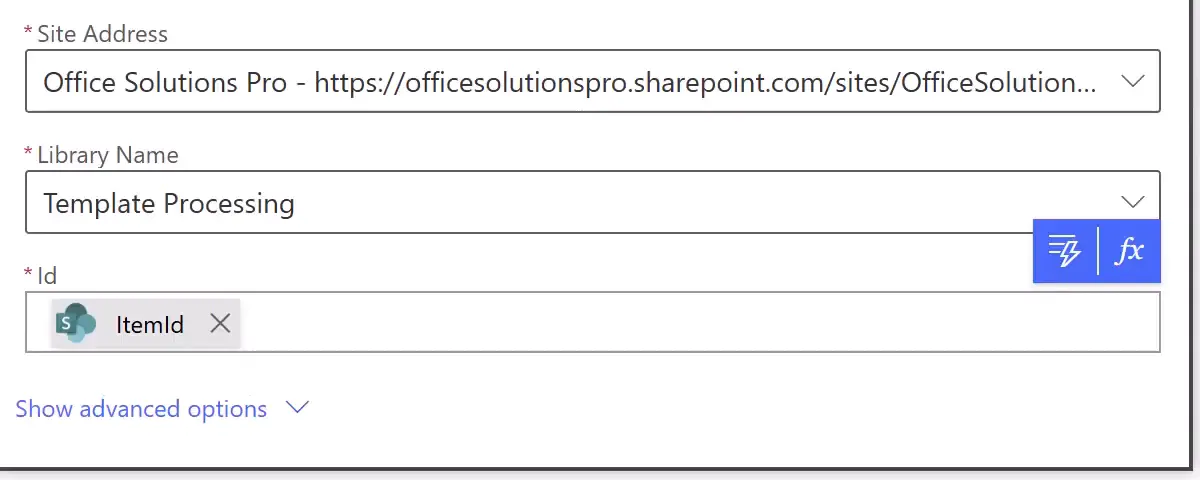
Add the SharePoint action Get file properties. Select the site and library, then set Id to ItemId from Create file (Word Document).
-
Add Convert Word Document to PDF, and select your site and library.
-
In File, type
/Runs/, add the run-name expression, and type/. Then select File name with extension from Get file properties. The path starts inside the library, so leave out the library’s name.
10. Save the PDF
- Add another SharePoint Create file, and rename it
Create file (PDF Document). - Use the same run folder and the same name, ending in
.pdf. - Set File Content to the output of Convert Word Document to PDF.
11. Move both files to the final folder
- Add the SharePoint action Move file, and rename it
Move file (Microsoft Word). - Select your site in Current Site Address, and set File to Move to the ID from Create file (Word Document).
- Select the destination site and folder.
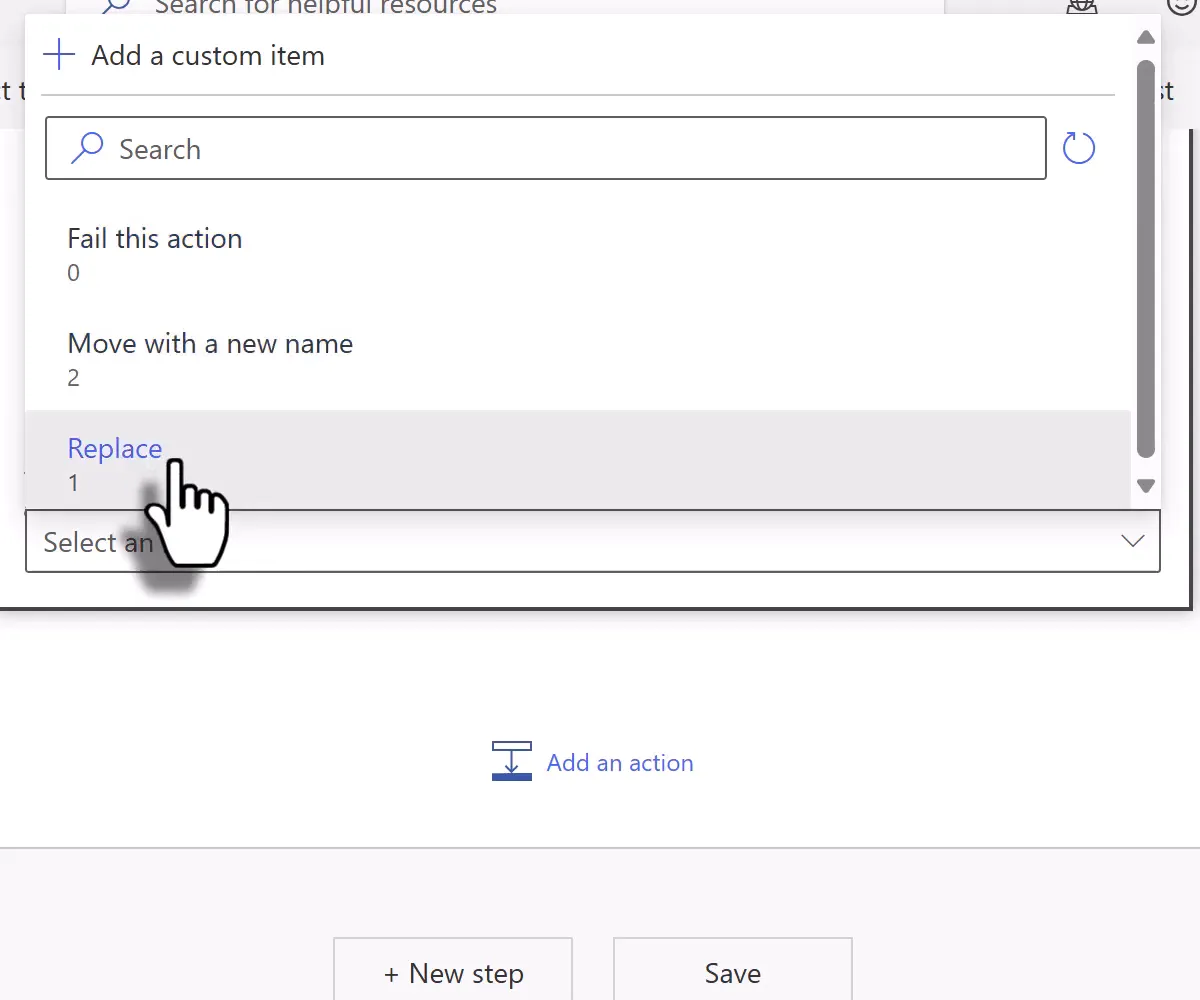
- Set If another file is already there to Replace.
- Repeat for
Move file (PDF Document), using the ID from Create file (PDF Document).
A moved file keeps its name, so the final files are Request-<ID>.docx and Request-<ID>.pdf. The run’s folder is left empty. Step 12 covers what happens to it.
12. Clear the Batch mark
- Still inside the outer loop, add the SharePoint action Update item.
- Select your site and list.
- Set Id to the ID from Get items. If the list’s title column is required, as it is by default, also set it from Get items. The example’s is Project Title, set to Title.
- Set Batch to No.
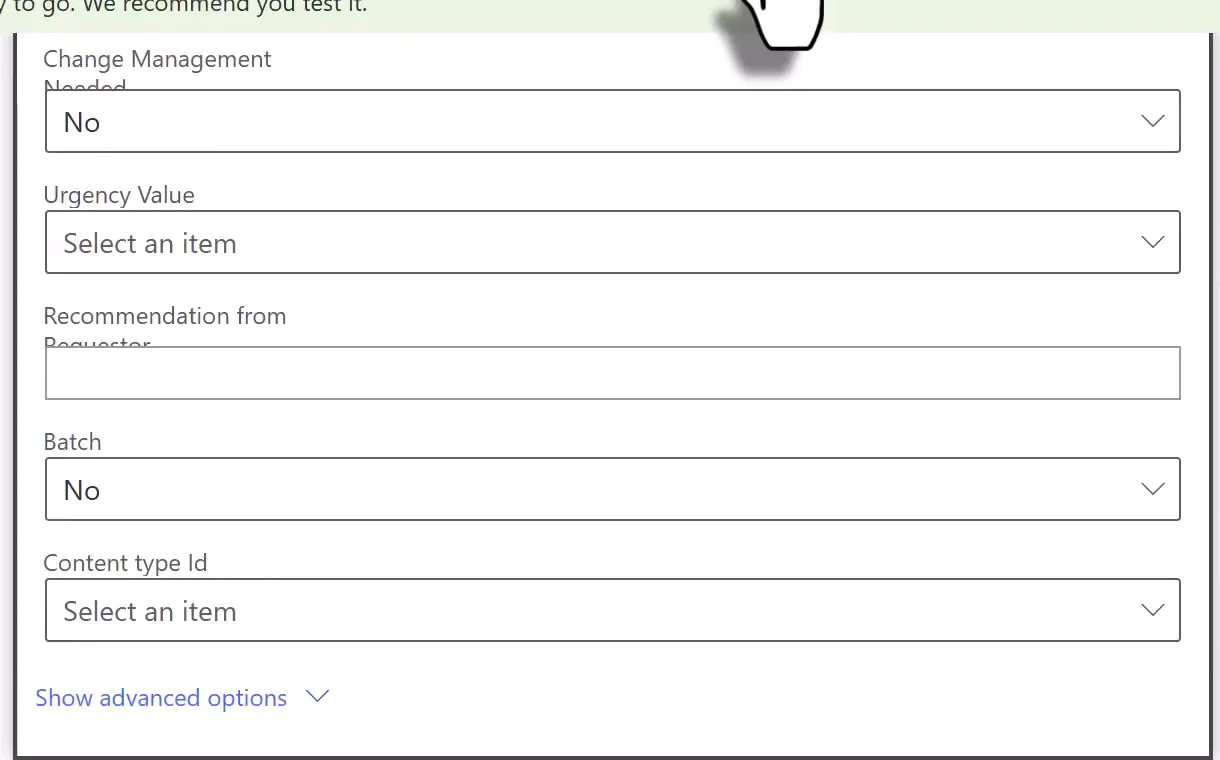
Check every other field before saving. The action can show values for columns that you did not choose. In the example, Yes/No columns such as Change Management Needed also show No, and Choice columns with a default value, such as Approval Status, show that default. If a field holds a value in this action, the flow may write it to the row. Map those columns to their current values from Get items so that the update changes only Batch. Those values are the ones Get items returned when the run started, so don’t edit marked rows until the run finishes.
Updating an item also changes its Modified details, and it can start other flows that watch the list.
-
After the outer loop, and outside it, add a Compose action named
Rows retrieved. Set Inputs to this expression:length(body('Get_items')?['value'])The run history then shows how many rows Get items returned. If a row’s actions fail, Rows retrieved is skipped; open Get items in that run instead.
The run’s empty folder stays in Runs. If a row’s actions fail, the run’s folder keeps any of that row’s working files that weren’t moved out, so you can see how far it got. The folder is named with the run’s name, which workflow() returns, so you can match it to the run in the run history.
Delete old run folders by hand. From time to time, open Runs in your working library and delete old folders. Before you delete one, make sure no run is in progress, and that the final documents for its rows are in the destination folder and open correctly. Keep a failed run’s folder until you’ve found out why it failed. Delete only folders inside Runs, never Runs itself or the destination folder.
Reading the list after a run. Update item keeps its default run-after setting, so it clears a row’s mark only after that row’s documents are made. A row whose actions fail keeps its mark.
A cleared mark means a run processed that row. A row still marked after a run wasn’t processed by that run. Its actions failed, or the run stopped before reaching it. It may have been marked after the run started, in which case it waits for the next run. Or Get items didn’t return it, as the large-list note in step 4 describes.
An empty view filtered to Batch = Yes shows only that no marked row is waiting. It doesn’t show that every row someone meant to include was marked, or that a row someone unmarked by hand was processed. If a run retrieves no rows while that view still shows marked rows, Get items didn’t return them. That can happen on a list with more than 5,000 items, as Microsoft describes.
One run at a time. Each row’s mark is cleared only after its documents are made, so a second run started before the first one finishes can pick up the same rows. That includes a run someone else starts, and a run started another way, such as from a button on a page. Nothing in the flow prevents it. Separate run folders keep the two runs from sharing a working file, but both replace the same Request-<ID> files, and each Move file replaces its file on its own:
- Both runs can succeed without an error. Each final file shows the run that last replaced it. When two runs process the same row, its Word file can come from one run and its PDF from the other, and the row may have changed in between.
- If a row’s actions fail after its Word file is moved and before its PDF is, that row’s Word file is new and its PDF is from an earlier run, or missing if there was none. The row keeps its mark.
So agree with everyone who uses the flow that only one run happens at a time. Don’t edit marked rows during a run either, because Update item writes back the values Get items returned when the run started, so an edit made in between can be overwritten. After a run that failed or overlapped another, open both final files for each affected row and check that they match the row and each other. To repair them, wait until no run is in progress, mark those rows, and run the flow once more. If that run succeeds, both files for each row come from it.
13. Test the flow
- In the list, select Edit in grid view, and mark two rows in Batch.
- Exit grid view, then select any one row. The flow is not offered if more than one row is selected.
- Select Integrate > Flows, and choose your flow. The first time, select Continue. Then select Run flow.
- Open the destination folder. Four files should appear. In the example, this takes a minute or two.
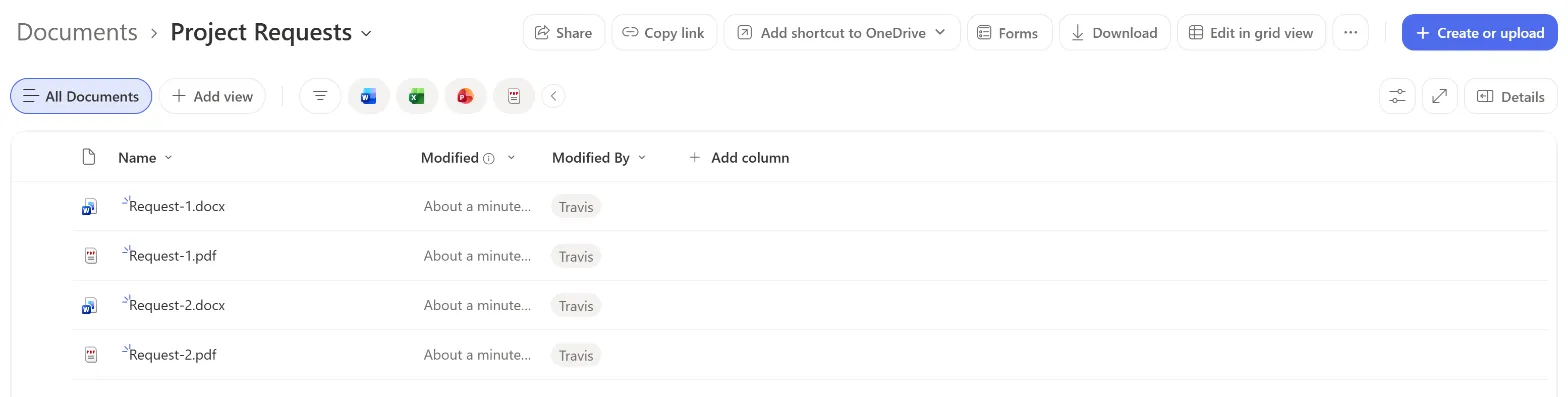
- Open a file from each pair and check every value.
- Return to the list and confirm that Batch is cleared. After a run that succeeds, Rows retrieved in the run history should match the number you marked in this test. A cleared mark, not the count, shows that a row was processed. In
Runs, the run’s folder is still there, and empty. - Run it again with the same rows marked, and confirm that the files are replaced, not duplicated.
- Mark more than 50 rows and run it. The run should fail with your message, make no files, and leave every mark in place.
Troubleshooting
| Symptom | Likely cause | What to do |
|---|---|---|
| The flow processes nothing | No rows are marked, or the filter is wrong | Mark rows, and use Batch eq 1 |
| The run fails with your “more than 50 rows” message | Too many rows are marked | Clear some marks, run the flow, then mark and run the rest |
| Rows stay marked after a run that succeeded | They were marked after the run started, or the list has more than 5,000 items and Get items didn’t return them | Run the flow again. For a large list, follow the large-list advice in step 4 |
| Create file fails | Folder Path doesn’t match the folder that Create new folder made | Use /Runs/ and the same run-name expression in both |
Empty folders build up in Runs | Each run leaves its folder behind | Delete old folders by hand, as described in step 12 |
| A row’s Word file and PDF show different values | Two runs processed the row, or its actions failed between the two Move file actions | Wait until no run is in progress, mark the row, run the flow once more, and check both files |
| The flow is not under Integrate > Flows | More than one row is selected, the flow is in another environment, or it’s turned off | Select one row, build in the default environment, and turn the flow on |
| A control is missing from the template action | The control is an unsupported type or has no title | Use a plain text control with a Title |
| Values from one row appear on the next | The reset step is missing | Add the Set variable step at the start of the outer loop |
| Multi-select values show as JSON text | The wrong token was used | Use the value token in the inner loop, with Impact Areas as the loop’s input |
| Other Yes/No columns changed after the run | Update item wrote its default values | Map those fields to the current row values |
| Rows are processed again | Update item failed, so Batch stayed Yes | Check run history, and confirm Update item is inside the outer loop |
| Convert to PDF cannot find the file | The file value doesn’t hold the run folder’s path | Use /Runs/, the run-name expression, /, and File name with extension |
| A step after Create file cannot find the new file, although the path is right | The file is not available yet | Microsoft recommends a short delay, about a minute, before later actions use a file created from the Word connector. Add a Delay before the step that fails |
| The conversion fails for a labeled file | The file has a Confidential or Highly Confidential sensitivity label | Handle these files outside the flow |
| Documents are missing formatting | Template spacing or layout issue | Adjust the Word file and upload it again |
Next steps
Instead of the list’s flow menu, you can start this flow from a single button on a SharePoint page. Copy the flow and change its trigger to Power Apps (V2). The canvas app rule in Licensing then applies. The separate article on running a flow on multiple items from a Power App button shows how.
Companion video
Video: Batch Generate Word & PDF from SharePoint List with Power Automate (Step-by-Step). The video creates the files at the top of the template library, named from the title, ID, and status, before moving them, and has no limit on marked rows. The steps here use a folder for each run, name the files by ID only, and stop when more than 50 rows are marked.
If the player is blocked on your network, open the video on YouTube.
Need help applying this to your own setup? Read about consulting.