 Office Solutions Pro
Convert Word files to PDF from a SharePoint library button
Build a Power Automate flow that converts a selected Word file to PDF, replaces any earlier copy, and runs from a button in a SharePoint document library.
On this page
- Overview
- Before you begin
- Decide how repeat conversions should behave
- 1. Create the flow
- 2. Get the file details
- 3. Convert the file
- 4. Create the PDF
- 5. Move the PDF and replace older copies
- 6. Test from the library
- 7. Add a column for the button
- 8. Format the column as a button
- 9. Test the button
- Share it with your team
- Troubleshooting
Converting a document to PDF by hand is easy to forget. This walkthrough builds a flow that does it for a selected file, then adds a button to the library so that people do not have to look through the library’s menus for the flow.
Before you begin
You need:
- A SharePoint document library with a Word file to test with. The example library is named
Demo. - A second library to use as a working area. The example uses
Template Processing. Each run makes its own folder there. - Permission to create flows, and to add and format columns in the library.
- Premium licensing. Word Online (Business) is a premium connector. This flow starts from the library, so it runs under the license of whoever starts it. Each of those people needs a Power Automate Premium license, unless the flow itself is assigned a Process license, which covers everyone who runs it. See Licensing. If that does not fit your organization, see the article on generating PDFs with standard connectors.
The site, list, library and flow names in the screenshots are examples. Use your own.
Decide how repeat conversions should behave
Answer this before you build, because it changes the flow.
| What you want | How to build it |
|---|---|
| One PDF that is always current | Create the PDF in a working folder, then move it with Replace. This article uses this approach |
| A new copy each time | Add the run’s name to the PDF’s file name. In step 4, set File Name to Name, then -, then the run-name expression, then .pdf. No other run has the same name, so no copy replaces another. You can add the date and time as well, to make the names easier to read, but on its own a time can repeat. The copies stay until someone deletes them, so plan how long to keep them |
| Simple, and repeat runs do not matter | Create the PDF directly in the library. A second run for the same file is likely to fail |
The PDF takes its name from the Word file, so “always current” holds only while that name stays the same. If someone renames the Word file, the next run makes a new PDF, and the old one stays. Two Word files with the same name in different folders also share one PDF in the destination, and each run replaces the other’s. If either matters, keep a separate destination folder for each source folder, and delete old PDFs after a rename.
1. Create the flow
Build the flow in your default environment. The library’s flow menu lists only flows from the default environment for this trigger.
- In Power Automate, select the default environment, and create an instant cloud flow.
- Name it, for example
Convert Word Document to PDF - Document Library. - Add the SharePoint trigger For a selected file, and select your site and library.
Use For a selected file for a library. For a selected item is for lists.
2. Get the file details
The trigger gives you the file’s ID, but the Word action needs its name.
- Add the SharePoint action Get file properties.
- Select your site and library.
- Set Id to the ID from the trigger.
- Save the flow. Saving as you go protects your work.
3. Convert the file
The action does not support files with a Confidential or Highly Confidential sensitivity label. Convert those files another way.
-
Add the Word Online (Business) action Convert Word Document to PDF.
-
In Location, select your SharePoint site.
-
In Document Library, select your library.
-
In File, type
/. A small menu opens; press Esc to close it, so that the slash stays. Then add this expression after the slash:join(skip(split(body('Get_file_properties')?['{FullPath}'], '/'), 1), '/')The name in
body()is the action’s name with underscores in place of spaces. If you renamed Get file properties, change it here.
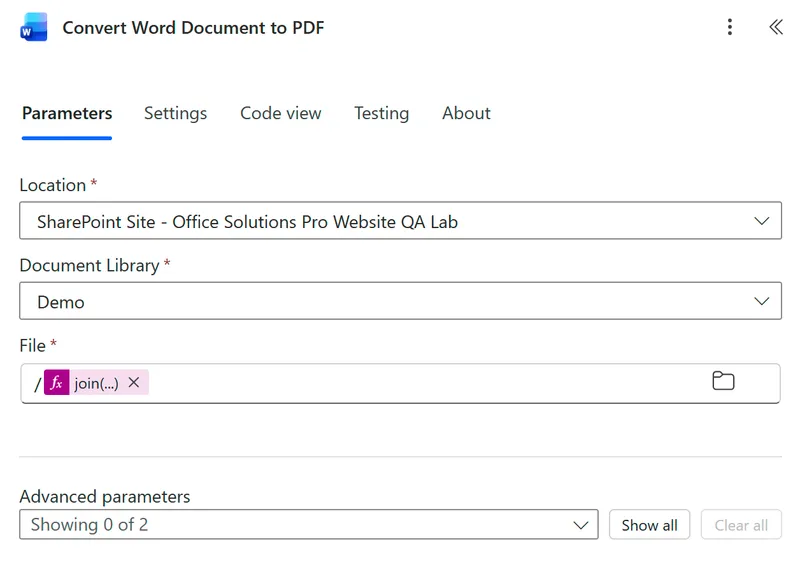
The File box expects the file’s path inside the library, not an ID. Full Path from Get file properties starts with the library’s folder, as in Demo/Sub/Cloud Migration.docx. The expression drops that first part, so the box gets /Sub/Cloud Migration.docx, wherever the file is. If you use only / and File name with extension, a file in a subfolder isn’t found, or, when a file with the same name is at the top of the library, that file is converted instead.
4. Create the PDF
Each run creates its PDF in a folder of its own, so two runs never share a working file.
-
Add the SharePoint action Create new folder. Select your site, set List or Library to your working library, and set Folder Path to
Runs/followed by this expression:workflow()?['run']?['name']workflow()returns details of the current run, including the run’s name, which is different for every run. -
Add the SharePoint action Create file.
-
Select your site.
-
In Folder Path, enter the run folder: your working library, then
/Runs/, then the same expression. In the example, that is/Template Processing/Runs/followed by the expression. -
In File Name, select Name from Get file properties, then type
.pdf. Name does not include the extension. -
In File Content, select the PDF output from Convert Word Document to PDF. It’s listed as PDF document.
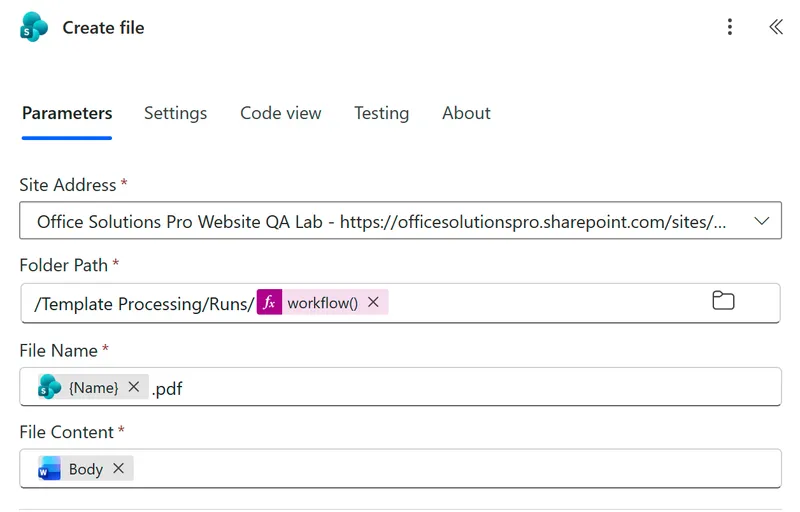
If you chose the simple option, skip Create new folder, and set Folder Path to the final folder. You can then stop here and test.
5. Move the PDF and replace older copies
- Add the SharePoint action Move file.
- In File to Move, select the Id from Create file. The token appears as body/Id.
- Select the destination site and folder.
- Set If another file is already there to Replace.
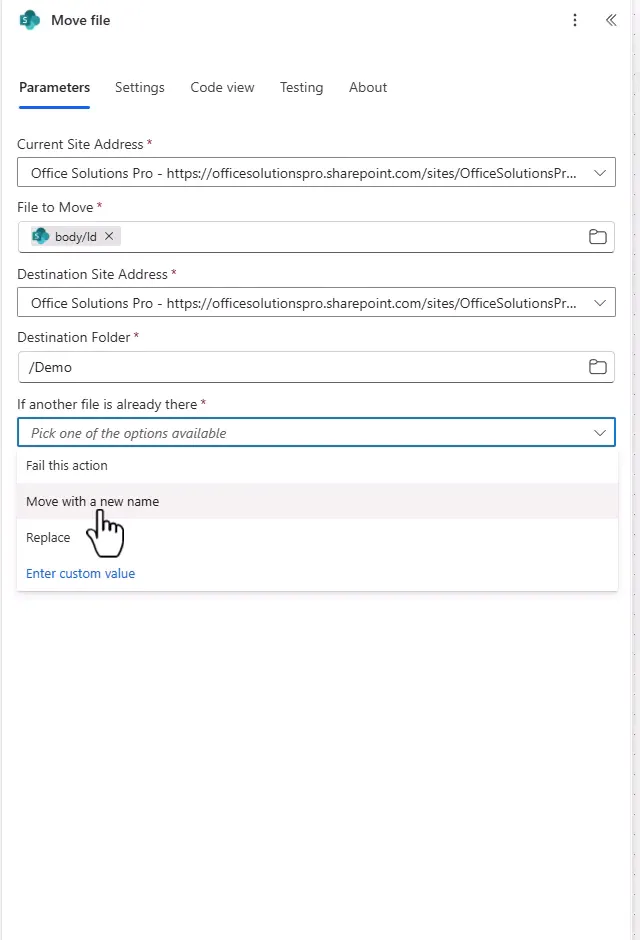
The move leaves the run’s folder empty, and it stays in Runs. If a run fails, its folder keeps the working file, so you can see how far it got. The folder is named with the run’s name, which workflow() returns, so you can match it to the run in the run history.
Delete old run folders by hand. From time to time, open Runs in your working library and delete old folders. Before you delete one, make sure no run is in progress, and that the PDF is in the destination folder and opens correctly. Keep a failed run’s folder until you’ve found out why it failed. Delete only folders inside Runs, never Runs itself or the destination folder.
Convert one file at a time. The flow is meant for one conversion of a file at a time, whether it’s started from the button or the library’s flow menu, and whoever starts it. Nothing in the flow enforces that. Separate run folders keep two runs from sharing a working file, but both replace the same PDF. The PDF shows the run whose Move file replaced it last. If the Word file changed between two overlapping runs, that can be the run that started first, so the PDF can show the older version. If a run fails, the PDF from an earlier run stays as it was. To be sure the PDF matches the current Word file, wait until no other run for the file is in progress, then run the flow once more. If that run succeeds, the PDF comes from it.
6. Test from the library
- In the library, select a Word file.
- Select Integrate > Flows, and select your flow. With a file selected, Integrate can be under … on the command bar. The first time, select Continue. Then select Run flow.
- Wait for the PDF to appear, and refresh the library if it doesn’t show.
- Open the PDF and check it.
- Run the flow again for the same file. The time on the PDF should update, which shows that it was replaced.
- In
Runs, the run’s folder is still there, and empty.
7. Add a column for the button
- In the library, select Add column, choose Text, and select Next.
- Enter a name with no spaces, such as
ConvertPDF, and select Save. This keeps the internal name simple. - Rename the column
Convert to PDF.
8. Format the column as a button
- Select the column heading, then Column settings > Format this column.
- If the pane doesn’t show a box of JSON, select Advanced mode.
- Delete any text in the box, then paste the contents of
flow-button-column.jsonfrom flow-button-column.zip. The JSON is adapted from the executeFlow sample in Microsoft’s PnP List Formatting repository, which is MIT licensed, so the download includes its license inLICENSE.txt.
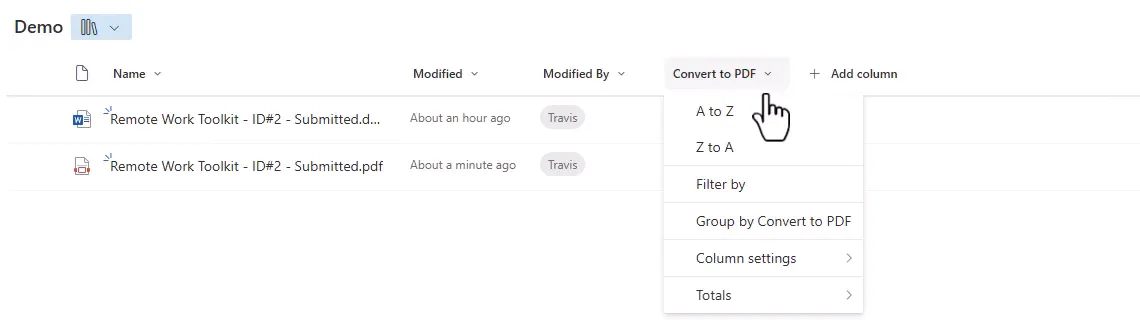
The file contains a placeholder. Replace YOUR-FLOW-ID with your flow’s ID.
To find the ID, open the flow in Power Automate and select Export > Get flow identifier. You can also copy it from the flow’s address in the browser, where it is the value after /flows/.
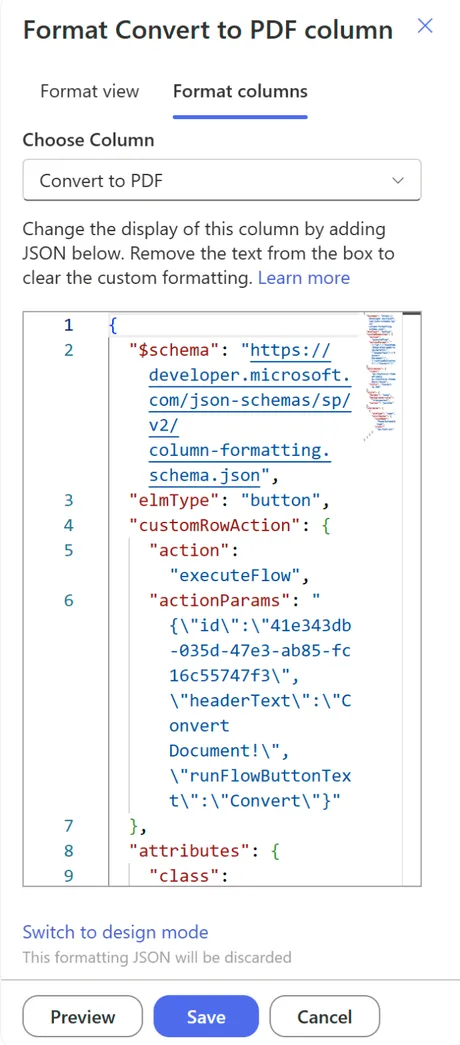
These values can also be changed:
| Part of the JSON | What it controls |
|---|---|
headerText | The title of the panel that opens |
runFlowButtonText | The button in that panel |
title | The text that appears when you hover over the button |
9. Test the button
-
Select Save. The column shows a Power Automate icon on each row.

-
Select the icon on a Word file.
-
If the panel shows a run button, select it. Solution-aware flows wait for you to select Run flow, while other flows start after the panel appears.
-
Confirm that the PDF updates.
To run more than one flow from a library, add another column with its own flow ID.
Share it with your team
Other people need access to the flow:
- On the flow’s details page, add them under Manage run-only users.
- Choose which connection the flow uses for those people.
People must have Edit permissions on the list or library to run the flow, and the licensing described above applies to each person who runs it.
Troubleshooting
| Symptom | Likely cause | What to do |
|---|---|---|
| Convert Word Document to PDF cannot find the file | The File box has an ID, or lacks the leading slash or the folder | Use / and the Full Path expression from step 3 |
| The PDF shows another file with the same name | File has only File name with extension, so a file in a subfolder is read from the top of the library | Use the Full Path expression from step 3 |
| The second run fails | The PDF already exists in the destination | Use a run folder with Move file and Replace, or add the run’s name to the file name |
| Create file fails | Folder Path doesn’t match the folder that Create new folder made | Use /Runs/ and the same run-name expression in both |
Empty folders build up in Runs | Each run leaves its folder behind | Delete old folders by hand, as described in step 5 |
| An old PDF stays after a rename | The PDF is named after the Word file | Delete the old PDF |
| A name with the date and time still fails | Two runs got the same time | Add the run’s name to the file name, as in the table at the start |
| The flow is not under Integrate > Flows | It is not in the default environment, it uses the wrong trigger, or it’s turned off | Use For a selected file in the default environment, and turn the flow on |
| The button does nothing, or reports an error | The flow ID is wrong | Paste the ID again without the quotes or surrounding text |
| Someone cannot run the flow | Run-only access, list permission, or license is missing | Check each item under Share it with your team |
| A step after Create file cannot find the new file, although the path is right | The file is not available yet | Microsoft recommends a short delay, about a minute, before later actions use a file created from the Word connector. Add a Delay before the step that fails |
| The conversion fails for a labeled file | The file has a Confidential or Highly Confidential sensitivity label | Handle these files outside the flow |
| The button fails on a PDF | The file is not a Word document | Select only Word files, or keep PDFs in a separate folder |
Companion video
Video: Convert Word to PDF Automatically in SharePoint with Power Automate | Add Button to SharePoint. The video fills File with the file name alone, and moves the PDF through one shared processing folder. The steps here use a path that also finds files in subfolders, and a folder for each run.
If the player is blocked on your network, open the video on YouTube.
Need help applying this to your own setup? Read about consulting.