 Office Solutions Pro
Control what users see in Power Apps with a SharePoint role list
Use a SharePoint list and an efficient App OnStart formula to find the signed-in user's role once, then show or hide parts of a canvas app based on that role.
Most apps have different kinds of users. An admin may need a settings screen that others should not see, and a developer may want to test unfinished features. This walkthrough keeps roles in a small SharePoint list. When the app starts, it reads the current user’s row once, stores it, and uses it wherever a control depends on a role.
The same approach works with a Dataverse table, with small differences in the formula.
This controls the app, not the data
Hiding a control changes what people see in the app. It does not protect the data behind it.
- Anyone with permission on a SharePoint list can reach that list outside your app, using the permissions they have there.
- App users need to read the role list for the check to work. Do not give them edit rights to it, or they could change their own role. Give general users Read access on that list, and limit editing to the people who manage access.
- Use SharePoint permissions to protect sensitive data, and use roles to shape the experience. To limit people to the list items they created, see Let SharePoint list users read and edit their own items.
Before you begin
You need:
- A SharePoint site where you can create a list and change its permissions.
- A canvas app that you can edit. A blank app is fine.
SharePoint is a Standard connector; the complete app still needs appropriate licenses and data permissions. Everyone who uses the app needs Read access to the role list, as described above.
1. Create the role list
-
In Site contents, select New > List, then Blank list.
-
Name it
Project Request Access Management, clear Show in site navigation, and select Create. -
Add a Yes/No column named
Admin, with Default value set to No, so that nobody becomes an admin by accident.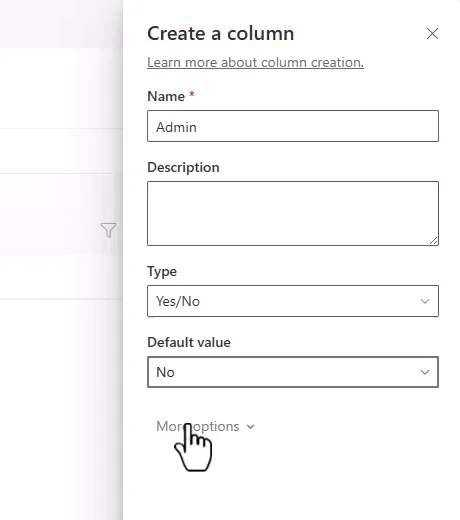
-
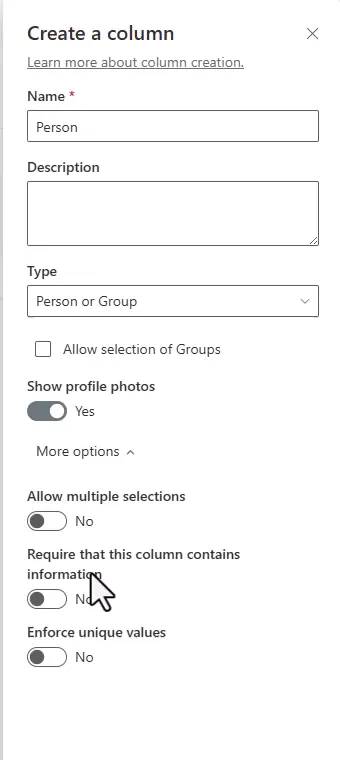
Add a Person or Group column named
Person.- Leave Allow selection of Groups off.
- Leave Allow multiple selections off. Use one row per person.
- Under More options, turn on Enforce unique values, so that a person can’t be added twice.
-
Add a row with your own name, and set Admin to Yes.

Add a Yes/No column for any other role you need, such as Developer. A developer role lets you hide unfinished features from the admins who are testing the app. Keep the number of roles as small as you can.
The Title column isn’t used here. You can leave it empty, or use it to hold the person’s name or email as text, which can be useful for sorting and filtering later.
2. Connect the app to the list
- In Power Apps, select Add data, then SharePoint.
- Select Connect directly (cloud services).
- Select your site and list, then Connect.
3. Add the OnStart formula
Select App in the Tree view, and open its OnStart property. Add this formula:
With({user: User()},    Set(gblUser, user);    Set(gblUserEmail, Coalesce(user.Email, ""));    Set(gblUserName, Coalesce(user.FullName, "")));
Set(gblRole, First(Filter('Project Request Access Management', Person.Email = gblUserEmail)));
Set(IsUserAdmin, Coalesce(gblRole.Admin = true, false));
Here is what each part does:
Withgets the user’s record once and names ituserfor the formulas inside it. The name only applies within theWith.Setcreates global variables that are available throughout the app. Thegblprefix is just a naming habit that makes them easy to recognize.Coalescereturns the first value that isn’t blank or an empty string. If every value is blank or an empty string, it returns blank. SoCoalesce(user.Email, "")gives blank, not empty text, when there’s no value, and the""fallback has no effect. Withfalseas the fallback, as inIsUserAdmin, the result is never blank.First(Filter(...))gets the user’s row from the list, withgblRoleholding the whole record.IsUserAdministruewhen the row’s Admin value is Yes. If the person has no row,gblRoleis blank, and the result isfalse.
Add a comment above each block, using //, to explain what it does. Future you, or the next person who maintains the app, will thank you.
Why this is better than one lookup per role
A common approach runs a separate lookup for each role:
Set(gblUser, User());Set(gblUserEmail, User().Email);Set(gblUserName, User().FullName);
Set(IsUserAdmin, !IsBlank(LookUp('Project Request Access Management', Person.Email = gblUserEmail && Admin = true)));
This works, but each new role adds another request to SharePoint, and each User() call repeats the same work. With the record approach, adding a role takes one short line that reads from a value you already have:
Set(IsUserDeveloper, Coalesce(gblRole.Developer = true, false));For an app with many roles, that saves several trips to the data source when the app starts.
4. Test it
OnStart runs when the app starts. After you change it, test it with Run OnStart.
- In the Tree view, select … next to App, then Run OnStart.
- Add a text label, and set its Text to
IsUserAdmin. You should seetrue. - Add a second label, and set its Visible property to:
IsUserAdmin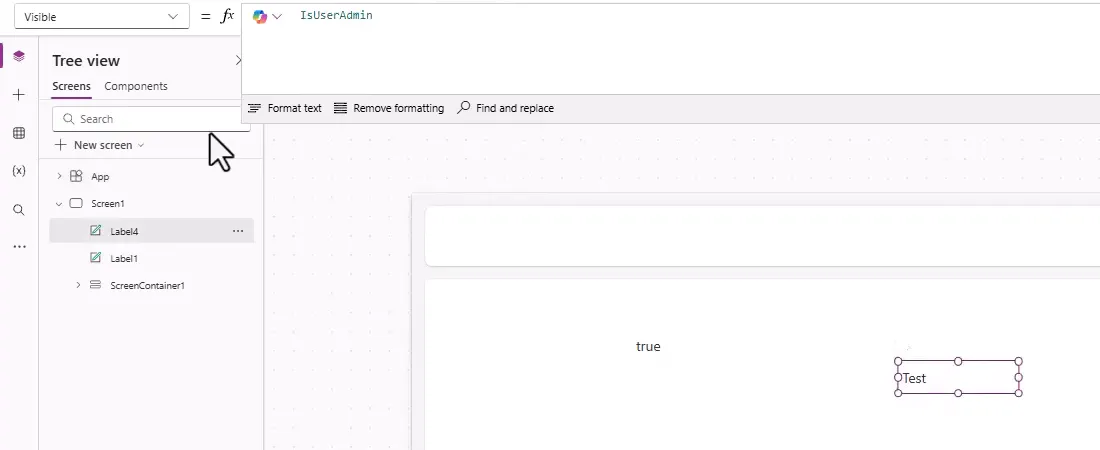
- In the list, clear Admin on your row.
- In the app, refresh the data source. Then run OnStart again. The label should show
false, and the second label should disappear. - Set Admin back to Yes, and remove your test labels.
If you change roles in SharePoint, the app picks up the change the next time it starts. A running session keeps the values it loaded.
5. Use the role in your app
You can use IsUserAdmin in any property that expects a true or false value:
| Goal | Property | Formula |
|---|---|---|
| Hide a button or screen link | Visible | IsUserAdmin |
| Show a control but block use | DisplayMode | If(IsUserAdmin, DisplayMode.Edit, DisplayMode.View) |
| Show something to two roles | Visible | Or(IsUserAdmin, IsUserDeveloper) |
The last row needs the Developer column from step 1 and the IsUserDeveloper line from step 3. Both variables come from Coalesce(..., false), so neither is ever blank, and Or returns true if any of its arguments are true.
Check the email match
The filter compares gblUserEmail, which comes from User().Email, with the Email value of the Person column. User().Email returns the user’s UPN, not their SMTP email address. In many organizations they are the same. If yours are different, a person’s row may not match even though they are in the list.
If a person who is in the list shows as false, compare the value of gblUserEmail with the Email value of their row’s Person column. If the two addresses differ, ask your administrator which value to use for your match.
Handling a load issue
Most apps put this logic in App.OnStart. With the default nonblocking OnStart, a screen can appear before OnStart finishes. Properties that use IsUserAdmin update once it’s set, so for a moment an admin may see the non-admin view.
Another place for startup logic is the first screen’s OnVisible, which Microsoft suggests for logic that runs when a specific screen is shown. A screen can also appear before its OnVisible finishes.
Troubleshooting
| Symptom | Likely cause | What to do |
|---|---|---|
| A label is blank | OnStart hasn’t run | Select Run OnStart |
IsUserAdmin is false after you add a row | The app has old data | Refresh the data source, then run OnStart |
The formula shows an error on Person.Email | The column has a different name | Use your column’s name |
A listed user shows as false | The UPN and the Person email differ, or Admin is No | See Check the email match |
| A user gets an error at startup | They can’t read the role list | Give them Read access to the list |
| The same person is entered twice | Enforce unique values is off | Turn it on and remove the duplicate |
| A user changed their own role | They can edit the list | Limit edit rights on the role list |
| A new role isn’t recognized | There’s no line for it in OnStart | Add a Set line for the new column |
Where to take this next
Once this works, you can build an admin screen inside the app, so that nobody needs to open the list to manage roles. Adding text columns that repeat the person’s name or email can also help when you need filtering or sorting that Person columns make harder.
Companion video
Video: Stop Making Multiple Calls in Power Apps! Smarter OnStart Setup
If the player is blocked on your network, open the video on YouTube.
Need help applying this to your own setup? Read about consulting.