 Office Solutions Pro
Add an admin screen and admin-only views to a Power Apps request app
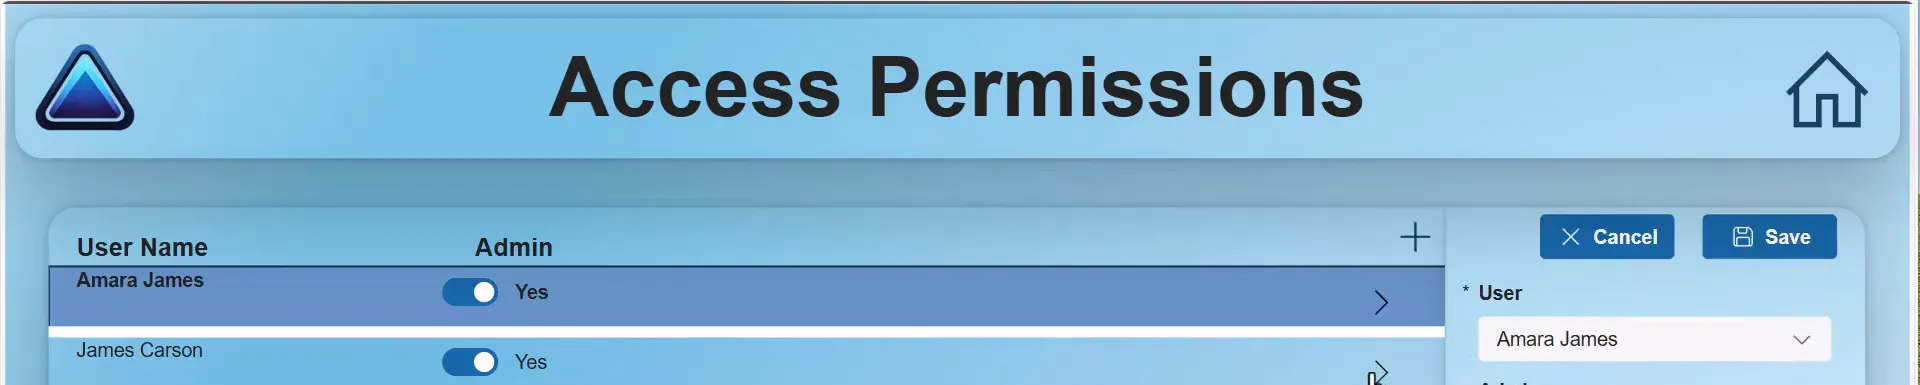
Build on a SharePoint role list. Manage roles from a screen in the app, and let admins see and edit every request while others see only their own.
This walkthrough adds admin features to a project request app built on SharePoint. A small permissions list says who is an admin. An Access Permissions screen lets admins add people and change roles without opening the list. The rest of the app then checks that role. Admins see every request and can edit it, including its status. Everyone else sees and views only their own requests.
Before you begin
- The app. The example app has a Main Screen that lists requests from a SharePoint list named Demo Requested Projects, and a Request Intake Form screen with section tabs. The Main Screen gallery’s OnSelect sets a record variable such as
gblSelectedRequest. No tutorial on this site builds that app, so adapt the names to your own. - The role check. This tutorial builds on Control what users see in Power Apps with a SharePoint role list, which explains the role list and the OnStart role check in more detail. Steps 1 and 4 summarize what this app needs.
- The user variables. The formulas below use
gblUserEmail, which App.OnStart sets fromUser().Email, as in the role tutorial. - Permissions. You need to create a list on the SharePoint site and change its permissions. SharePoint is a Standard connector; the complete app still needs appropriate licenses and data permissions.
- Read Who can change roles before you share the app. Hiding admin features in the app doesn’t stop anyone from opening the SharePoint lists directly.
1. Create the permissions list
Already have a role list? If you built the list in the role tutorial, use it instead of creating a second one. Two lists would mean two places to keep in step, and a person could be an admin in one and not the other. Fill in its Title column with each person’s name, and use its names in the formulas: Project Request Access Management for Project Intake Permissions, and Person for User.
- In your SharePoint site, select New > List > Blank list. Name it Project Intake Permissions, and clear Show in site navigation.
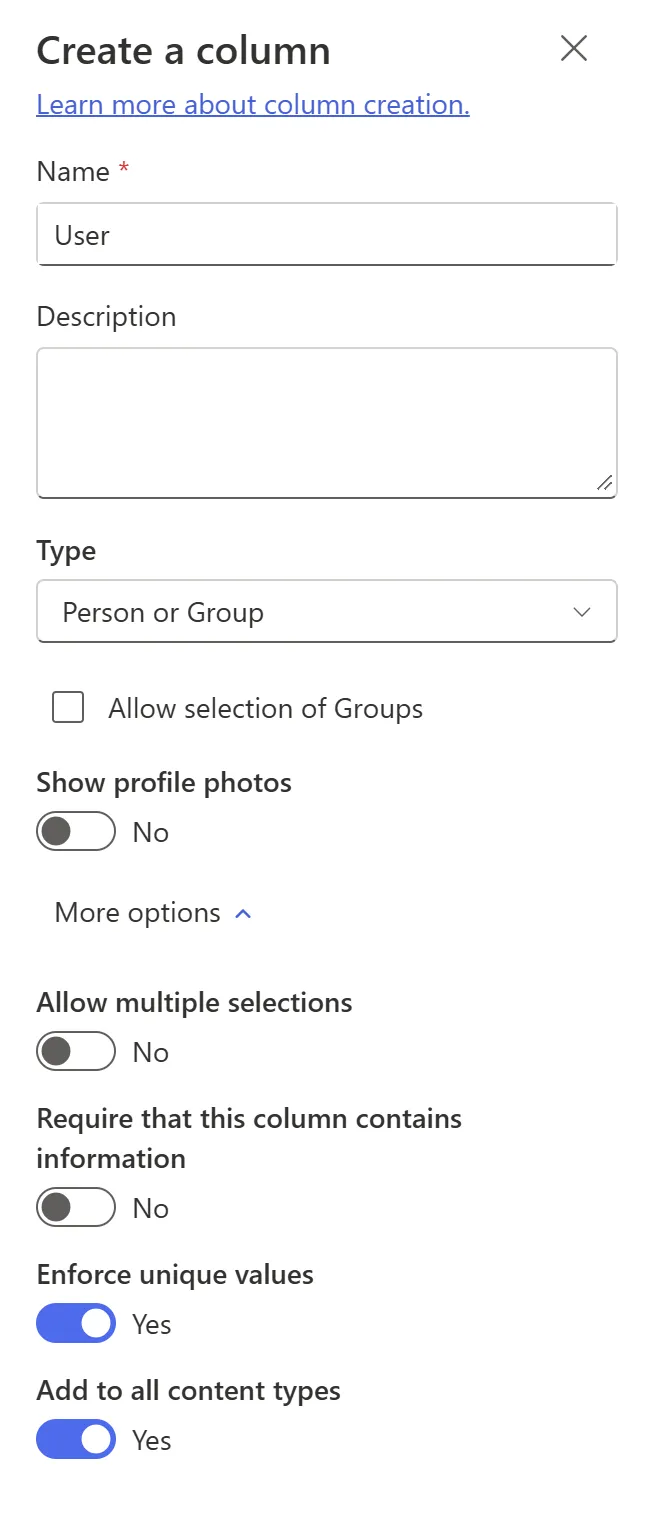
- Add a Person or Group column named User. Turning on Show profile photos is optional.
- Leave Allow selection of Groups off, so the column holds people only.
- Under More options, leave Allow multiple selections off. Each row is one person.
- Turn on Enforce unique values, so each person can have only one row. SharePoint supports unique values on a single-value Person column, and indexes the column for you.
- Add a Yes/No column named Admin, with a default value of No. New roles should always default to No, so nobody gets access by accident.
- Keep the Title column. The app fills it with the person’s display name.
Why people, not groups. The app finds a person’s row by comparing the Email of the User column with the signed-in user’s address. A group entry never matches an individual’s address, so adding a group gives its members nothing. Add each admin as an individual.
Why one row per person. The role check in step 4 keeps the first row that matches. If someone had two rows, one set to Yes and one to No, the formula doesn’t decide which one counts, so a forgotten Yes row could still make them an admin. Enforce unique values stops a second row from being saved, in the app or in SharePoint. SharePoint can’t turn it on while the column already holds duplicates. If that happens, sort the list by User to find people listed twice, and delete the extra rows before you try again.
Add the first admin in SharePoint. Once step 4 hides the admin icon from non-admins, only admins see the way into the Access Permissions screen. Add a row for yourself directly in the list now, with yourself in User, your name in Title, and Admin set to Yes. Your account needs to be able to add items to the list, and so does any admin who manages roles later.
Why keep Title? It’s a plain text copy of the person’s name. Power Apps can delegate sorting and filtering on text columns to SharePoint, but it can’t delegate a sort on a Person column. Sorting by Title lets SharePoint do the sort, however long the list gets.
Compared with the role tutorial. The role tutorial calls this list Project Request Access Management and its person column Person. Its Title column is optional, because nothing in that app sorts the list. Here, Title holds the person’s name so the Access Permissions gallery can sort by it.
2. Build the Access Permissions screen
- Select Data > Add data > SharePoint, and connect Project Intake Permissions.
- Duplicate a screen that has your header, and rename it Access Permissions Center. Change the header text to Access Permissions.
- Arrange the main area as a horizontal container with two vertical containers:
- Left: a row for the column headers and an Add icon, with the gallery below it.
- Right: a 42-pixel-high row for the Cancel and Save buttons, with an edit form below it.
The gallery
- Set the gallery’s Items. Sorting by Title lists people alphabetically:
Sort('Project Intake Permissions', Title, SortOrder.Ascending)- In the template, add a text label for
ThisItem.User.DisplayName, and a Toggle with Checked set toThisItem.Admin. Set the toggle’s Label to:
If(ThisItem.Admin = true, "Yes", "No")- Line up the columns with the headers. Set each gallery label’s X and Width to match its header label above the gallery, for example
lblUserName.XandlblUserName.Width. Resizing a header label then moves its column too. - Set TemplateSize to about 50 to fit more people on screen.
Make the toggles read-only. The gallery only shows roles; changes are made in the form. A toggle that can be clicked looks like it changed something, but nothing is saved. The example covers the toggles with a transparent rectangle, RGBA(0, 0, 0, 0). A simpler option is to set the toggle’s DisplayMode to DisplayMode.View. The updated modern toggle is truly read-only in View mode.
The form
- Add an Edit form, name it
frmAccessPermissions, and set its data source to Project Intake Permissions. Remove the Content type field. - Set the form’s Item to
locUserSelectedPermissionsand its Visible tolocFormVisible. The steps below set both. - Unlock the User card. Change its label to Select user, set its Required to
true, and set its combo box Items to:
Choices([@'Project Intake Permissions'].User, Self.SearchText)
The second argument passes what someone types to Choices as a text filter. For a Person column, the list can stay empty until someone types. It then shows people whose names start with that text, and narrows as they type.
- Unlock the Title card, set its Update to the selected person’s display name, and set the card’s Visible to
false. ReplaceDataCardValue2with the name of the combo box in your User card:
DataCardValue2.Selected.DisplayName
Nobody has to type the name, and the hidden Title column stays in step with the User column.
- Turn off the borders on the form and its cards if you prefer the cleaner look.
The buttons and Add icon
Save button, OnSelect:
SubmitForm(frmAccessPermissions)Form OnSuccess. This shows a confirmation, keeps the saved person selected, and leaves the form in edit mode:
Notify("Successfully saved", NotificationType.Success, 1000);UpdateContext({locUserSelectedPermissions: Self.LastSubmit});EditForm(frmAccessPermissions)
The third argument of Notify is in milliseconds, so the banner shows for one second.
Form OnFailure. If a save fails, for example because the person already has a row, show the reason. The form’s Error property holds the reason when a save fails. For a duplicate, that’s SharePoint’s own message naming the column, such as “duplicate values were found in the following field(s) in the list: [User]”:
Notify(frmAccessPermissions.Error, NotificationType.Error)Cancel button, OnSelect:
ResetForm(frmAccessPermissions);UpdateContext({locFormVisible: false});UpdateContext({locUserSelectedPermissions: Blank()})Add icon, OnSelect. Clear the selection first, so the new form doesn’t show the last person’s details:
UpdateContext({locUserSelectedPermissions: Blank()});NewForm(frmAccessPermissions);UpdateContext({locFormVisible: true})Gallery OnSelect (the arrow or the row):
UpdateContext({locUserSelectedPermissions: ThisItem});EditForm(frmAccessPermissions);UpdateContext({locFormVisible: true})The screen’s OnVisible hides the form when the screen opens:
UpdateContext({locFormVisible: false})Highlight the selected row. Set the gallery’s TemplateFill:
If(ThisItem.ID = locUserSelectedPermissions.ID, App.Theme.Colors.Lighter30, RGBA(7, 112, 184, 0.1))Use the same ThisItem.ID = locUserSelectedPermissions.ID test in the labels’ FontWeight to make the selected person bold. Comparing IDs works because the selection is held in a variable, so it still matches after a save, when Self.LastSubmit replaces it.
Why a form, not editing in the gallery? You could save toggle changes directly from the gallery. Changing roles through a form with Save and Cancel makes accidental changes much less likely.
Test it
Select Preview, then the Add icon. Pick a person, turn on Admin, and select Save. The new row appears with the person’s name in Title. Try saving with no person selected: the required User field stops the save.
3. Link the screens
- On Access Permissions Center, put a Home icon in the header with OnSelect set to
Back(). - On Main Screen, add an icon to the header, such as Add user, with this OnSelect:
Navigate('Access Permissions Center', ScreenTransition.Fade)To keep both header icons the same size and the title centered, put each icon in its own container. The example sets that container to the logo’s width of 100, with right padding of 20, and turns off the icon’s border.

4. Check the user’s role when the app starts
Add this to App.OnStart, after the line that sets gblUserEmail:
IfError( Set( gblRole, First( Filter('Project Intake Permissions', User.Email = gblUserEmail) ) ), Set(gblRole, Blank()));Set(IsUserAdmin, Coalesce(gblRole.Admin, false))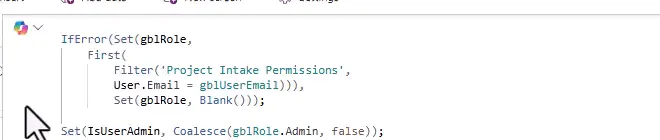
- Filter on the Person column’s Email is delegable to SharePoint. First returns the first record of the result. That’s why step 1 allows only one row per person.
- IfError sets the role to blank if the lookup fails.
- Coalesce turns a missing role into
false, so people who aren’t in the list, or whose lookup failed, aren’t admins. - The app reads the row once and stores it, so each extra role needs one more Yes/No column and one more
Setline, without another call to SharePoint. The role tutorial explains this approach.
This is the role tutorial’s check with this list’s names. Two details differ. This version wraps the lookup in IfError, and it passes gblRole.Admin straight to Coalesce, where the role tutorial passes gblRole.Admin = true. Either way, someone with no row gets false.
Which address is compared. This lookup and the request filter in step 5 both compare gblUserEmail, which comes from User().Email, with the Email of a Person column. User().Email returns the user’s UPN, which can differ from the email address stored in the Person column. Where they differ, the person’s row isn’t found, so they aren’t treated as an admin, and the request filter doesn’t find their requests. See Check the email match in the role tutorial.
To test, show IsUserAdmin in a temporary label. If you added or changed your row while Studio was open, first refresh Project Intake Permissions in the Data pane. Then open the App menu in the Tree view and select Run OnStart.
Before the next line, make sure your own row is in the list with Admin set to Yes, as described in step 1. Then set the Main Screen admin icon’s Visible to IsUserAdmin.
Timing. With the default nonblocking OnStart, the first screen can appear before OnStart finishes. Properties such as Visible and Items update once IsUserAdmin is set, so for a moment an admin may see the non-admin view.
5. Give admins a different view of requests
Show admins every request
Set the Main Screen gallery’s Items:
If(IsUserAdmin, // Admin view: every request Sort('Demo Requested Projects', Created, SortOrder.Ascending), // Everyone else: only their own requests Sort( Filter('Demo Requested Projects', Requestor.Email = gblUserEmail), Created, SortOrder.Ascending ))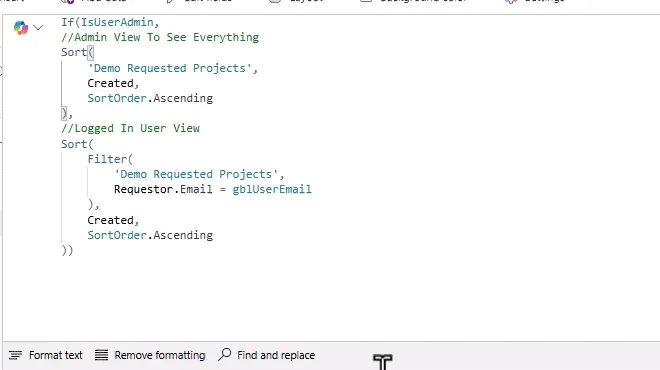
Both branches can be delegated to SharePoint: the Person Email comparison and the sort on a date column.
Open requests in edit mode for admins
Set the Main Screen gallery’s OnSelect:
Set(gblSelectedRequest, ThisItem);If(IsUserAdmin, Set(gblFormMode, "edit"), Set(gblFormMode, "main"));Navigate('Request Intake Form', ScreenTransition.CoverRight)
On Request Intake Form, set the form’s DefaultMode:
Switch( gblFormMode, "intake", FormMode.New, "edit", FormMode.Edit, FormMode.View)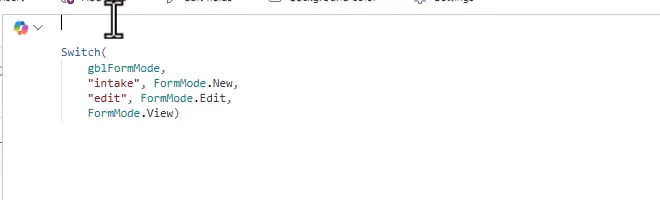
Show the Save and Cancel buttons only when the form can be changed. Set their Visible:
Switch(gblFormMode, "intake", true, "edit", true, false)"intake" is the mode the app uses for a new request, as set from the app’s start link. Any other value, including "main", opens the form read-only.
Add a Status tab for admins
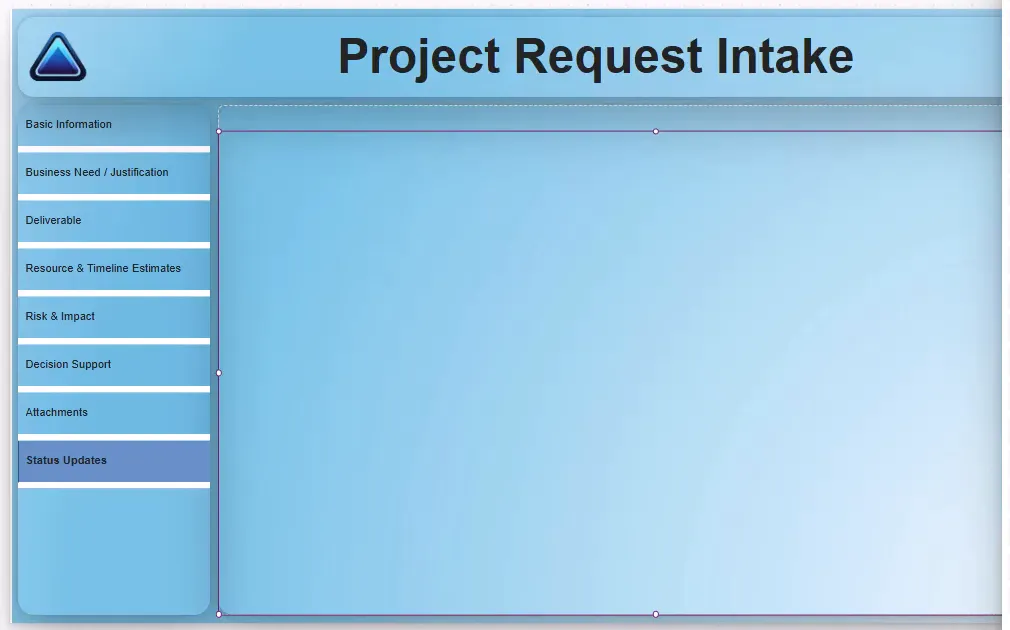
The request form’s section tabs come from a gallery whose Items is a table of {Visible, Title} records. Wrap it in If(IsUserAdmin, ...). The admin table repeats the existing records and adds one more:
{Visible: "Status", Title: "Status Updates"}Then add the Status field to the form with Edit fields, and set its card’s Visible:
galSelectArea.Selected.Visible = "Status"Admins now see a Status Updates tab and can change a request’s status in the app. Other users don’t see the tab.
Who can change roles
The app hides admin features, but the permissions live in SharePoint lists that people can open directly. Set the list permissions to match.
The permissions list. Everyone who uses the app needs to read Project Intake Permissions, because OnStart looks up their row. But if ordinary users can edit it, anyone could open the list in SharePoint and set themselves to Admin. Give everyone Read access, and give edit access only to admins:
- Open the list, then go to Settings > List settings > Permissions for this list.
- Select Stop Inheriting Permissions.
- Select the members group, select Edit User Permissions, clear the level it has, which is Edit by default, and select Read. Selected levels combine, so if Edit stays selected, members keep it.
- Make sure the admins who manage roles in the app have Contribute or higher. Contribute lets them add and change rows. Edit also lets them change or delete the list itself.
These steps follow Microsoft’s guide to customizing permissions for a list.
The requests list. Showing people only their own requests is a convenience, not security. Anyone who can read Demo Requested Projects can see every request in SharePoint. If requests must be private, restrict the list itself. To let people read only the requests they created, see Let SharePoint list users read and edit their own items. That setting goes by Created By, not by the Requestor column, and admins who must see every request need the elevated permissions it describes.
Role changes. The app reads the role once, when it starts. Someone added as an admin sees the admin features the next time they open the app.
Troubleshooting
| Symptom | Likely cause | What to do |
|---|---|---|
| An admin doesn’t see the admin icon | Their row is missing or Admin is No, or the app was already open | Check the list, then reopen the app |
IsUserAdmin is false while editing | OnStart hasn’t run in Studio | Select Run OnStart on the App object |
| The person picker doesn’t find someone | The text filter matches the start of the name | Type the beginning of their display name |
| Title is empty after saving | The Title card’s Update doesn’t point at your combo box | Use your User card’s combo box name in .Selected.DisplayName |
| The form shows the previous person after selecting Add | The selection variable wasn’t cleared | Set locUserSelectedPermissions to Blank() before NewForm |
| Clicking a gallery toggle seems to change a role | The toggle is still interactive | Set its DisplayMode to DisplayMode.View |
| Users can see other people’s requests in SharePoint | The app filter isn’t a permission | Restrict the requests list in SharePoint |
| Someone made themselves an admin | They can edit the permissions list | Give non-admins Read access only |
| Saving a person shows an error | They already have a row, and Enforce unique values is on | Select their existing row and change it there |
| Members of a group don’t get admin features | The list holds a group, not individuals | Add each admin as a person |
| No one can open the Access Permissions screen | No row has Admin set to Yes | Add an admin row directly in the SharePoint list |
Companion video
Video: Build Admin Functionality Using SharePoint List Access Permissions: Set Admin Views, +Admins & More!
If the player is blocked on your network, open the video on YouTube.
Need help applying this to your own setup? Read about consulting.