 Office Solutions Pro
Standards for configuring a Power Platform environment
Recommended settings, why they matter, and decisions to make before deployment.
On this page
- Overview
- Before you begin
- Plan the environment before changing settings
- Configure auditing and data recovery
- Review features and integrations
- Configure attachments and email-related settings
- Improve usability of the User lookup view
- Security, governance, and capacity
- Application lifecycle and operational maintenance
- Final validation checklist
- About the screenshots
- Microsoft documentation and further reading
Audience: Power Platform makers, solution architects, and administrators responsible for Microsoft Dataverse environments. This guide explains what to configure, when to consider each setting, and why a change may be appropriate. Some features do not apply to every environment.
Before you begin
You need suitable administrator permissions to change environment settings. The exact menu labels, availability of features, and licensing requirements can vary by tenant, region, environment type, and Microsoft rollout. Start at the Power Platform admin center (admin.powerplatform.microsoft.com), then Manage > Environments. Record the current setting before making a change, especially in an existing production environment.
This guide starts with common environment configuration tasks and expands into security, recovery, licensing, and deployment practices. A setting is not automatically recommended simply because it is available. Choose settings based on application needs, organizational policy, and documented support.
Plan the environment before changing settings
Select the right environment type and purpose
Why this matters. Development, testing, and production have different access and risk requirements. Separating them keeps experiments, test data, and unfinished changes away from business-critical applications and reduces the chance of affecting real users.
What to do. Document whether an environment is for individual development, shared development, testing/UAT, or production. Confirm environment type, region, Dataverse availability, expected users, licensing, security group, and the purpose of each environment before provisioning it. Decide whether the project needs Dynamics 365 applications before creating its Dataverse database.
Considerations. A small solution may use DEV and PROD; projects with formal acceptance requirements should include TEST/UAT. The Default environment is available broadly across the tenant and should not be the automatic home for business-critical production solutions. Microsoft states that if you don’t select Enable Dynamics 365 apps when the Dataverse database is created, you can’t change it later or install Dynamics 365 apps in that environment. Selecting Yes requires a Dynamics 365 license. Microsoft has deprecated unmanaged developer environments, and new ones can’t be created from November 15, 2026. Existing ones are then suspended and deleted, as described in the next section, so plan individual development in managed developer environments or another supported environment. Flows that people start from a SharePoint list or library’s Automate menu use the For a selected item or For a selected file trigger. For those two triggers, the menu lists only flows in the default environment, so build them there, and plan for them when you decide what the default environment may hold. Microsoft states this limit only for those two triggers, so it doesn’t require automated flows, such as ones that start when an item is created, to be in the default environment.
Act on unmanaged developer environments before December 15, 2026
Why this matters. Microsoft is retiring unmanaged developer environments in stages. New ones can’t be created from November 15, 2026. Existing ones are suspended from December 15, 2026, when their apps, flows, agents, Power Pages developer sites and data become unavailable, and deleted from January 15, 2027. Developer environments that are Managed Environments aren’t affected, including those that environment routing creates, and neither are production, sandbox, trial or default environments.
What to do. In Manage > Environments, filter the list where Type is Developer and Managed is No, and use the Last activity column to find the environments still in use. Before December 15, 2026, for each one you still need, either enable Managed Environments on it, which keeps its apps, flows, agents and data, or move its solutions to a sandbox or another supported environment. Ask makers to export their solutions now so that they keep a copy, and to copy any data they need, because it’s deleted with the environment.
Considerations. Managed Environments use rights aren’t included in the Power Apps Developer Plan, so users need a premium license to run apps and flows in a managed developer environment. Review the licensing under Decide whether Managed Environments are appropriate before you convert. Starting November 15, 2026, each user can create only one managed developer environment. Existing managed developer environments are unchanged, including where a user already has more than one. Microsoft’s deprecation notice has the current dates and options.
Confirm language, currency, region, and update cadence
Why this matters. Environment creation choices affect data location, regional formats, language, financial values, and future application support. Some base settings are difficult or impossible to change after provisioning. An incorrect choice may require rebuilding an environment rather than editing one field.
What to do. Before creating Dataverse, confirm its region, base language, and base currency. Check whether additional languages are needed. Review the environment refresh cadence (Frequent or Moderate) and decide which environment should receive maker-experience changes sooner.
Considerations. Microsoft documents the base language and base currency as settings that cannot be changed after they are established. Confirm these during provisioning, rather than waiting for a post-creation checklist. Refresh cadence is not a blanket control over all Power Platform or Dynamics 365 service updates.
Confirm environment name and descriptive details
Why this matters. Clear, consistent names help makers select the correct environment and reduce the chance of changing or deploying to the wrong place. The display name can change, but identifiers such as the environment ID and URL should not be assumed to change with it.
What to do. In Manage > Environments, select the environment and open its details or edit action. Confirm display name, purpose, region, environment type, and any security group. Save and refresh the list to verify the updated display name.
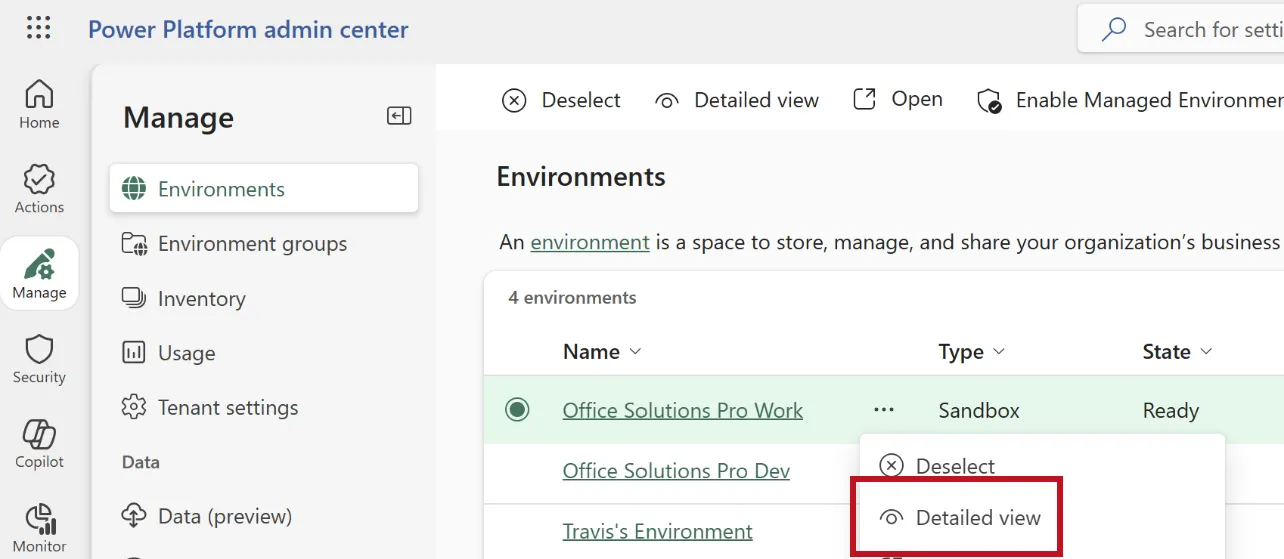
Figure 1 — Environment list and Detailed view.

Figure 2 — Edit environment details.
Considerations. A naming pattern such as Product - DEV, Product - UAT, and Product - PROD makes environments easier to recognize. Changing the display name does not automatically rename the environment ID or URL. Refresh and verify the saved name; do not instruct users to repeat a successful save.
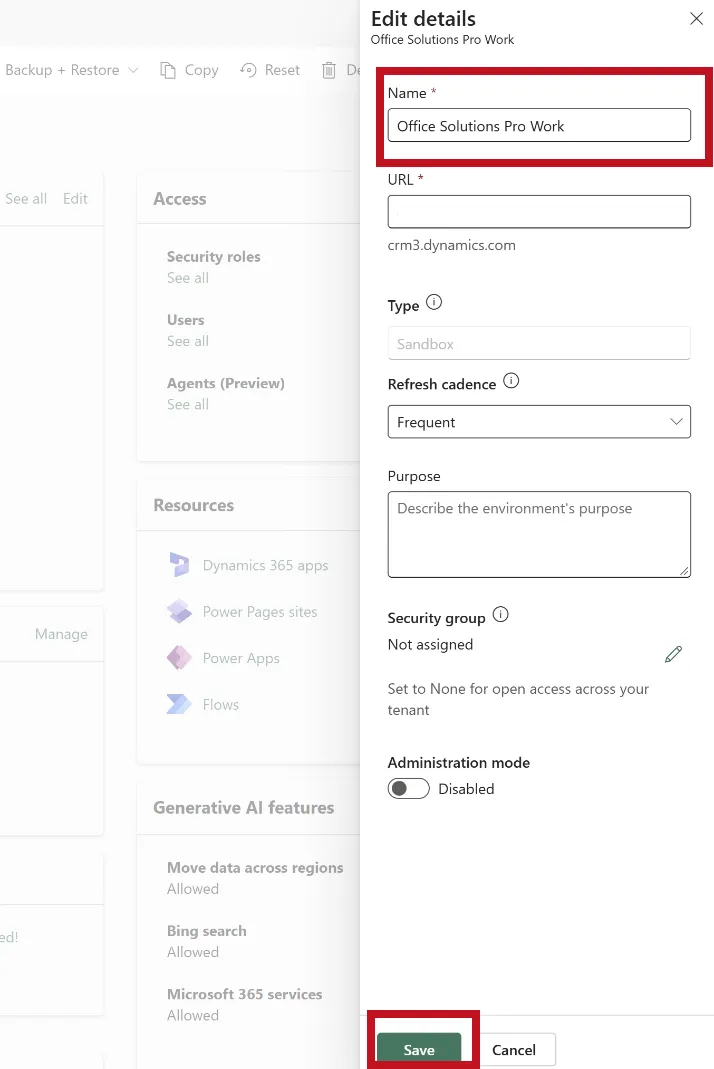
Figure 3 — Update the environment display name.
Decide whether Managed Environments are appropriate
Why this matters. Managed Environments provide additional governance, usage insights, policy controls, and administrative features. They also have licensing requirements that can affect every user who runs an app or flow in the environment, including apps that otherwise appear to use standard connectors.
What to do. Before enabling Managed Environments, identify all active users and workloads and confirm qualifying premium or capacity-based licenses. Compare desired governance features with tenant and environment group policies, and document how licenses will be assigned and reviewed.
Considerations. These licensing requirements aren’t new. Starting February 2027, a user without an appropriate license can’t open apps in a Managed Environment, even apps that use only standard connectors. Microsoft has been notifying unlicensed users inside the app since June 2026. Verify current terms, eligible licenses, and any pay-as-you-go options before enabling this feature. Managed Environments and managed solutions are different concepts.
Configure auditing and data recovery
Turn on Dataverse auditing where there is a reason to retain change history
Why this matters. Auditing can record changes to supported Dataverse data and helps answer who changed a record and when. This matters for investigations, business accountability, and troubleshooting, but it consumes log capacity.
What to do. In the Power Platform admin center, open the environment and go to Settings > Audit and logs > Audit settings. Select Start Auditing, choose a period under Retain these logs for, and select Save. Leave Log access and Read logs off unless you need them (see the next section). A new retention period applies only to audit records created after the change. Then, in Power Apps (make.powerapps.com), open the solution that contains the tables, or add them to one. For each table to audit, select Edit > Edit table properties, expand Advanced options, select Audit changes to its data, and save. For each column to audit, open the column, expand Advanced options and select Enable auditing. Save and publish your changes. Test an update on a disposable record and verify its audit history.
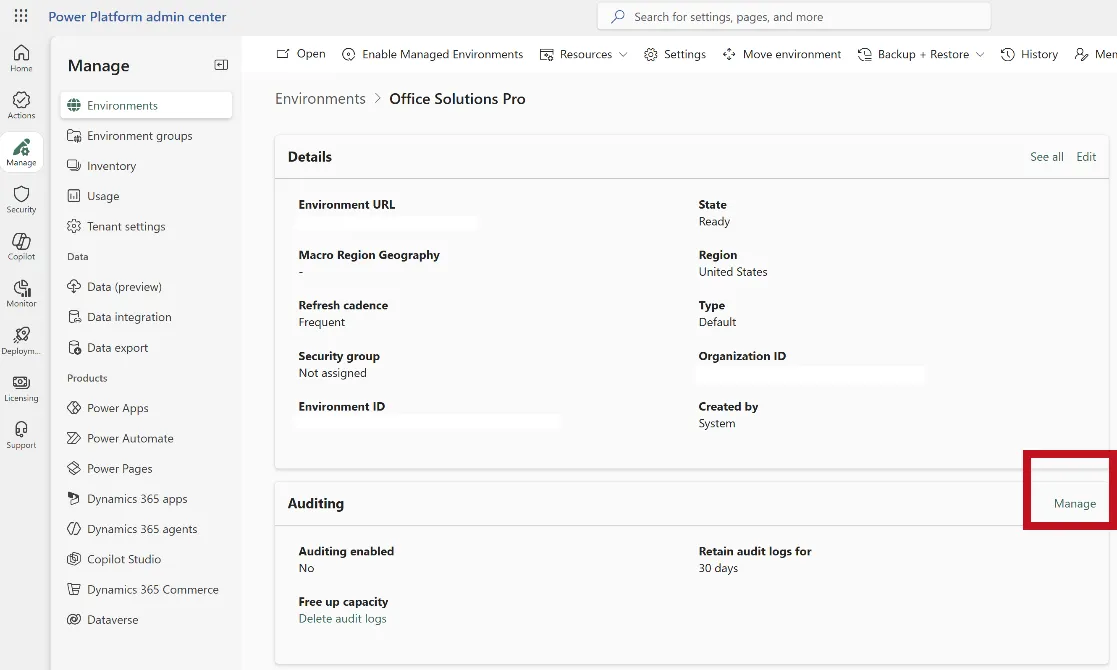
Figure 4 — Access auditing controls.
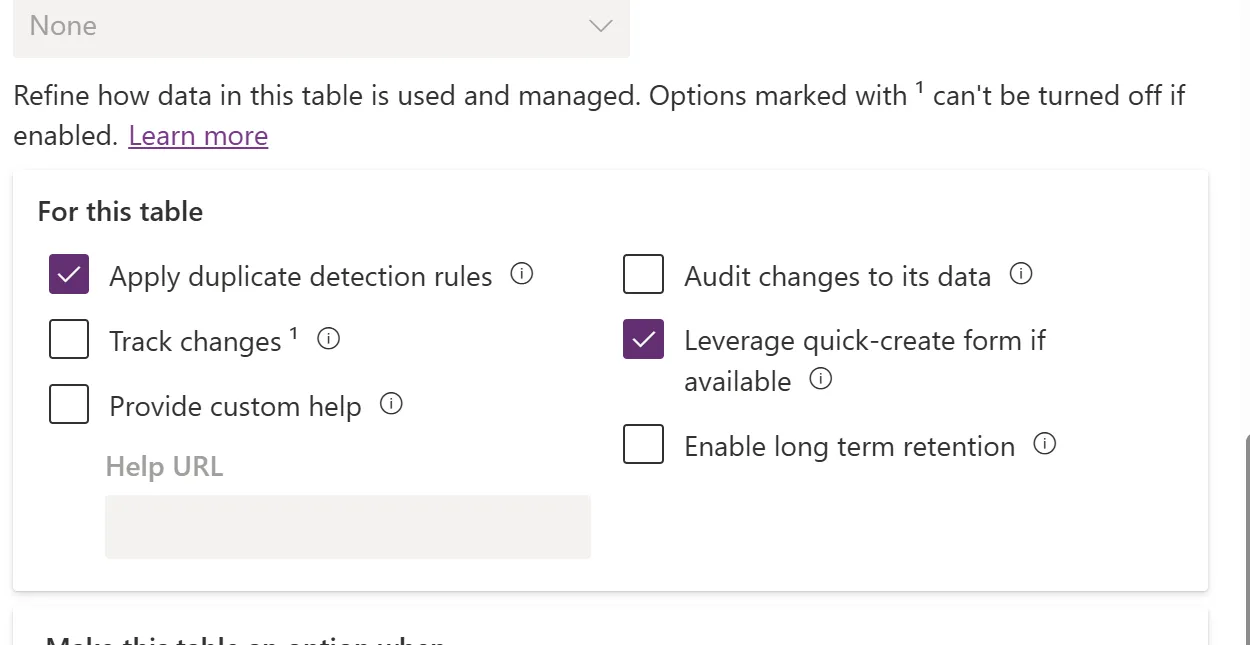
Figure 5 — Audit changes to its data on an individual Dataverse table (checkbox shown off).
Considerations. Production applications with important business records are strong candidates for auditing; development and testing may also need auditing during troubleshooting or validation. Figure 5 shows Audit changes to its data cleared. It shows where the option is, not a recommendation to leave it off. Table and column settings must be reviewed separately from environment-level auditing. Audit logs consume log capacity.
Evaluate access logging and read/activity logging separately
Why this matters. Record-change auditing, access logging, and read/activity logging serve different purposes. Enabling all options automatically can create noise, consume resources, or introduce licensing and compliance considerations.
What to do. Enable Log access when the organization needs access tracking. Review Read logs separately, including applicable licenses and Microsoft Purview configuration. The Read logs option appears only when the tenant meets Microsoft’s licensing requirements. Each table whose reads you want logged also needs its single-record and multiple-record auditing settings turned on. Validate the output and retention against the type of event the organization actually needs to investigate.
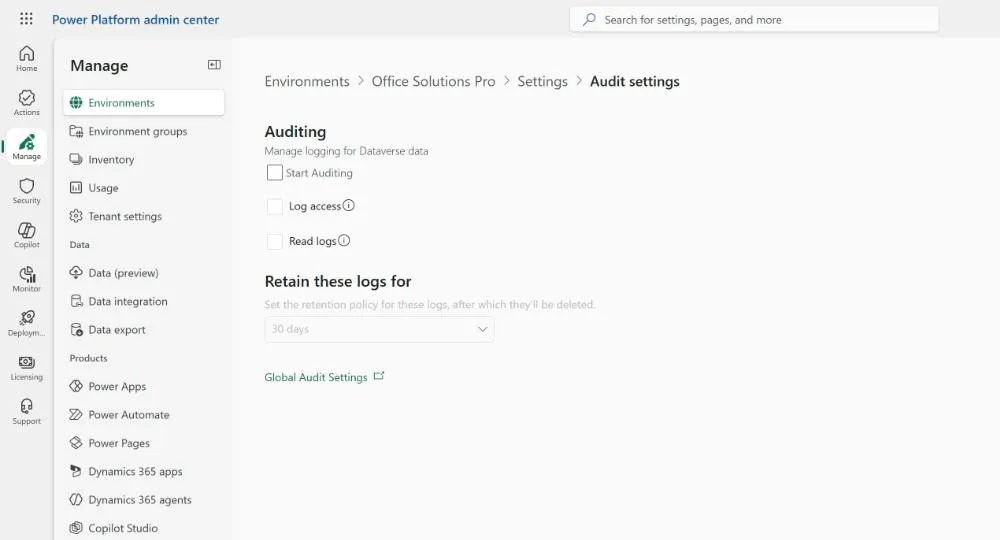
Figure 6 — Audit settings and retention.
Considerations. Dataverse audit history is not a complete record of every user read. Microsoft states that user access or activity logging is sent to Microsoft Purview for production environments only. Logging options depend on licenses, and unnecessary collection can create additional operational work.
Review deleted-record recovery
Why this matters. Deleted-record recovery is intended to restore eligible Dataverse rows deleted accidentally after the feature was turned on. It can avoid restoring an entire environment when a supported record is deleted, but it is not designed to reverse updates or recover entire tables.
What to do. In Settings > Product > Features, locate Deleted records (preview). Decide whether record recovery is appropriate for the environment, enable Keep deleted Dataverse records if approved, and choose a retention period supported by the environment. Microsoft’s dedicated restoration instructions describe a range of 1–90 days. Allow about 30 minutes for the setting to take effect, then test the recovery of a disposable record deleted after activation. To restore rows, go to Settings > Data management > Deleted Records. If records deleted after activation don’t appear there, check under Settings > Audit and logs > System jobs that the job Enable keeping deleted data for Organization has finished.
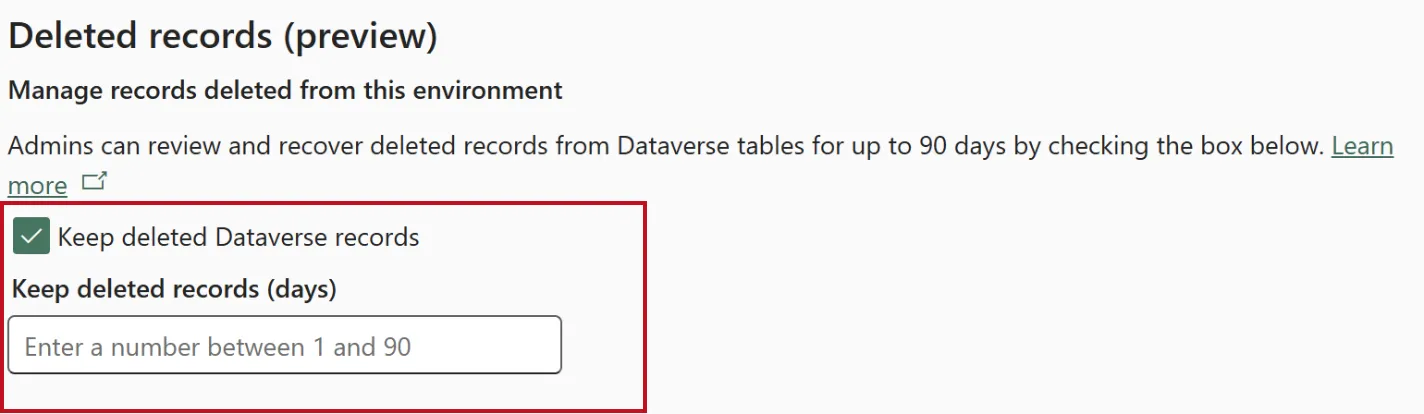
Figure 7 — Deleted records settings in the Power Platform admin center, with a retention range of 1 to 90 days.
Considerations. Microsoft’s instructions for restoring deleted records give a retention range of 1 to 90 days, as shown in Figure 7. Microsoft’s feature settings reference still lists a range of 1 to 30 days and labels the feature preview. Check the range your environment accepts and the feature’s release status before you rely on it in production. Deleted records remain in Dataverse storage until removed. Only eligible records deleted after the setting becomes active can be recovered; updates, entire tables, and unsupported records cannot be restored through this feature. Cascading deletes may require restoring parent records first. Deleted-record recovery is not a substitute for environment backups.
Understand environment backups and restoration
Why this matters. An application or data error can require restoring more than one deleted record. Backups provide broader recovery options, but restoring can overwrite target environment data and require a sandbox target.
What to do. Select the environment in the Power Platform admin center and open Backup + Restore. Use New manual backup before significant supported changes, and Restore or manage to inspect available restore operations. Review system-backup availability, target environment restrictions, and recovery objectives. Document and test the recovery process in a sandbox before an incident occurs.
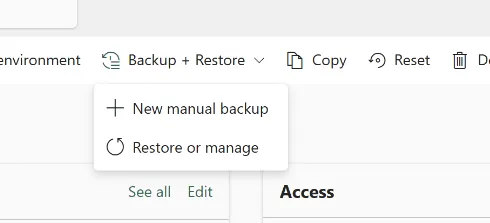
Figure 8 — Backup + Restore menu for an environment, including manual backup and restore options.
Considerations. Microsoft documents seven-day default retention for supported Dataverse environments and optional extension up to 28 days for production Managed Environments. A backup cannot be restored directly over a production environment: use an eligible sandbox target or follow Microsoft’s documented environment-type procedure. Backup/restore includes Power Apps and flows only when they are in a Dataverse solution; validate what else must be recreated. Manual backups aren’t available for the Default environment, and trial environments aren’t backed up. A restore needs at least 1 GB of available capacity, and a Managed Environment can be restored only to another Managed Environment.
Review features and integrations
Allow Power Apps component framework (PCF) controls in canvas apps when required
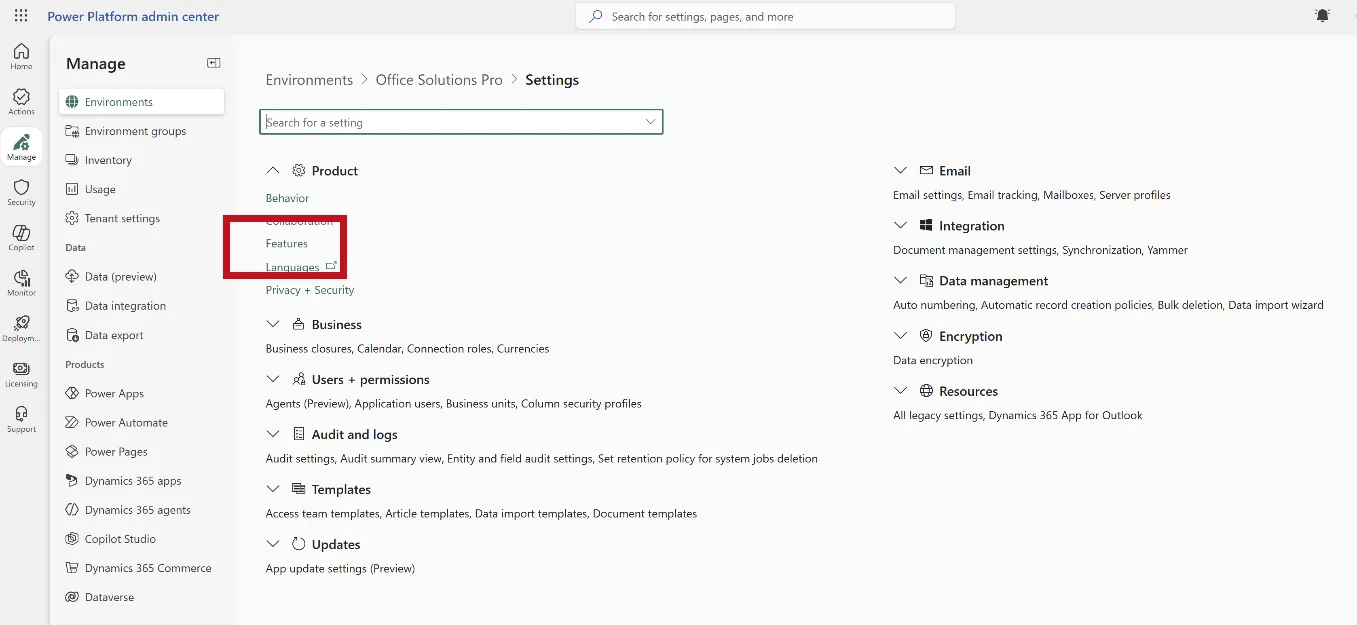
Figure 9 — Navigate to Product features.
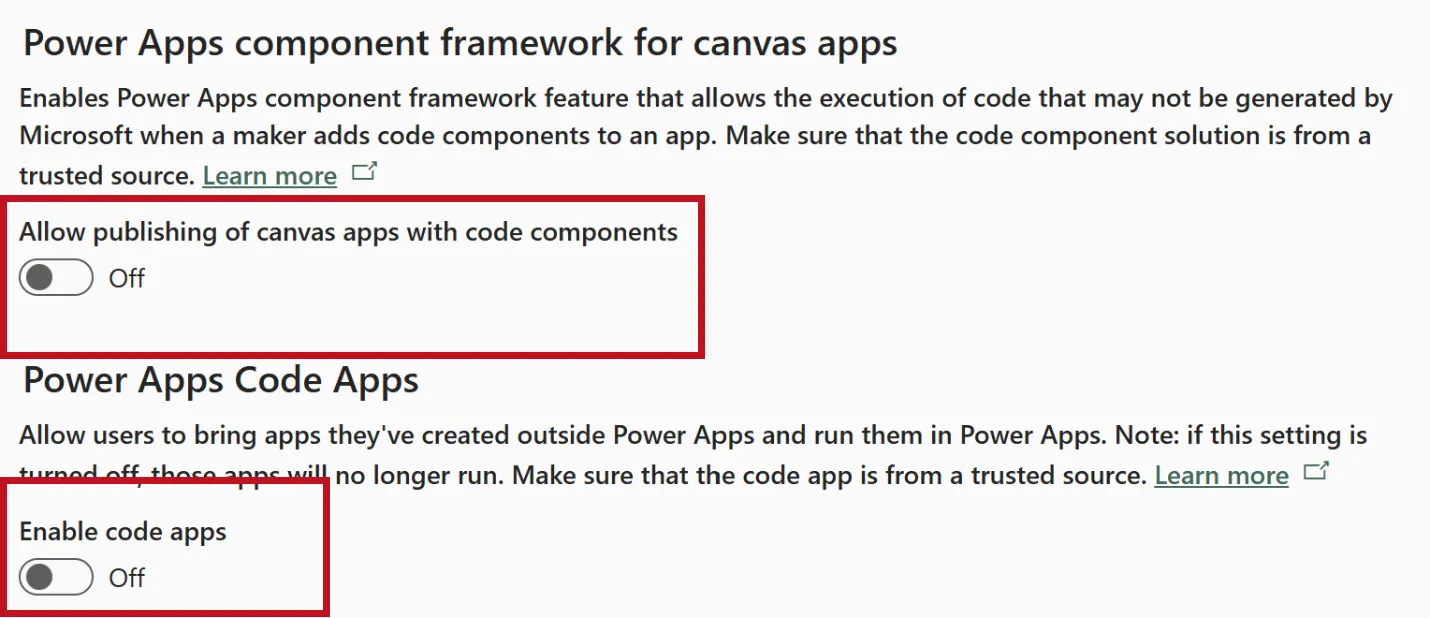
Figure 10 — PCF and code apps options.
Why this matters. Power Apps component framework (PCF) controls can add advanced UI or interactions that built-in canvas controls do not provide. Because code components may execute code from third parties or internal developers, enabling them introduces additional dependency, maintenance, and trust decisions.
What to do. Settings > Product > Features: locate the canvas-app code-component publishing option. Enable it only when the solution uses reviewed PCF components, and test compatibility in development before deployment.
Considerations. Enabling this switch allows publishing canvas apps that use code components; it does not improve ordinary app performance by itself. Turn the setting on in each environment you deploy to, such as TEST/UAT and PROD, before you import a solution that contains code components. Apps that are already published keep working if the setting is later turned off, but republishing them requires it on again. Review the component source, licensing, support arrangements, accessibility, mobile compatibility, and future updates.
Enable Power Apps code apps only for planned projects
Why this matters. Code apps allow developers to build applications outside the traditional visual Power Apps designer and run them within the Power Apps platform. This changes the development and review model.
What to do. Enable code apps in Settings > Product > Features only when there is a planned code-app solution. Confirm developer tooling, source control, deployment, policy, and support arrangements before enabling the setting for shared use.
Considerations. Microsoft states that turning this setting off stops existing code apps from running. Code-app users also need appropriate premium or other qualifying licensing. Check both usage and end-user entitlements before enabling or disabling the setting.
Allow Power BI visualizations on personal dashboards when needed
Why this matters. This switch allows users to add Power BI visualizations to personal dashboards in supported model-driven experiences. It does not control every Power BI integration, so enabling it when only system-level embedded reports are used may accomplish nothing.
What to do. Under Settings > Product > Features > Embedded content, enable Power BI visualization embedding only if users need that personal-dashboard capability. Independently verify Power BI permissions, workspace access, licensing, and row-level security for the embedded content.
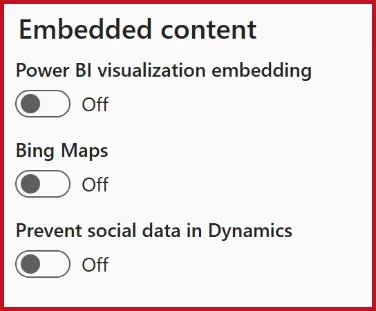
Figure 11 — Power BI embedding and Bing Maps.
Considerations. Microsoft says that Power BI embedded in system dashboards or forms ignores this particular environment setting. Do not present this switch as a universal requirement for embedding Power BI, or as a way to grant Power BI access to users.
Enable Bing Maps only for an actual mapping requirement
Why this matters. Mapping features may display locations or geographic context in supported experiences. If applications do not use maps, enabling the option has little benefit.
What to do. Under Embedded content, evaluate the Bing Maps option only if the solution uses a supported mapping feature. Confirm data-sharing, privacy, and licensing requirements before making location data available through an external mapping service.
Considerations. Treat Bing Maps as an optional capability, not a baseline requirement. Review the actual controls and services used by the solution; an independent custom mapping integration may have its own configuration.
Review new feature toggles periodically
Why this matters. Microsoft adds and changes environment-level controls. New features can introduce dependencies, security changes, or preview limitations.
What to do. Review Product > Features after major releases and before adopting a new capability. Record what changed, who approved the change, and how rollback would work.
Considerations. Avoid enabling preview features in business-critical production scenarios without validating Microsoft support and organizational policy.
Configure attachments and email-related settings
Set an appropriate maximum attachment size
Why this matters. Small limits can prevent legitimate business records from being attached, while very large attachments increase Dataverse storage demand, network transfer time, and the likelihood of failures in downstream integrations.
What to do. Open Settings > Email > Email settings. Review the maximum file size for attachments and compare it with real user needs. Increase only where necessary and test the full upload, email, and automation process.
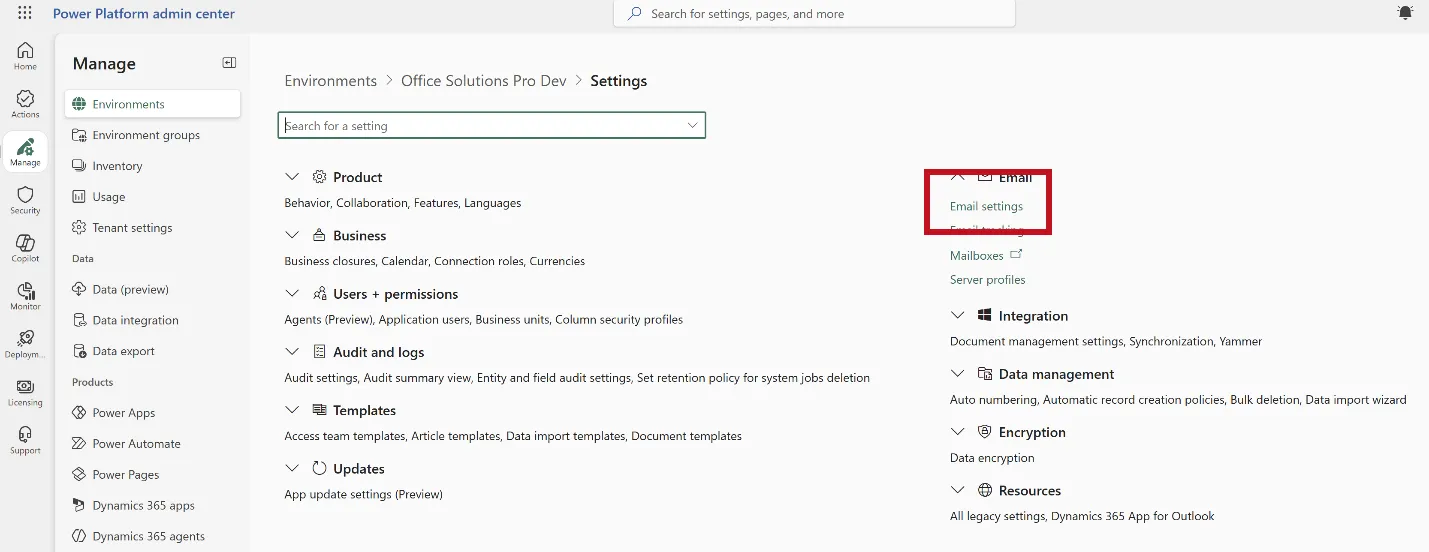
Figure 12 — Open Email settings.
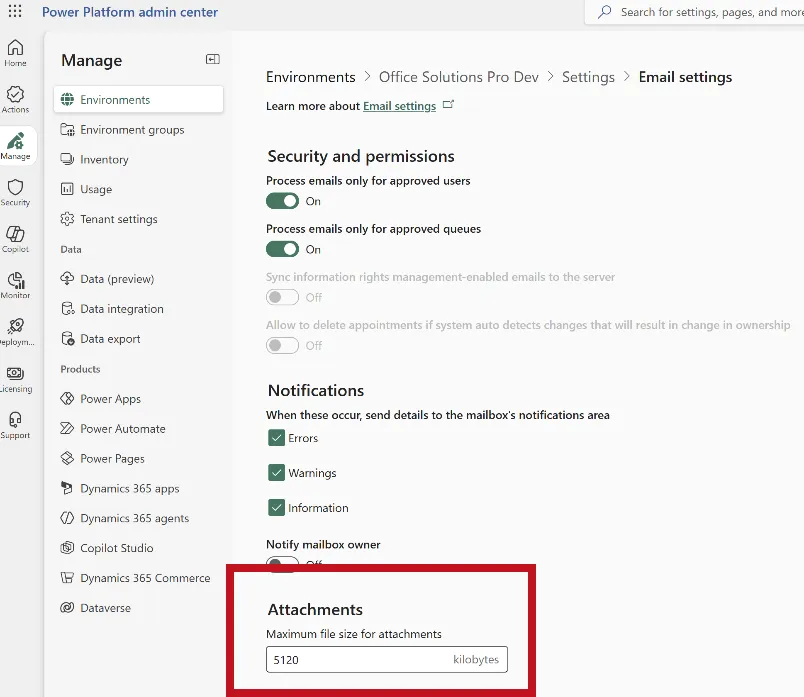
Figure 13 — Maximum attachment size.
Microsoft currently documents a default of 5 MB (5,120 KB) and a maximum of 128 MB (131,072 KB) for the Email settings attachment value. This does not universally raise the limits for Dataverse file columns, Exchange messages, Power Automate actions, or connector payloads. Test the narrowest limit across the complete process.
Review email synchronization and notification behavior when applicable
Why this matters. An environment that uses Dynamics 365-style email tracking, user mailboxes, or queues may require additional configuration; canvas apps sending mail through connectors do not necessarily depend on these settings.
What to do. Check the email server profile, mailbox synchronization, notification recipients, and relevant security or licensing requirements only if the solution uses these capabilities.
Considerations. Do not confuse environment email settings with a Power Automate Outlook connector connection or a shared mailbox configuration.
Improve usability of the User lookup view
Show email alongside full name in the User lookup
Why this matters. Two users can share the same display name. Showing Primary Email near Full Name in a model-driven lookup helps a user choose the correct person, especially in large organizations.
What to do. In make.powerapps.com, select the intended environment. From Solutions, open the solution that includes the User table (add the table if it isn’t there), open the table, select Views, and open User Lookup View. The same views also appear under Tables > User > Views, as in Figure 14, but changes made inside your solution are easier to deploy. Position Primary Email next to Full Name, select Save and publish, and test the model-driven lookup with users who have similar names.
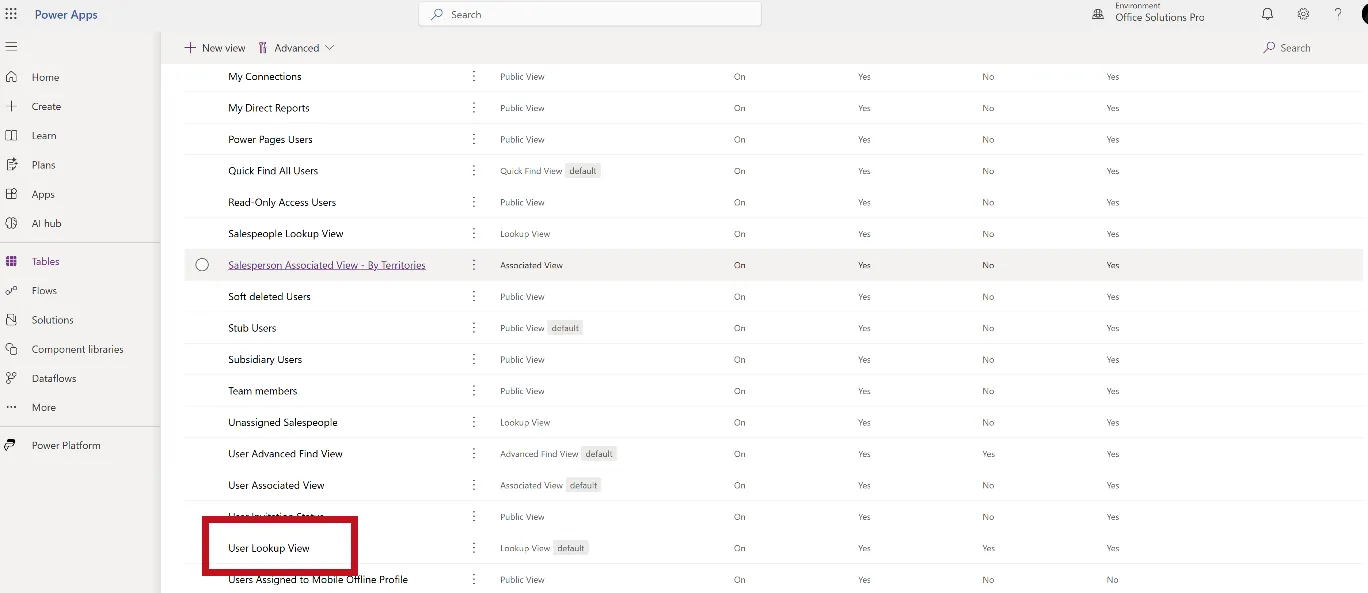
Figure 14 — Locate the User lookup view.

Figure 15 — Show Primary Email in the lookup view.
Considerations. Lookup views are system views and can be customized only to the extent Microsoft supports for that table. Test in development and deploy supported customizations with a solution. Changing lookup columns is different from changing the User table’s structure. Consider whether displaying email addresses to all users of that lookup is appropriate.
Security, governance, and capacity
Restrict who can enter and administer an environment
Why this matters. Environment access and Dataverse data permissions are different layers. Having a user in an environment does not automatically mean they should be able to read or modify all records.
What to do. In Manage > Environments, open the environment and edit its details to review the Security group field. Assign an appropriate Microsoft Entra security group if membership should be restricted. Then open the environment’s Settings, expand Users + permissions, and select Security roles to review each user or team’s Dataverse privileges. Test access with representative nonadministrator accounts; do not assume that belonging to the environment security group grants record permissions.
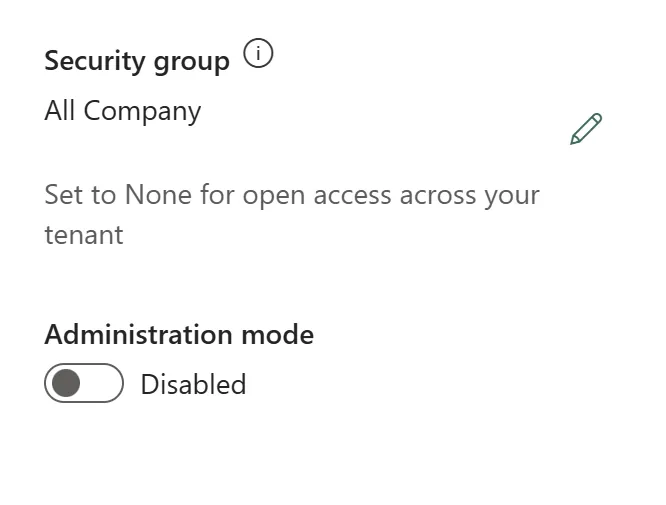
Figure 16 — Environment security-group selection in Edit details (example: All Company).
Dataverse security roles are a separate layer of access control. Review what each role permits and assign roles to the appropriate users or teams.
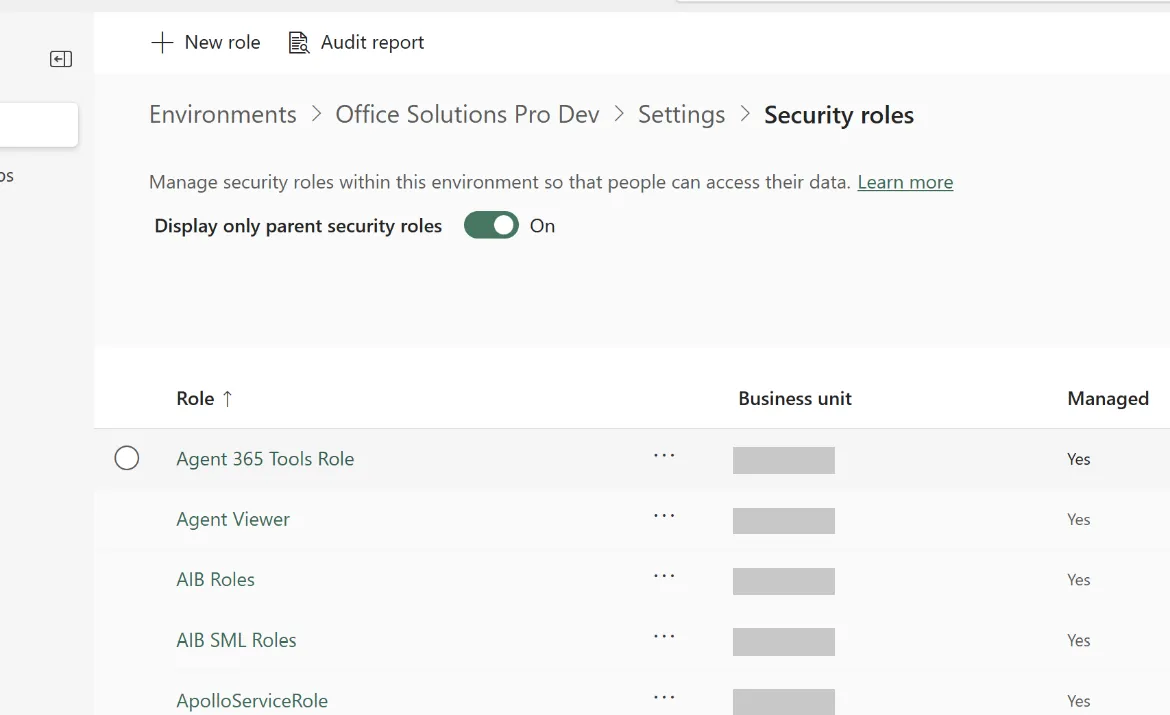
Figure 17 — Environment Settings > Security roles and the list of Dataverse security roles.
Considerations. The screenshot shows All Company as an example of the currently selected group, not a universally recommended choice. A broad group may be inappropriate for sensitive environments. Group membership, security role assignments, and individual record access should each follow least privilege. Keep emergency administrator access and ownership documented, and review memberships when staff change roles.
Review connector data policies
Why this matters. Apps and flows can move data among Microsoft and third-party services. Without appropriate connector policies, makers can combine connectors that the organization does not want used together for business information.
What to do. In the Power Platform admin center, select Security > Data and privacy > Data policies. Review any existing policies and their scope before creating another policy. If a new policy is needed and you have the required administrator permissions, select New Policy. Name the policy, classify connectors as Business, Non-business, or Blocked, define the applicable environments, and review the configuration before saving. Test proposed restrictions against existing apps and flows, since changing connector classifications can disrupt integrations.
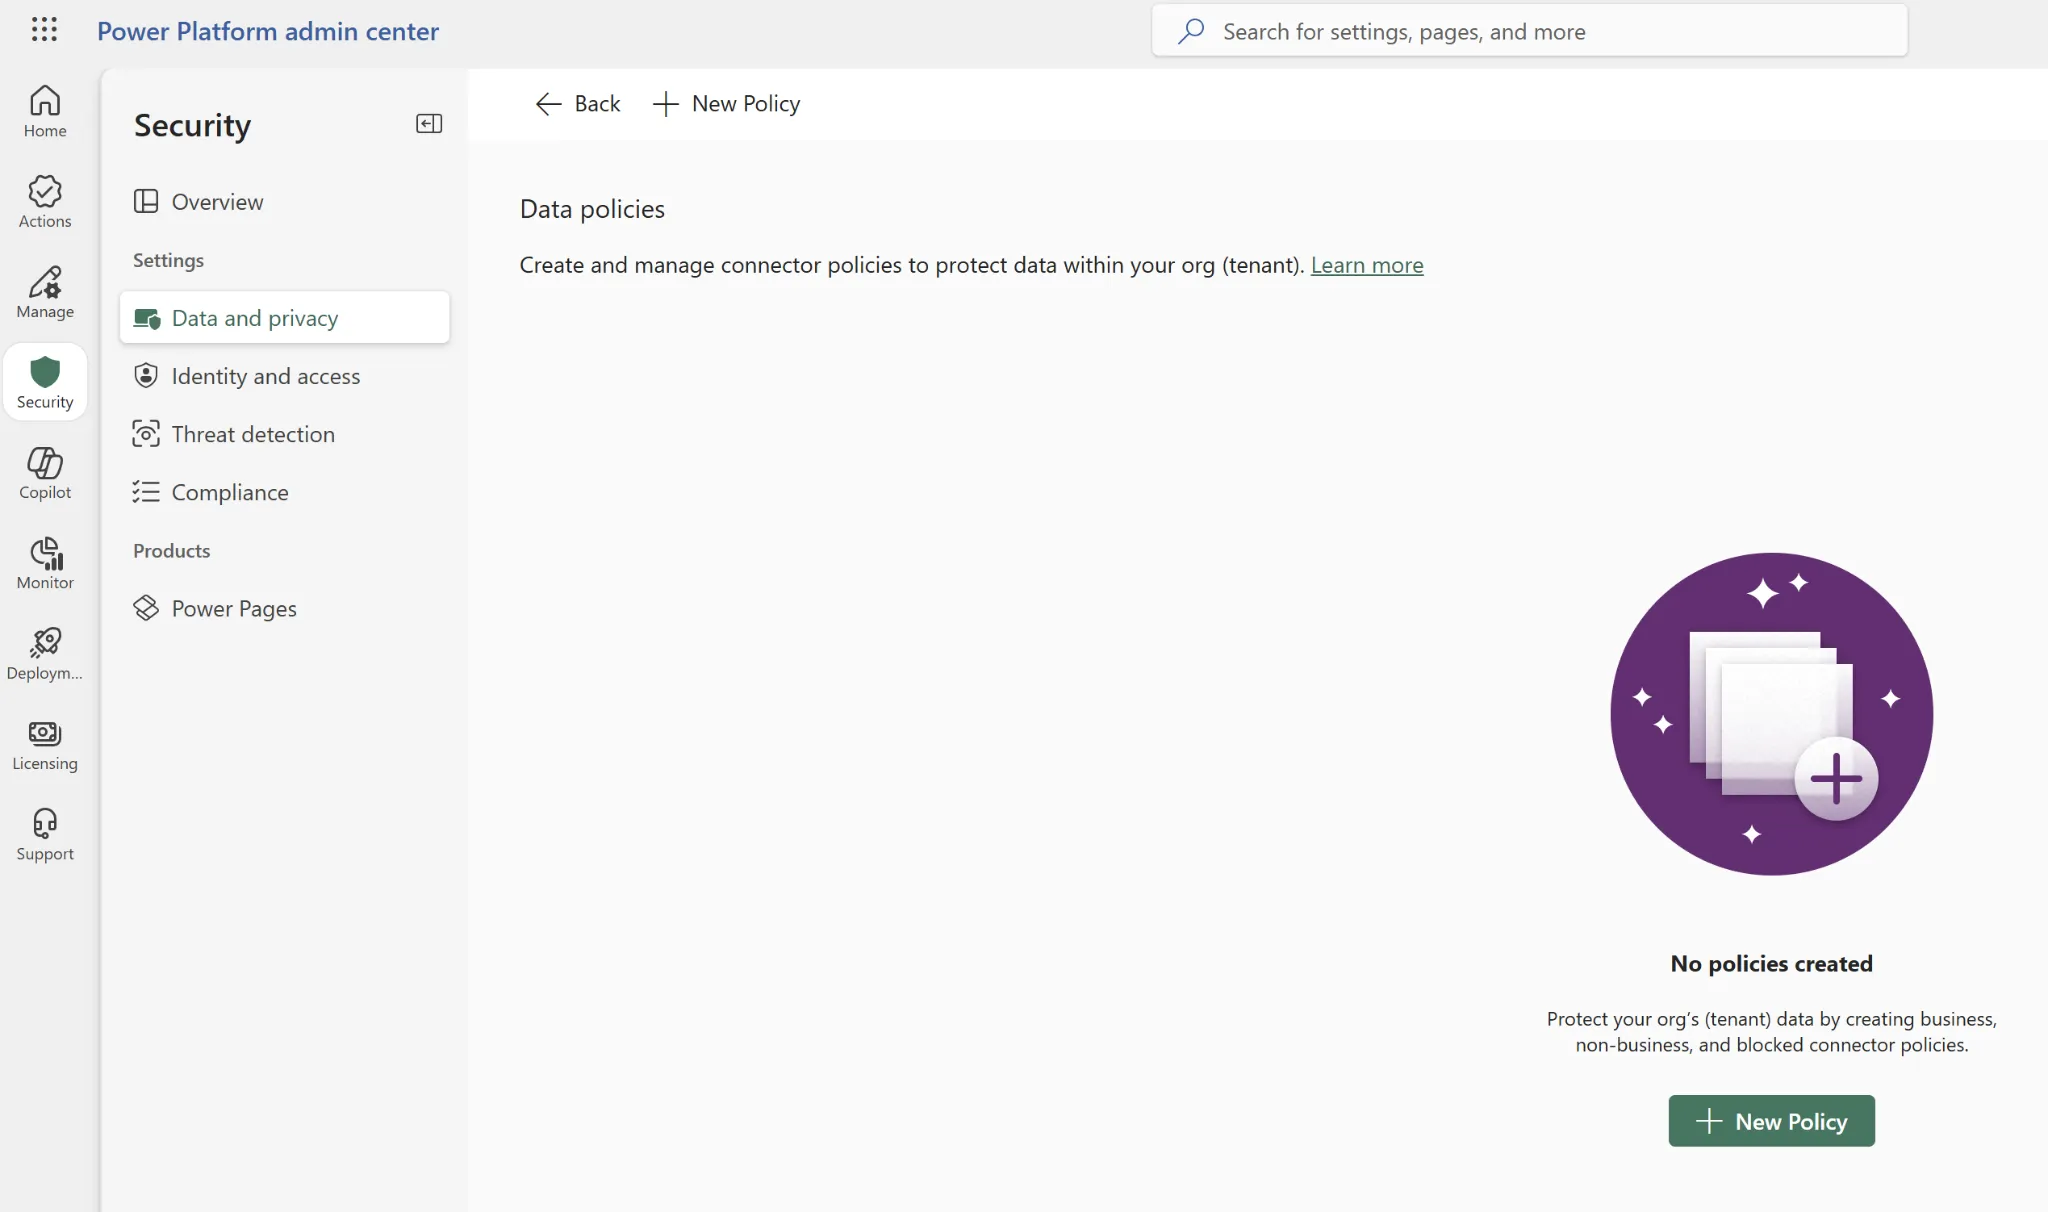
Figure 18 — Data policies landing page showing New Policy and the no-policies empty state.
Considerations. The screenshot shows the Data policies landing page before any policies have been created in that view. It shows where to begin, not the connector-classification screen. A Business connector cannot share data with a Non-business connector within an app or flow subject to that policy; Blocked connectors cannot be used where the policy applies. Some connectors cannot be blocked. Tenant-level policies may apply across environments, and environment-level policies cannot override tenant-wide restrictions. Data policies reduce inappropriate connector combinations but do not replace data classification, authentication, or Dataverse security roles.
Review tenant-wide and cross-environment settings
Why this matters. A perfectly configured individual environment can still be affected by tenant-level policies, sharing restrictions, environment routing, and maker permissions.
What to do. Confirm environment creation policies, default-environment governance, guest access, cross-tenant restrictions where relevant, and whether environment groups enforce settings.
Considerations. Some changes require tenant-level administration rather than environment-level privileges.
Check Dataverse storage capacity
Why this matters. Database rows, attachments, and auditing each contribute to different storage categories. Capacity issues can affect operations and influence whether a setting is sensible.
What to do. In the Power Platform admin center, select Licensing, then Dataverse under Products. Review the Summary page, and select Manage capacity to see how capacity is allocated to each environment. Inspect database, file, and log usage separately. Compare actual consumption with entitlement and growth expectations, especially for attachments, Dataverse tables, integrations, and audit logs. Recheck capacity after material changes and on a regular schedule.
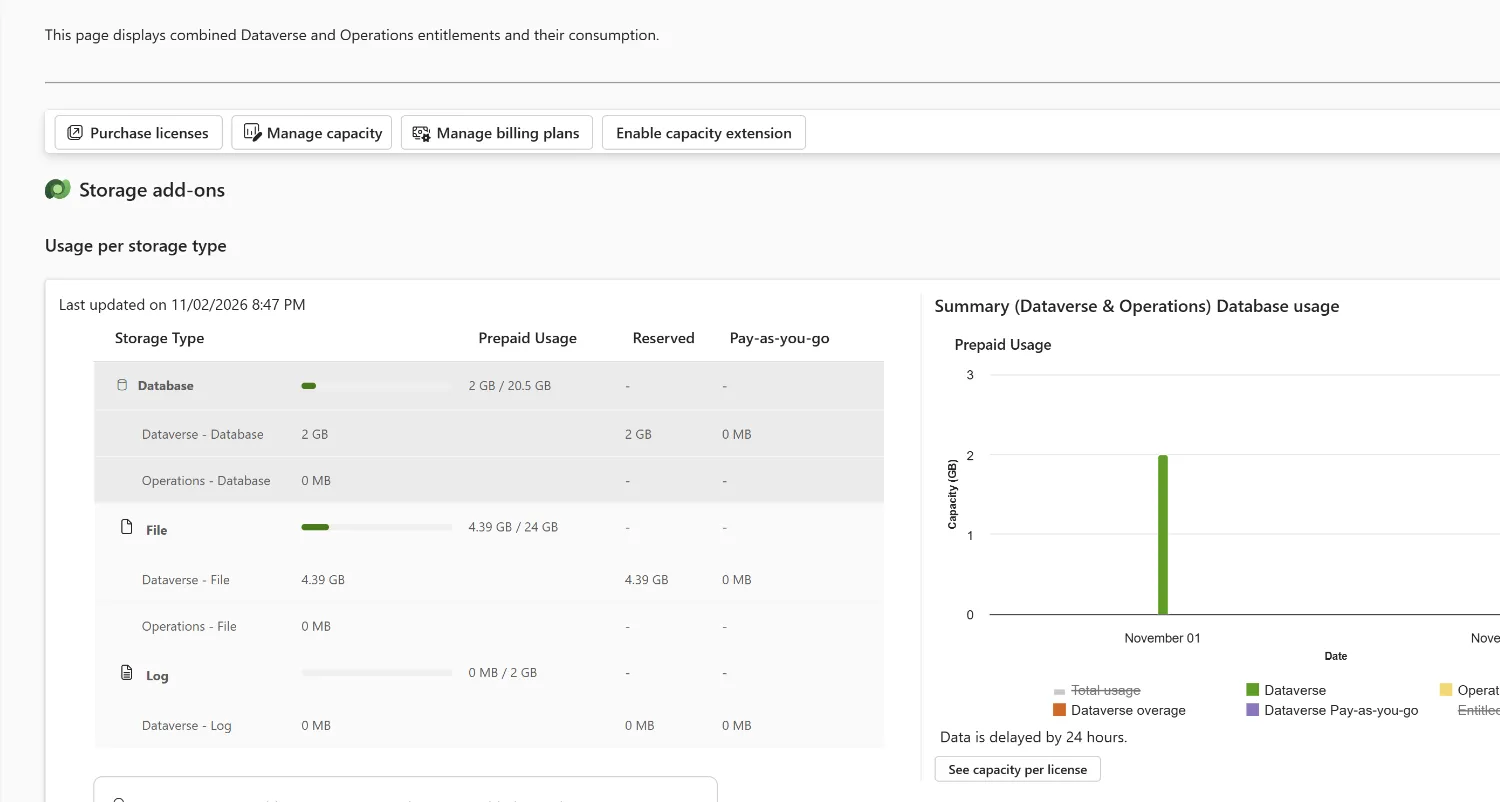
Figure 19 — Dataverse capacity report with database, file, and log usage.
Considerations. Reducing audit retention has implications for compliance and investigation, so do not tune it based only on storage use.
Check Dataverse search and other app-specific settings
Why this matters. Users may expect to locate records by keywords rather than navigate through views. Dataverse search and other optional features can change the app experience and create additional indexing, privacy, or configuration considerations.
What to do. For model-driven apps, confirm whether Dataverse search is available and appropriate. Review search-enabled tables and searchable columns, and test whether users can find the expected records while respecting their security roles. Enable mobile offline and other specialized options only when an application requires them.
Considerations. Search settings vary by tenant and app capabilities, and indexing does not override Dataverse security. This is an application-specific review, not a recommendation to enable every feature.
Application lifecycle and operational maintenance
Use solutions, publishers, and environment variables
Why this matters. Solutions make application changes easier to package and deploy. Environment variables let the same app refer to different URLs or configuration values in development and production without hardcoding.
What to do. Create an appropriate publisher and solution for each product or group of components. In Power Apps > Solutions, include supported apps, flows, tables, environment variables, and connection references. Use environment variables for configuration that varies between DEV, TEST/UAT, and PROD, and validate connector bindings when importing solutions.
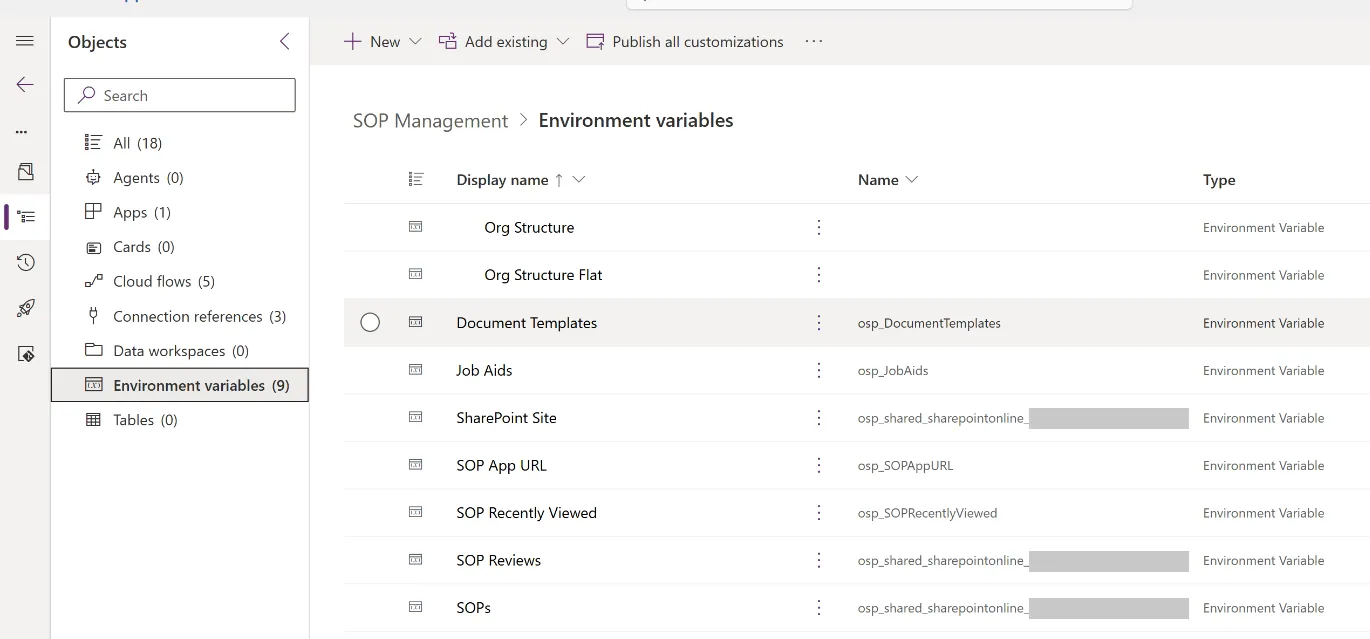
Figure 20 — Solution containing environment variables and connection references.
Considerations. Build and customize in development, then deploy through a controlled process. Environment variables hold configuration values; connection references associate solution-aware components with connector connections. Neither automatically grants data access. Do not place credentials or other secrets in ordinary text environment variables. Use the Secret type, which references a secret stored in Azure Key Vault. Microsoft currently supports Secret variables only in Power Automate flows, Copilot Studio agents and custom connectors. Separate reusable components into solutions when that improves dependency and upgrade management.
Use repeatable solution deployments
Why this matters. Managed solutions can help control changes in downstream environments, while unmanaged solutions are normally used during development. Direct editing in production makes repeatable deployments harder.
What to do. Define DEV > TEST/UAT > PROD deployment expectations. Consider Power Platform pipelines or another controlled deployment approach; document version numbers, approval steps, testing, and rollback plans.
Considerations. Managed and unmanaged are solution packaging/deployment states, not guarantees of data security or grants of copyright ownership. Commercial licensing terms are separate from the ability to customize an unmanaged solution.
Document owners and operational monitoring
Why this matters. Flows and applications can fail when a connection expires, an owner leaves, permissions change, or external services are unavailable.
What to do. Identify an accountable owner and backup owner for each business-critical solution. Review connection health, failed flow runs, service accounts or service principals where appropriate, operational alerts, and support handoff requirements.
Considerations. Use organization-approved identity and licensing patterns. Avoid making critical production processes depend only on one employee’s personal connection.
Final validation checklist
- Environment name, type, region, purpose, and intended users are documented.
- Unmanaged developer environments still in use are converted to Managed Environments, or their solutions moved, before December 15, 2026.
- Admin roles, security-group membership, and user-level data access have been tested.
- Auditing is enabled for the appropriate environment, tables, and columns; retention is documented.
- Deleted-record recovery and backup procedures have been assessed separately.
- Only required PCF, code-app, Power BI, and mapping features are enabled.
- Attachment requirements have been tested across all participating services.
- Data policies and Dataverse storage capacity have been reviewed.
- User lookup adjustments have been published and tested, if used.
- Solutions, environment variables, connection references, and deployment owners are documented.
- Base language, base currency, region, and Dynamics 365 provisioning decisions are confirmed before environment creation.
- Managed Environment license requirements are verified for all active users, including future enforcement dates.
- Preview features are not recommended for production without Microsoft support and organizational approval.
- Dataverse search and other app-specific options are tested only when needed.
- Changes are reviewed on a recurring schedule and after major Microsoft updates.
About the screenshots
Microsoft may change labels, menu placement, feature limits, and availability between releases or tenants.
The environment names shown in the examples are illustrative.
Microsoft documentation and further reading
- Dataverse auditing
- Feature settings
- Manage email settings
- Manage data policies
- Environment strategy
- Important changes coming in Power Platform
- Backup and restore
- Use Power BI
- Power Platform security and governance
- Managed Environments licensing
- Restore deleted Dataverse records
- Configure Power BI embedded system dashboards
- Create environments and confirm provisioning options
- Regional and language settings
- Manage Power Apps views
Review feature limits and licensing against current Microsoft documentation and the target environment before implementing changes.
Need help applying this to your own setup? Read about consulting.