 Office Solutions Pro
Send Microsoft Forms responses to a SharePoint list
Use Power Automate to add a SharePoint list item for every new Microsoft Forms response, including forms that belong to a Microsoft 365 group.
On this page
- Overview
- Before you begin
- 1. Create the SharePoint list
- 2. Decide where the form will live
- 3. Add the Forms trigger
- 4. Read the response
- 5. Add the SharePoint action
- 6. Map each column to its answer
- 7. Save and test the flow
- 8. Optional: record the response and prevent duplicates
- Troubleshooting
- Where to go next
Microsoft Forms is good at collecting answers, but a SharePoint list is often a better home for them. Once responses are in a list, you can report on them in Power BI, use them in a Power App, or add other automation.
This walkthrough builds a three-step flow: a trigger that starts when someone submits the form, an action that reads the answers, and an action that creates the list item. The example is an employee satisfaction survey, but the same pattern works for intake and request forms.
Before you begin
Have these ready:
- A work or school account. The Microsoft Forms connector only works with organizational accounts.
- An existing form with its questions finished. Knowing your questions first makes the list easier to design. The example survey is built in Build an employee survey in Microsoft Forms with branching, Likert, and NPS questions.
- A SharePoint site where you can create a list and add items.
- Access to Power Automate. Both connectors used here are classified as Standard in Power Automate: Microsoft Forms and SharePoint.
1. Create the SharePoint list
Create one column for each answer you want to keep. You do not need a column for every question in the form.
Include a couple of keywords from each question in the column name. The flow’s dynamic content search uses the question wording, so matching keywords make the mapping in Step 6 much faster.
| Form question | Example column | Column type |
|---|---|---|
| How long have you been in the organization? | Length Present Org | Single line of text |
| What is your job role? | Job Role | Single line of text |
| Overall, how satisfied are you…? | How Satisfied | Single line of text |
| On a scale of 0-10, how likely are you to recommend…? | Likely to Recommend | Single line of text |
| Same question, stored as a number | Likely to Recommend Number | Number |
| I am enabled to support… | Enabled to Support | Single line of text |
| I have adequate tools… | Adequate Tools | Single line of text |
| I have adequate training… | Adequate Training | Single line of text |
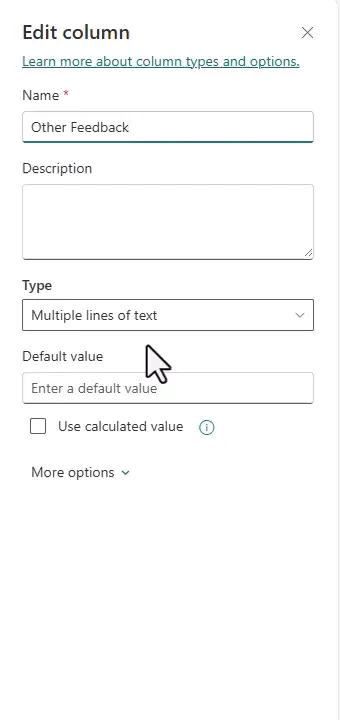
| Other feedback | Other Feedback | Multiple lines of text |
Choose the type based on how you will use the answer:
- Number: use this when you plan to chart or calculate the value, for example in Power BI. Map only answers that are always numeric to a Number column. The example keeps the same answer in both a text column and a Number column so you can compare the two. If a numeric question is optional, or on a branch some people skip, see Step 6.
- Multiple lines of text: use this for open-ended answers. A Single line of text column holds 255 characters, while Multiple lines of text holds up to 63,999.
- Single line of text: a good fit for short choice answers.
By default, everyone who can open the list can read every stored answer, because list items inherit the list’s permissions. If the answers are sensitive, limit who can open the list.
2. Decide where the form will live
The answer changes how you select the form in Step 3.
| Where the form is | How to select it in the flow | Things to plan for |
|---|---|---|
| My forms | Choose it from the Form Id list | Decide who will manage the form if the owner is no longer available |
| A Microsoft 365 group or team | Choose Enter custom value and paste its Form Id | Group forms may not appear in the dropdown, but Microsoft documents this manual method |
A form that belongs to a group can work well for long-term ownership, because moving a form to a group gives members full editing capabilities.
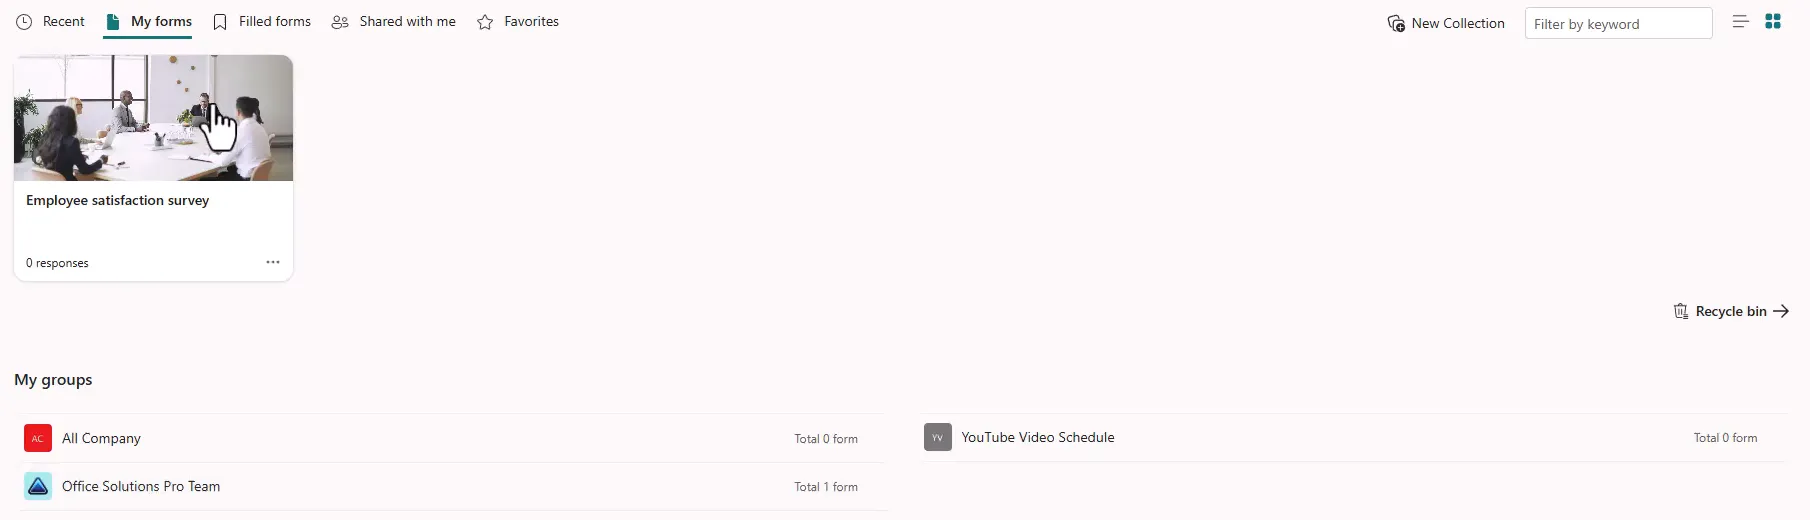
If you would rather have a personal copy of a group form, open the group’s forms, select … on the form, and select Copy. Then check My forms for the new copy.
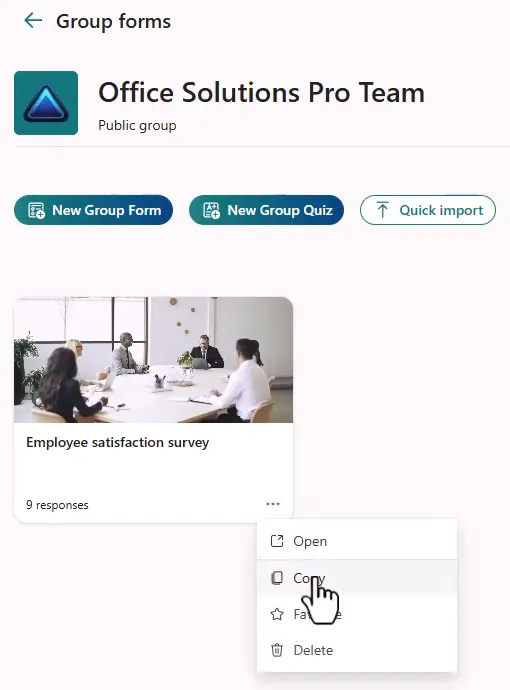
A copy is a new form. Only the questions, format, and layout are copied, and existing responses do not carry over. Send respondents the link from the copy, because the flow only watches the form you select.
3. Add the Forms trigger
- In Power Automate, create an automated cloud flow from blank, then choose Add a trigger.
- Search for Microsoft Forms and select When a new response is submitted.
- In Form Id, select your form.
- If your form belongs to a group:
- Open the form for editing and look at the browser’s address bar.
- Copy only the part after
FormId=. - In Form Id, select Enter custom value and paste the value.
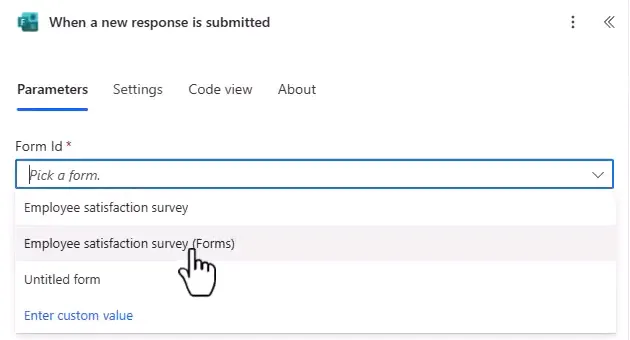
The connector’s trigger list may show a second trigger with a similar name marked [DEPRECATED]. Use the one without that label.
4. Read the response
The trigger only tells the flow that a response exists. A second action retrieves the answers.
- Select + under the trigger, then Add an action.
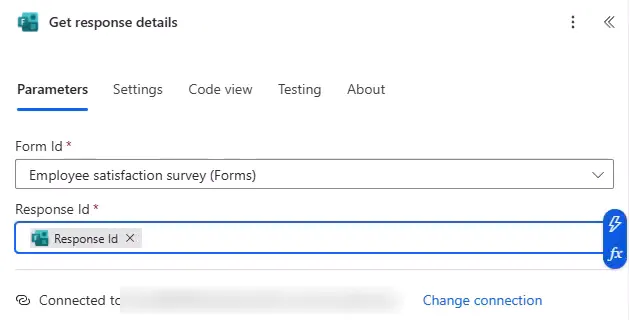
- Search for Microsoft Forms and select Get response details. Do not choose Get form details, which returns information about the form itself, such as its title and status.
- In Form Id, select the same form or paste the same custom value.
- Click in Response Id and select Response Id from the trigger’s dynamic content.
5. Add the SharePoint action
- Select +, then Add an action.
- Search for SharePoint and select Create item.
- In Site Address, select your site. If it is not listed, select Enter custom value and paste the site URL.
- In List Name, select your list.
- Open Advanced parameters and select Show all so that every column is available.
6. Map each column to its answer
For each column, click in the field and open dynamic content. Search for a keyword from the matching question, then select the answer from Get response details.
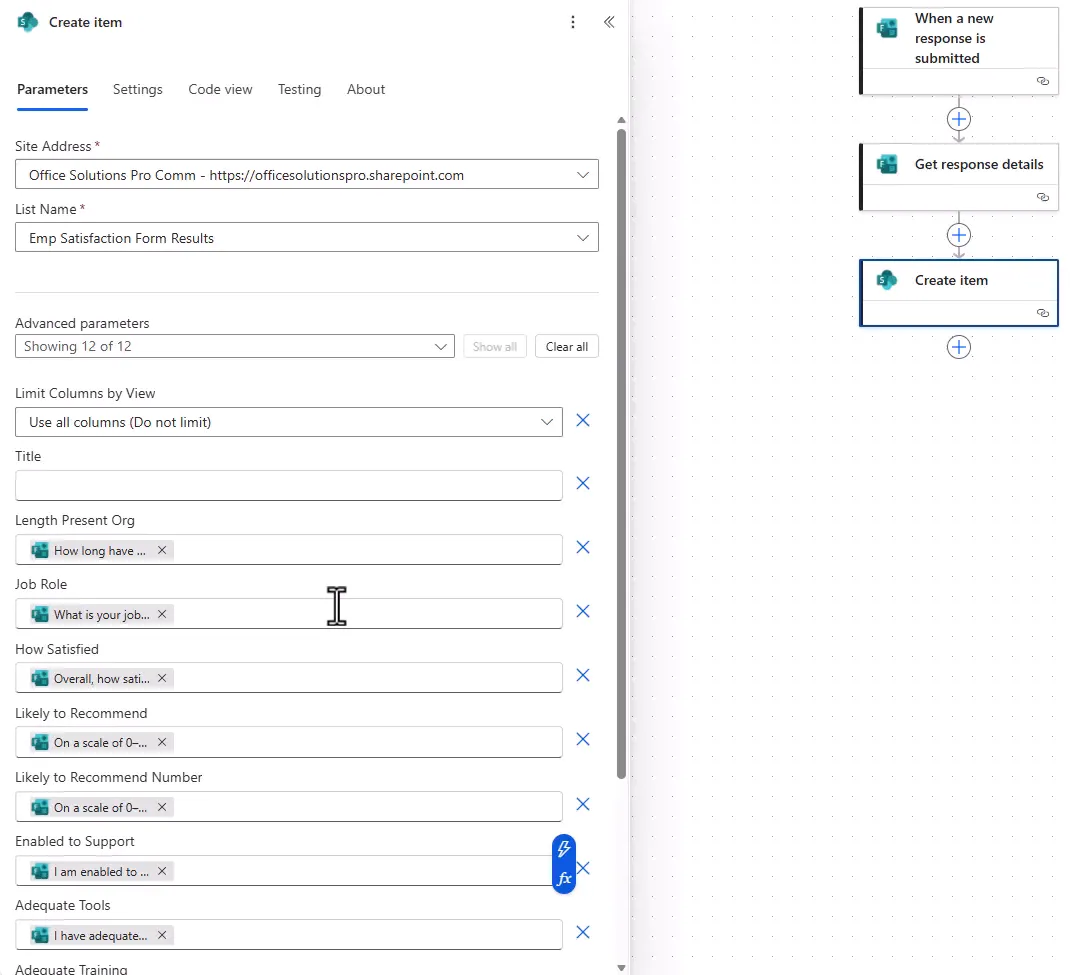
To store an answer in both a text and a Number column, map the text field first. A Number field’s dynamic content may list only number values, such as Response Id, and not the form’s answers. To add the answer there, copy its token from the text field and paste it into the Number field, or enter it through the expression editor (fx), whose Dynamic content tab lists the form’s answers, as with the expression below.
A question the respondent didn’t answer comes through empty. That includes optional questions and questions on a branch they didn’t take. In the example survey, individual contributors never see the manager questions, so Enabled to Support, Adequate Tools, and Adequate Training stay blank for them. A blank text column is fine, but a Number column may reject an empty value and fail the run. If a numeric question can be skipped, enter this expression in its field instead of the token:
if(empty(<answer>), null, <answer>)Replace each <answer> with the question’s answer: in the expression editor, place the cursor, open the Dynamic content tab, and select the answer from Get response details.
Check the Title field before moving on:
- If Title has no asterisk, as in this example, it is optional and you can leave it blank.
- If Title shows an asterisk, it is required. Map a value such as a short answer, or make the column optional in the list settings.
The item’s Created value records when the flow added the item, not when the person submitted the form. The two are usually close, but a delayed or resubmitted run adds the item later. If the original submission time matters, add a Date and time column with Include Time on, and map Submission time from Get response details if it’s listed in dynamic content.
7. Save and test the flow
-
Rename the flow, for example
Satisfaction survey results, then select Save. -
Open the form and select Collect responses.
-
Copy the link, open it, and submit a test response.

-
Refresh the SharePoint list and confirm that a new item appears with each answer in the correct column.
-
If the form branches, submit one test response for each path, for example one as an individual contributor and one as a manager. Check that the run succeeds and the skipped answers are blank.

The flow starts with new submissions, so responses submitted before the flow was on are not added to the list.
Test again whenever you change the form. Each answer token belongs to a question in the form the flow uses. If you delete and re-add a question, or switch the flow to a copy of the form, select the form again in both Forms steps, check every field in Create item, and submit a new test response.
8. Optional: record the response and prevent duplicates
The flow so far adds one item per run. If you resubmit a run, for example after fixing a failed step, it processes the same response again and adds a second item. These optional steps record which response each item came from, and skip a response that’s already in the list.
-
In the list, add two Single line of text columns named
FormIDandResponseID, without spaces, so that the filter below can use those names. You can change the display names afterwards. -
In Create item, set FormID to your Form Id value, the same one the trigger uses. If you selected the form from the list, copy the value after
FormId=from the form’s address, as in Step 3. Set ResponseID to Response Id from the trigger. Get response details needs both values to find a response, so together they identify it. -
Between Get response details and Create item, add the SharePoint Get items action for the same site and list. Under Advanced parameters, set Filter Query to the line below, replacing
<Response Id>with the trigger’s Response Id token and<Form Id>with your Form Id. Keep the single quotation marks. Set Top Count to1.ResponseID eq '<Response Id>' and FormID eq '<Form Id>' -
Add a Condition. In the first box, enter the expression
length(body('Get_items')?['value']), choose is equal to, and enter0. If you renamed Get items, use its new name, with underscores for spaces. -
Move Create item into the True branch, and leave False empty.
Now a resubmitted run finds the existing item and adds nothing. The check can’t stop two runs for the same response that start at the same moment, so it reduces duplicates rather than ruling them out. If the list may grow past 5,000 items, index the ResponseID column so that the filter keeps working within SharePoint’s list view threshold.
Troubleshooting
| Symptom | Likely cause | What to do |
|---|---|---|
| The form is not in the Form Id list | It belongs to a group | Use Enter custom value with the value after FormId=, as in Step 3 |
| The flow does not run | The flow is watching a different form, such as the original instead of a copy | Confirm that the link you submitted belongs to the form selected in the trigger |
| Dynamic content shows only Response Id | The field is a Number column, whose dynamic content can leave out the form’s answers, or Get response details uses a different form | For a Number column, paste the answer’s token from a text field, or select the answer in the expression editor’s Dynamic content tab. Otherwise, confirm Get response details uses the same form |
| The flow fails on the Number column | The answer is not numeric, or the question was skipped | Map that answer to a text column, use a form question that only returns numbers, or use the empty-value expression in Step 6 |
| A column is blank after you changed the form | Its token belongs to a question that was removed or replaced | Select the answer again in Create item, then submit a test response |
| The same response appears twice | A run was resubmitted, or ran again for that response | Add the duplicate check in Step 8 |
| Long answers are cut off or rejected | The column is Single line of text | Change the column to Multiple lines of text |
| Earlier responses are missing | They were submitted before the flow was on, or to another copy of the form | Only new responses to the selected form start the flow. Copied forms do not include earlier responses |
| You need uploaded files in the list | File upload questions need extra steps | This walkthrough covers text and number answers. Plan separate steps for attachments |
Where to go next
With responses in a list, you can connect the list to Power BI, use it as a data source in a Power App, or extend the flow with an email notification after Create item.
Companion video
Video: Microsoft Forms to SharePoint with Power Automate (The Right Way)
If the player is blocked on your network, open the video on YouTube.
Need help applying this to your own setup? Read about consulting.